If you or someone you love uses a wheelchair, you know how frustrating it can be to carry everyday essentials. Balancing a phone, wallet, water bottle, and medications on your lap isn’t just inconvenient—it’s unsafe. While commercial wheelchair bags exist, many are overpriced, poorly designed, or don’t fit specific models. The better solution? Make your own wheelchair bag.
With just a few hours, basic sewing skills, and affordable materials, you can create a custom bag that fits perfectly, stays secure, and keeps everything within easy reach. This step-by-step guide shows you how to build a durable, functional wheelchair bag—whether it’s a back-mounted tote, side armrest carrier, or frame-attached caddy. You’ll learn from real-world feedback, tested patterns, and community projects that have delivered hundreds of these bags to seniors, hospice patients, and caregivers.
No guesswork. No complicated techniques. Just clear, practical instructions to make a bag that works—without interfering with self-propulsion, tipping over, or sagging under daily use.
Let’s get started.
Choose the Right Bag Placement
Back-Mounted Totes: Simple but Limited
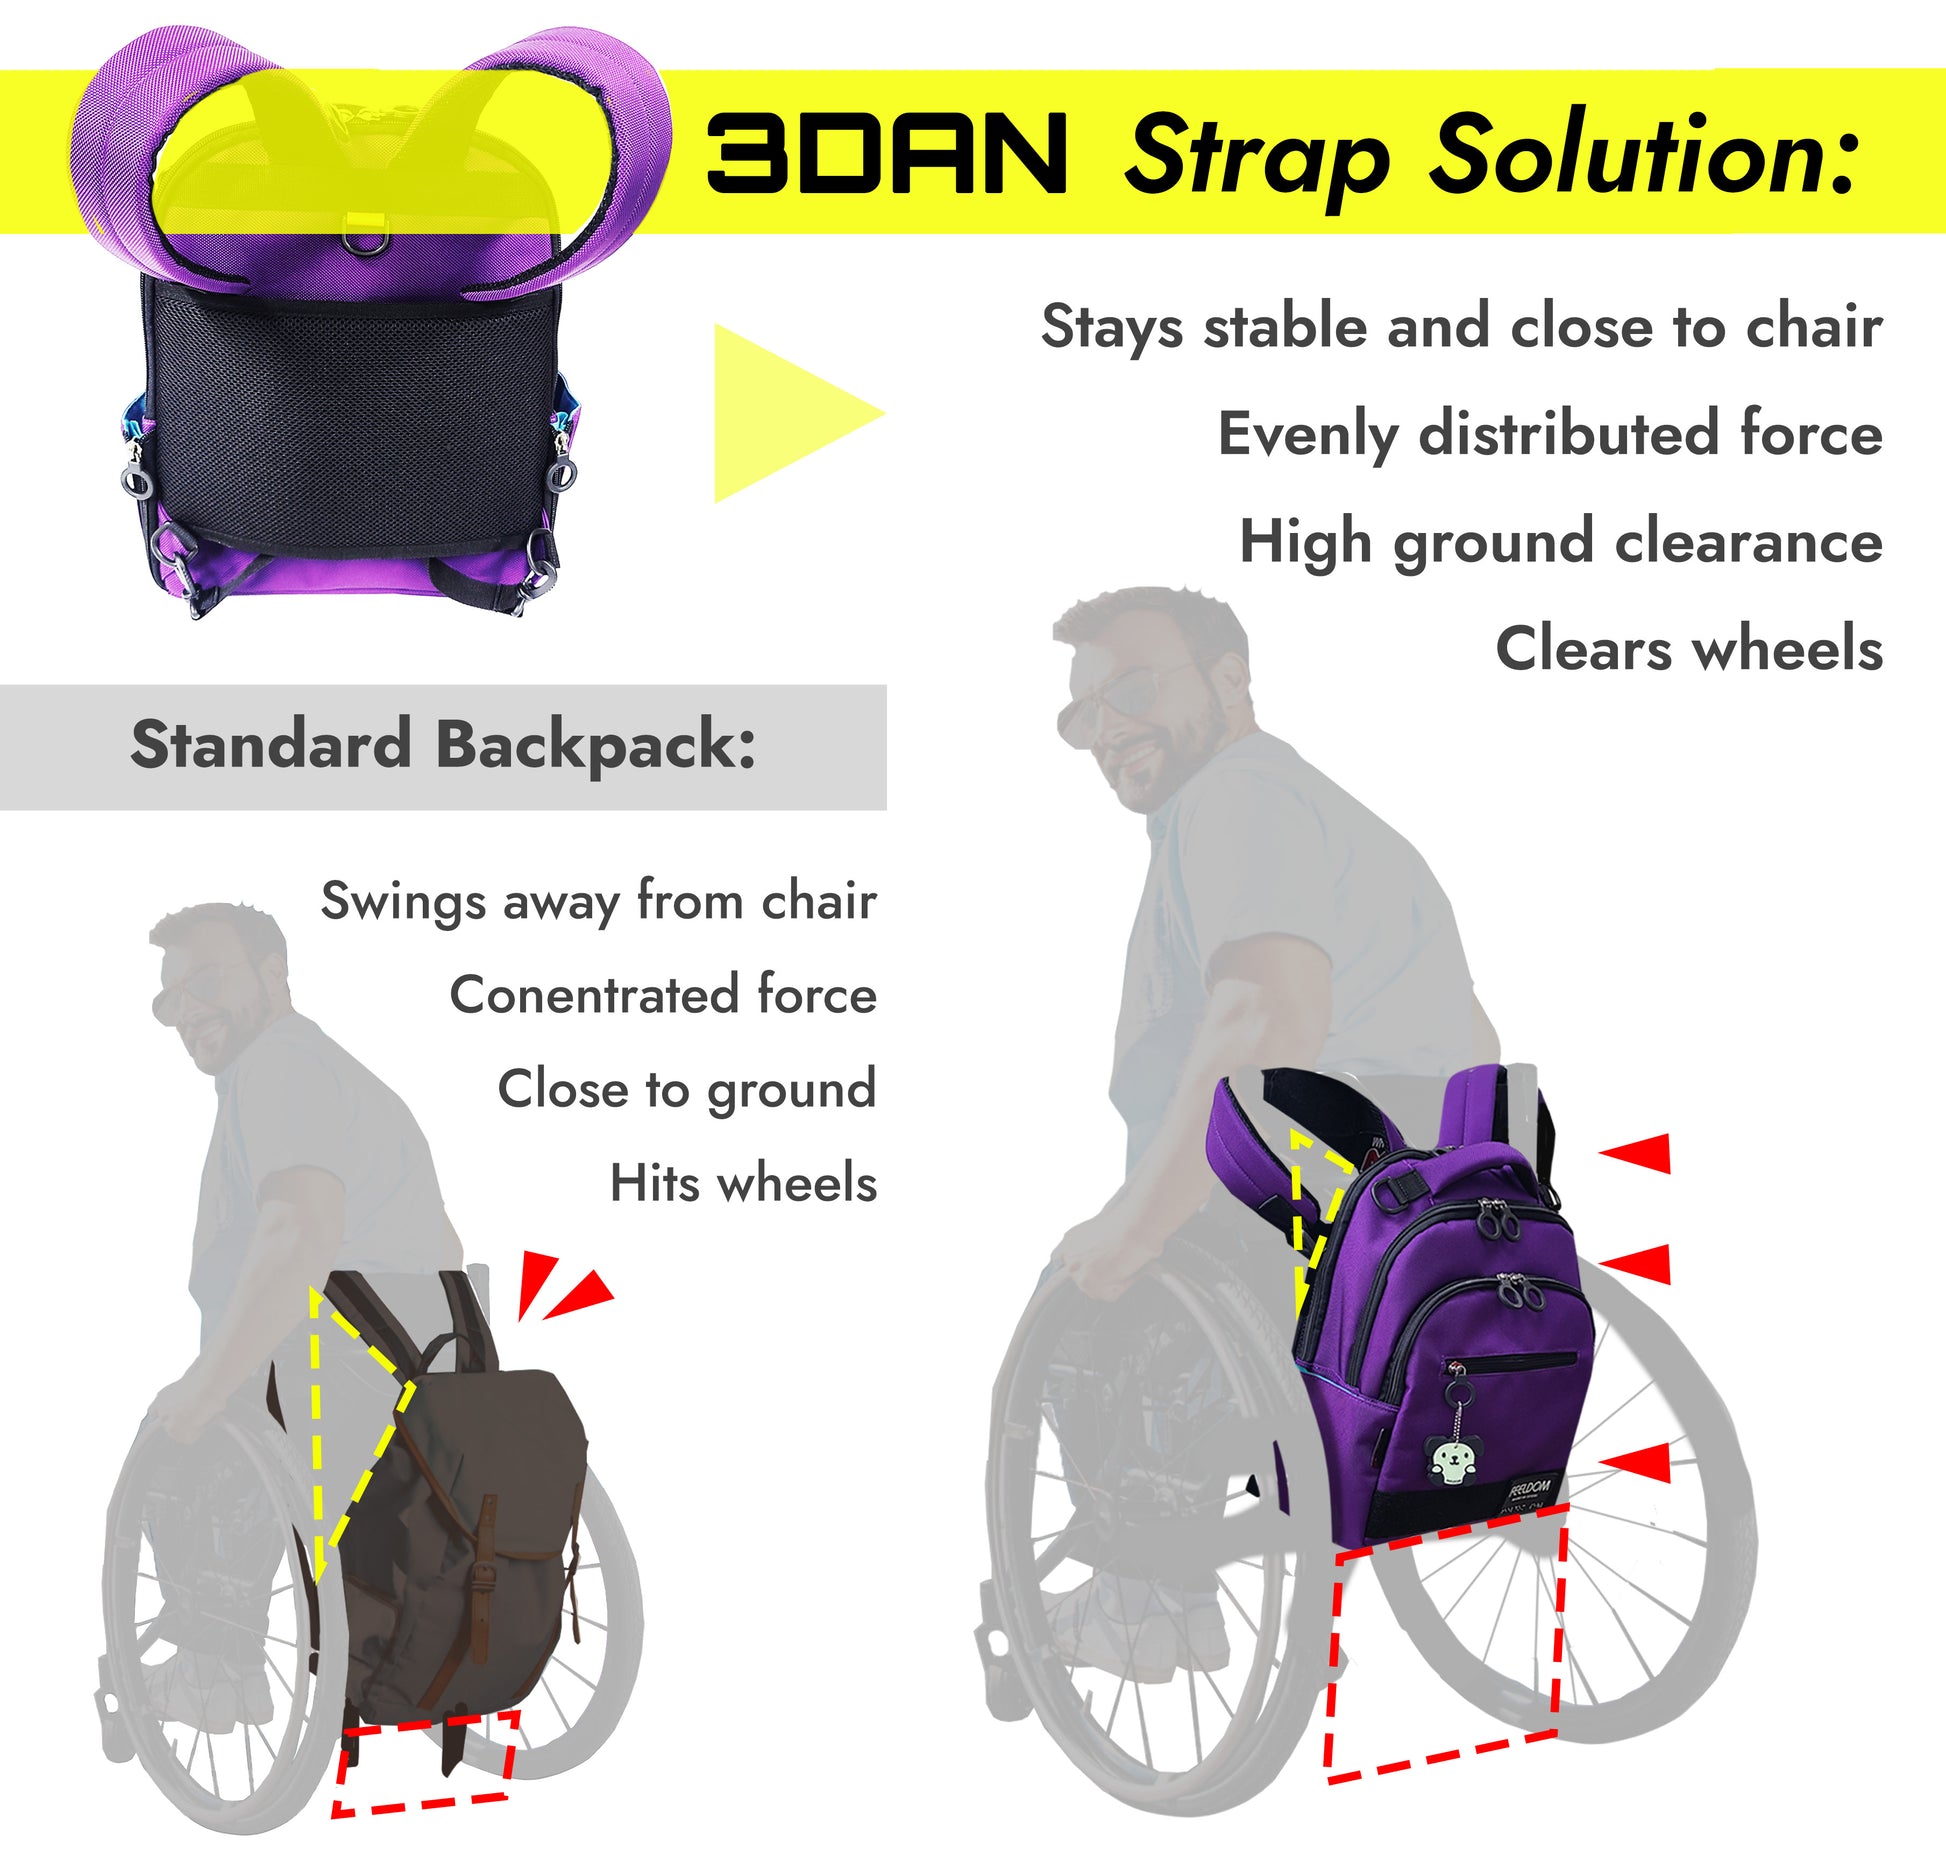
A back-mounted tote drapes over the top of the wheelchair backrest and secures with straps. It’s the easiest to install—no tools, just drape and fasten.
Best for: Transport wheelchairs, caregiver-pushed chairs, or users who don’t self-propel.
Watch out: If the user pushes the wheels independently, the bag may block hand movement. As one caregiver noted, “It would be in the way when someone is self-propelling. This bag would only work for someone pushing.”
Size tip: Keep it narrow—under 18 inches wide—and avoid deep designs that tilt backward when loaded. A lower profile reduces interference and maintains balance.
Side-Mounted Armrest Carriers: Most Accessible
Side-mounted bags attach directly to the armrest, placing items at hand level without reaching.
Best for: Self-propelled users, those with limited trunk mobility, or anyone needing quick access.
Why it works: Doesn’t interfere with wheel movement, fits on either side, and keeps essentials visible and reachable.
Design tip: Use a 13-inch width for standard armrests. Add Velcro straps that wrap under the armrest for a snug, adjustable fit. This design is ideal for users who value independence and easy access.
Front Frame Caddies: Compact & Versatile
These small caddies wrap around the front frame bars of the wheelchair or walker.
Best for: Lightweight storage—phone, glasses, sanitizer, or a small water bottle.
Use case: Great for walkers or minimalist users. Can double as a shopping caddy.
Stability note: Avoid heavy loads. Uneven weight distribution can cause tipping, especially on rollators.
Pick Durable Fabrics & Materials

Use Heavy-Duty Outer Fabric
Choose home décor fabric or cotton blends for the main body. These are thicker than quilting cotton and resist sagging under daily use.
Pro tip: Avoid stretchy or flimsy fabrics—they’ll droop and lose shape. For personal flair, pick floral, striped, or themed prints like sports teams. Users love bags that reflect their personality and bring a smile.
Reinforce with Stabilizers
Without structure, your bag will collapse. Use:
- Pelen interfacing: Felt-like material that stiffens panels
- Felt (craft or industrial): Adds body to pockets and straps
- Thick bottom stabilizer: Keeps the bag upright and load-bearing
Apply interfacing to both the outer fabric and lining before sewing. Then quilt with a grid or squiggly stitch to lock layers in place.
Never skip stabilizers—especially if using lightweight cotton. They prevent drooping and extend the bag’s life.
Select the Right Fasteners
Velcro (hook-and-loop tape) is the top choice. It’s adjustable, removable, and strong.
- Use heavy-duty Velcro for strap ends
- Backstitch over it when sewing to prevent peeling
- Test placement on the chair before final stitching
Alternatives:
– Snaps or buttons: Sleek but less adjustable
– Ribbon ties or buckles: Good for decorative touches or temporary attachment
For security, add a zippered interior pocket to store wallets or medications.
Measure Before You Cut
Measure the Wheelchair First
Never assume standard sizes. Wheelchairs vary widely.
For back-mounted totes:
– Measure backrest width (typically 16–18″)
– Add 1″ for seam allowance—cut front/back panels at 19″ × 13″
For side-mounted carriers:
– Measure armrest width (often 12–13″)
– Add ½” for seams—cut main panels at 14″ × 8″
For frame caddies:
– Wrap measuring tape around the frame bar
– Add 1″ for overlap and Velcro
Pro tip: Sketch a quick diagram of the attachment point. Note curves or angles that affect strap length.
Use This Cutting List (Back Tote Example)
| Part | Fabric | Size (inches) | Qty |
|---|---|---|---|
| Front/Back | Main + lining | 19″ × 13″ | 2 each |
| Side Panels | Main + lining + Pelen | 13″ × 7″ | 2 each |
| Bottom | Main + lining + Pelen | 17″ × 7″ | 1 each |
| Front Pocket | Main + lining + Pelen | 18″ × 9″ | 1 each |
| Straps | Folded 2″ strip | 16–18″ long | 2 |
Final size: 18″ wide × 12″ high × 6″ deep
Build the Bag Step by Step
Quilt the Panels for Structure
- Layer main fabric, Pelen, and lining.
- Pin together.
- Sew in a grid or random squiggly pattern to prevent shifting.
- Press with a hot iron.
Why quilt? It adds stiffness and prevents the bag from looking flat after use.
Sew the Front Pocket (Optional)
Want organized storage? Add a front pocket with compartments.
Tri-fold design:
– Cut fabric 14″ × 8″
– Fold into three equal sections (≈2.7″ each)
– Press creases
– Topstitch along folds
Creates three pockets for phone, glasses, and wallet.
Divided design:
– Sew a vertical seam down the center
– Backstitch at top and bottom
– Press open
Assemble the Main Body
For box-style tote:
1. Sew side panels to front panel.
2. Attach back panel.
3. Sew bottom panel to sides and front/back.
4. Leave a 3–4″ gap in the bottom seam for turning.
Repeat for lining (sew separately).
For side carrier:
1. Layer front fabric with felt; sew top edge (¼” seam).
2. Turn right side out, press.
3. Repeat for back.
4. Place front and back together (right sides facing).
5. Sew sides and bottom, leaving 5″ opening at bottom.
Trim corners diagonally before turning to reduce bulk and sharpen edges.
Insert the Lining
- Turn main body right side out.
- Insert lining (wrong side out) into main body.
- Match side seams.
- Pin top edges together.
- Sew around the top to join outer and lining.
- Turn right side out through the gap.
- Hand-stitch the gap closed with a whip stitch.
Use a point turner or chopstick to push out corners neatly.
This method hides raw seams and gives a clean interior.
Attach Reinforced Straps
- Cut two strips: 2″ wide × 16–18″ long.
- Fold lengthwise (wrong sides together).
- Fold long edges inward (¼”) and press.
- Insert felt strip inside for strength.
- Sew around all four edges.
Placement:
– For back tote: Attach near top of side panels
– For side carrier: Attach to front panel before assembling sides
Reinforce: Double-stitch where straps meet the bag.
Install Secure Attachment System
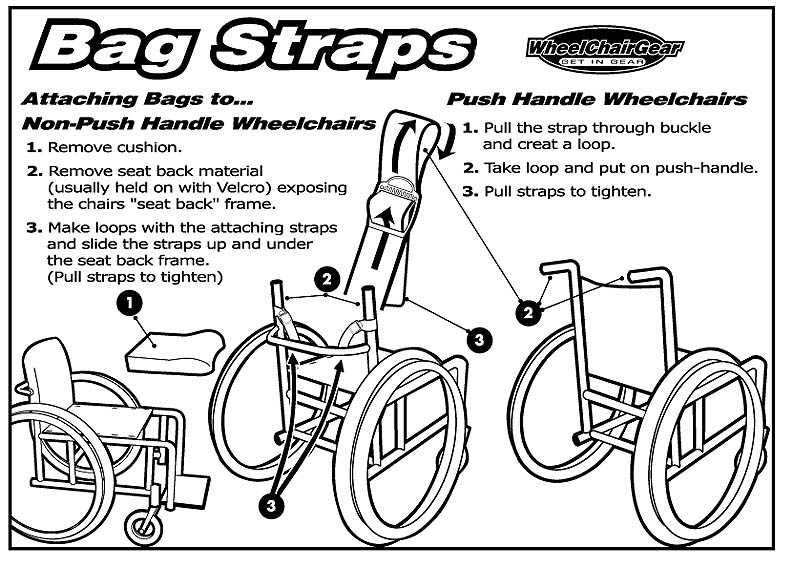
Sew on Velcro Straps
- Cut two Velcro strips (hook and loop).
- Sew loop side to strap ends.
- Sew hook side to opposite side of bag (back or side panel).
- Test fit on the wheelchair.
Adjust length so straps wrap snugly over the backrest or under the armrest.
Alternative: Use button straps or buckle closures for a cleaner look.
Use Fabric Glue for Tricky Areas
On curved edges (like pocket hems), sewing can pucker the fabric.
Fix: Use fabric glue to secure layers before stitching. It creates a smooth, flat finish.
Customize for Real-World Use
Add Functional Pockets
- Front pocket: For phone or glasses
- Side slip pockets: Fit a water bottle
- Interior zippered pocket: Secure cash or ID
- Stacked pockets: Three-tier design (large on top, small on bottom)
One user modified their bag with a wider pocket, gaining extra space after stitching the side seams.
Modify for Fit & Comfort
- Cut corners at an angle to clear tight armrest openings
- Add 1–2″ to depth for more storage
- Use reversible fabric for two looks in one
A “corner cutout” helps the bag fit compact wheelchairs. (Source: Article 5)
Make It Multi-Use
Design the bag to work on:
– Wheelchairs
– Walkers
– Mobility scooters
Use universal Velcro straps so it’s interchangeable.
Many free patterns are labeled for all three devices.
Test, Use, and Maintain
Check Stability in Motion
After sewing, test the bag on the actual chair.
- Simulate movement: Rock the chair forward and back
- Check for shifting or swinging
- Ensure straps stay tight
Back bags: May stay in place but can hinder self-propulsion.
Side bags: Most stable and accessible.
One user asked: “Can the bag stay in place while the chair is being moved?”
Answer: Yes—if properly secured. But avoid overloading.
Limit Weight for Safety
- Max load: 5–7 lbs
- Ideal items: Phone, wallet, keys, small water bottle
- Avoid heavy books or groceries
Warning: Excessive weight can unbalance a walker or cause tipping.
Keep It Clean & Usable
- Use machine-washable fabrics
- Remove Velcro before washing (or use Velcro covers)
- Air dry or tumble dry low
- Iron to restore shape
Find Free Patterns & Tutorials
Best Free Resources
- The Sewing Hui (Maui): Free PDF patterns made from leftover mask fabric
- Redneedle Sewing Blog: Step-by-step tote tutorial (redneedlesewing.blogspot.com)
- Bluprint: Structured wheelchair bag guide
- Etsy: Instant-download pram caddy patterns (adaptable to wheelchairs)
- YouTube: Video tutorial at https://youtu.be/YP4a5oYIE7k
These include cutting templates, seam allowances, and diagrams.
Great for Beginners
- Uses straight seams
- No complex techniques
- Can be done in under an hour (simple caddy) to a few hours (structured tote)
One sewer completed their third-ever project and found it “highly functional.”
Make It for a Cause or as a Gift
Community Projects That Matter
Groups like The Sewing Hui have donated hundreds of bags to:
– Hale Makua Health Services
– Maui Hospice
– Bayada Home Health Care
– Senior centers and hospitals
These bags provide dignity, independence, and practical help.
Perfect Handmade Gift
- Ideal for kūpuna (elders) or friends with mobility needs
- Great for church groups, quilting bees, or school service projects
- Use themed fabric (sports, holidays, florals) for personal touch
“Your thoughtful effort will be deeply appreciated,” no matter who receives it.
Top 7 Tips for Success
1. Measure Twice, Cut Once
Always test fit before final stitching. A ½” error can ruin the fit.
2. Use Strong Thread & Needle
Heavy-duty thread and a size 14 needle prevent seams from bursting.
3. Reinforce Stress Points
Double-stitch strap attachments and Velcro areas.
4. Test Fit on the Chair
Attach the bag and simulate real use—reaching, turning, moving.
5. Personalize It
Add embroidery, favorite colors, or a name tag.
6. Prioritize Accessibility
Place pockets and closures where they’re easiest to reach.
7. Don’t Overload
Keep weight light. A full water bottle and phone are plenty.
Final Note: Making a wheelchair bag isn’t just a sewing project—it’s an act of care. With this guide, you can create a functional, durable, and personalized bag that improves daily life. Whether for a loved one, a patient, or a community project, your handmade bag will be used, valued, and appreciated.