For wheelchair users, something as simple as holding a drink can become a daily challenge. Reaching awkwardly, balancing a cup on your lap, or risking spills with every turn—these frustrations are real and common. But there’s a solution: learning how to make a cup holder for a wheelchair puts control back in your hands. With a custom-built mount, you gain secure, ergonomic access to your favorite beverage, right where you need it. This guide walks you through three proven DIY designs—soft fabric, rigid metal, and dual-purpose wood—each tailored to different lifestyles, environments, and skill levels. Whether you bump into walls, use assistive tech, or spend time outdoors, there’s a build that fits your life. Let’s create a smarter, spill-free way to stay hydrated.
Choose the Right Design for Your Needs
Not every cup holder works for every user. The best design matches your mobility habits, environment, and physical needs. Below are three top-performing options, each solving specific real-world challenges.
Match Design to User Profile
If you frequently navigate tight hallways or bump into furniture, the fabric-reinforced soft holder is ideal—its flexible structure survives impacts without damage. For users who value versatility, the metal bracket mount offers tool-free switching between a cup, phone, or service dog leash. And if you’re often outdoors, the wood-based dual holder supports both drinks and umbrellas, providing sun or rain protection with one sturdy unit. Consider your daily routine, tools available, and physical abilities before choosing your build.
Build a Soft-Sided Fabric Cup Holder
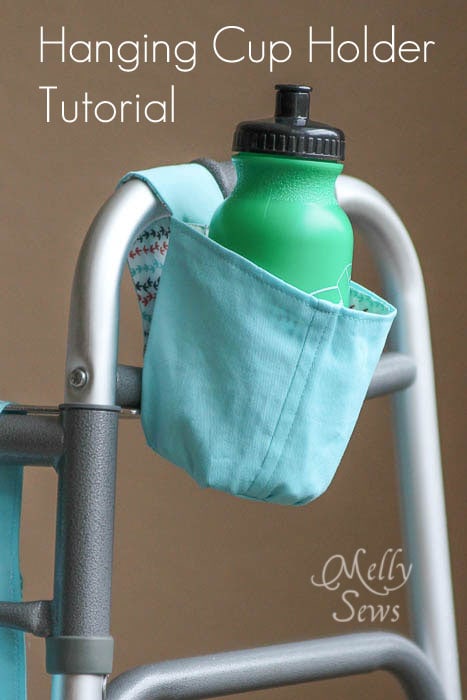
Perfect for crowded homes or narrow spaces, this flexible design absorbs shocks while keeping drinks upright. It’s lightweight, washable, and fully customizable to your cup size and armrest shape.
Cut and Shape the Structural Base
Start by measuring your most-used cup. Note its diameter and height. Then, cut a half-moon shape from a thin plastic cutting board: the flat edge aligns with the wheelchair side, the curved front holds the cup securely, and the squared rear allows hand clearance. This semi-circular base provides wiggle room for easy insertion while preventing tipping. Make it slightly larger than the cup for smooth access.
Reinforce with Durable Fabric
Use ripstop nylon or nylon sports fabric—both resist tears and dry fast after spills. Sandwich each plastic piece (base and back panel) between two fabric layers. Sew around the edges with strong thread, enclosing all plastic completely. This prevents fraying and hides sharp corners, creating a clean, safe finish.
Assemble the U-Shaped Frame
Create a curved front strip from the same plastic, long enough to span from the back panel to the base’s front edge. Cover it in fabric too. Then:
1. Attach the front strip to the back panel, forming a U-shape
2. Join this frame to the half-moon base using foldover braid
3. Use a sewing machine for speed and durability
The foldover braid adds strength without bulky seams—ideal for repeated use.
Attach Using Secure Straps
Sew top and side straps to the back panel. These clamp under the armrest:
– Temporarily remove the armrest to thread straps through
– Or design to sit over the top if removal isn’t possible
– Use hook-and-loop (Velcro) or buckles for tool-free adjustment
Once mounted, the holder stays put during turns and bumps. Users praise the low front wall—it allows easy sipping without precise hand control.
Install a Metal Bracket Cup Holder
For users who want strength and flexibility, this rigid metal mount offers unmatched stability. Built from hardware store parts, it doubles as a leash anchor when not holding a drink.
Prepare the Mounting Plate
Use a 6-inch × 1-inch steel bending plate. File all edges smooth to prevent cuts. Position it under the armrest, letting one hole extend past the edge for vertical attachment. Secure it with two M6 × 12 mm bolts, washers, and lock nuts through existing armrest grooves.
⚠️ Check Fit First: Not all wheelchairs have compatible grooves—verify before drilling.
Modify the Corner Brace
Take a 2.5″ × 2.5″ corner brace and cut one arm down by 1 inch using a hacksaw. File the cut edge until smooth. This shortened brace angles the cup holder forward for better access while reducing bulk.
Mount the Mesh Pencil Holder
Use a black mesh cylinder (~3″ diameter) as the cup sleeve. It’s lightweight, visible, and holds pens or small bottles too.
1. Hold the modified brace against the back of the mesh holder
2. Pre-drill or enlarge two holes to fit 3/16″ × 1″ stove bolts
3. Secure with washers and wing nuts—allowing future removal
The wing nut makes disassembly easy, enabling quick cleaning or function switching.
Final Assembly with Wing Nut
Align the pencil holder assembly with the protruding hole in the base plate. Insert a 3/16″ × 3/4″ stove bolt, add a washer, and tighten the wing nut. Adjust the angle so the cup tilts slightly toward the user for comfortable sipping.
✅ Pro Tip: Loosen the wing nut to reposition the holder anytime—no tools needed.
Add Leash Attachment Function
When the cup holder is removed, insert two M6 lock nuts into the base plate holes. These create secure anchor points for a service dog leash—hands-free mobility made simple.
Create a Wood Dual-Purpose Cup and Umbrella Holder

For outdoor users, combining shade and drink storage in one unit maximizes independence. This sturdy 2×4-based mount supports heavy umbrellas and standard cups—season after season.
Cut and Position the Mounting Board
Cut a 5.25-inch section from a 2×4. Place it near the corner of the armrest, ensuring at least ¼ inch clearance from the wheel. Mark two pilot hole locations aligned with existing armrest screws.
🔍 Visual Cue: If the wheel rubs the board during turns, trim it slightly.
Attach the Cup Holder with a Soldering Iron
Place a flanged plastic cup holder on top of the wood. Instead of guessing screw positions, use a soldering iron to melt small anchor points through the front and back flanges. This creates precise entry spots without cracking the plastic.
1. Pre-drill corresponding holes in the wood
2. Drive 1.25-inch screws through the flanges into the board
The result is a clean, vibration-resistant mount.
Secure the Assembly to the Armrest
Align the board with the armrest’s screw holes. Insert screws through the armrest and into the pre-drilled wood holes. Tighten firmly to prevent wobbling.
✅ Best Practice: Use rubber washers between metal and wood to reduce frame wear.
Convert to Umbrella Holder
To add shade:
1. Center the plastic-based umbrella over the cup holder
2. Mark two contact points on the board (avoiding the central pole)
3. Drive 2-inch screws through the wood and into the umbrella’s base
When done, back the screws out ¼ to ½ inch—the umbrella lifts off cleanly, leaving screws ready for next time.
🌧️ Why Plastic Base? Prevents scratches on the wheelchair frame.
Compare All Three Designs
Choosing the best option depends on your priorities. Here’s how they stack up:
| Feature | Fabric Holder | Metal Mount | Wood Holder |
|---|---|---|---|
| Impact Resistance | ✅ Excellent | ✅ Good | ⚠️ Fair |
| Removability | ✅ High | ✅ High | ❌ Low |
| Multi-Functionality | ⚠️ Low | ✅ High (leash) | ✅ High (umbrella) |
| Installation Ease | ⚠️ Moderate (sewing) | ⚠️ Moderate (cutting) | ✅ Easy (drilling) |
| Best For | Tight spaces, frequent bumps | Modularity, tech users | Outdoor, all-weather |
Each design shines in specific scenarios—pick based on your environment and needs.
Follow Universal Design Best Practices
No matter which version you build, these principles improve safety, comfort, and longevity.
Select Durable, Cleanable Materials
Use marine-grade vinyl, neoprene, or ripstop nylon for fabric—these resist water and stains. For structure, try HDPE plastic or acrylic strips. Fasteners like wing nuts, quick-release bolts, or hook-and-loop straps allow tool-free adjustments. Avoid materials that absorb moisture or degrade in sunlight.
Optimize Ergonomic Placement
Mount the holder so:
– The cup top is at or below elbow height when your arm rests naturally
– There’s at least 2 inches between the cup and your body to prevent spills
– The opening angles slightly toward you for easier sipping
Test reach while seated in your usual posture.
Smooth All Sharp Edges
After cutting metal or wood:
– File down burrs
– Round corners with sandpaper
– Cover exposed edges with rubber tubing or plastic caps
Safety first—snag-free design prevents cuts and clothing tears.
Prevent Wheel Interference
Ensure the holder doesn’t overhang:
– Keep it ¼ inch or more from the wheel’s path
– Test during full turns and backward movements
– Use compact designs near armrest corners
Even small overlaps cause friction over time.
Customize for Enhanced Functionality
Make your cup holder uniquely yours with smart upgrades.
Add Magnetic or Elastic Securing
Sew magnetic closures into fabric tops to hold cups during transit. Use elastic bungee cords over the rim to prevent bounce-out on rough terrain—great for users with tremors or uneven surfaces.
Integrate Phone or Wallet Pockets
Attach a zippered mesh pocket to the back of fabric holders. Mount a small phone clamp to the metal bracket near the cup. Keeps essentials visible and within reach.
Personalize Aesthetics
Paint or wrap wood/metal mounts in favorite colors. Add reflective trim on fabric edges for nighttime visibility. Install LED puck lights for low-light use—function meets flair.
Final Recommendations by User Type
For High-Impact Users
Build the fabric-reinforced holder. Its soft exterior survives daily bumps. Add reflective tape for added safety in dim hallways.
For Independent, Tech-Savvy Users
Choose the metal bracket mount. Swap between cup, phone, and leash in seconds. Upgrade with a magnetic lid holder or USB port.
For Outdoor Enthusiasts
Go with the wood dual holder. Support a golf umbrella in wind and sun. Seal the wood with waterproof varnish for long life.
For Temporary or Minimalist Needs
Try a clamp-on car cup holder. Attach it to the armrest with heavy-duty Velcro. No tools, no permanent changes.
You now have everything needed to make a cup holder for a wheelchair that fits your life—not the other way around. From soft fabric bumpers to rugged metal mounts and all-weather wood builds, each design empowers independence. Choose based on your environment, tools, and daily challenges. Build it, test it, refine it. With the right holder, every sip becomes a little easier.