Transferring a loved one or patient from bed to wheelchair is one of the most physically demanding tasks in caregiving. Without proper tools, it can lead to back injuries, falls, and discomfort for both caregiver and patient. The Hoyer lift—a hydraulic or electric patient transfer device—was designed to eliminate these risks by providing a safe, controlled, and dignified way to move individuals with limited mobility. Knowing how to use a Hoyer lift from bed to wheelchair correctly isn’t just helpful—it’s essential for safety and independence. This comprehensive guide walks you through every step, from selecting the right equipment and sling to executing a smooth transfer and performing post-move checks. Whether you’re a family caregiver or a healthcare professional, this step-by-step breakdown ensures confidence, safety, and efficiency in every transfer.
Choose the Right Hoyer Lift Type
Manual vs. Electric Lifts
Before any transfer, confirm whether you’re using a manual (hydraulic) or electric (powered) Hoyer lift, as operation differs significantly.
- Manual lifts rely on a hand pump to raise the patient. They’re ideal for occasional use, require no charging, and work during power outages. However, they demand more physical effort.
- Electric lifts operate via remote control, offering effortless lifting and lowering. They’re better suited for daily transfers or heavier patients, but require regular battery charging.
Pro Tip: Even electric models include a manual override valve. Test it monthly so you’re prepared in case of battery failure.
Confirm Weight Capacity
Every Hoyer lift and sling has a maximum weight rating—commonly 350, 450, or 600 lbs. Always:
– Weigh the patient accurately.
– Match both the lift and sling capacities.
– Never exceed the lower-rated component.
Using equipment beyond its limit risks mechanical failure and serious injury.
Identify Key Lift Components

Know Your Equipment
Familiarize yourself with the core parts of the Hoyer lift to ensure safe use:
- Base with wheels: Must be fully extended and locked to prevent tipping.
- Mast: The vertical pole connecting the base to the boom.
- Boom: The horizontal arm that swings over the patient.
- Swivel bar: Rotates to align with the transfer path.
- Attachment hooks: Securely connect sling straps.
Visual Cue: Hooks should always face away from the body to avoid skin pinching or snagging.
Pre-Use Inspection Steps
Before every transfer:
– Check for loose bolts, cracks, or bent components.
– Ensure wheels roll smoothly and lock securely.
– Test lift function with an empty run.
– For electric models, verify the battery is charged.
Warning: Never use a damaged lift. Tag it “Do Not Use” and remove it from service immediately.
Select the Correct Sling Type

Match Sling to Patient Needs
The sling is the foundation of a safe transfer. Choose based on mobility and support needs:
| Sling Type | Best For |
|---|---|
| U-Sling | Patients who can sit up slightly; most common for bed-to-wheelchair |
| Full Body Sling | Non-sitters or poor trunk control |
| Toilet Sling | Hygiene-related transfers |
| Pediatric Sling | Children or small adults |
Inspect Sling Before Use
Always check for:
– Tears, fraying, or worn stitching.
– Stiff or cracked fabric.
– Damaged loops or metal rings.
– Mold or odor from improper drying.
Rule: If in doubt, replace the sling. A compromised sling can fail mid-transfer, leading to falls.
Prepare the Environment
Clear the Transfer Path
Ensure at least 3 feet of clearance around:
– The bed.
– The wheelchair.
– The Hoyer lift’s movement path.
Remove:
– Rugs (slip hazard).
– Cords or medical tubing.
– Furniture blocking access.
Adjust Bed and Wheelchair
- Raise the bed to caregiver’s waist height.
- Keep the bed flat with the headrest down.
- Lock bed wheels.
- Position the wheelchair close, facing the same direction as the bed.
- Lock wheelchair brakes.
- Remove or swing away armrests.
- Retract footrests or swing them out.
Pro Tip: Slightly recline the wheelchair backrest for easier seating and better posture.
Prepare the Patient
Communicate Clearly
Explain each step:
– “I’m going to help you move to the wheelchair now.”
– “You’ll feel the lift lifting you—just relax.”
Confirm:
– Patient understands.
– They’re ready and willing.
– No pain or discomfort.
Never transfer a resisting patient—pause and reassess.
Position for Sling Placement
- Lay patient flat on back (supine).
- Cross arms over chest.
- Keep legs straight or slightly bent.
- Adjust clothing for dignity; use a sheet if needed.
Step-by-Step: Place the Sling Under the Patient
Roll and Slide Technique
- Bend one knee and place foot on bed.
- Gently roll patient onto their side, away from you.
- Slide half the sling under their back, top edge near armpits, bottom edge 3–4 inches above knees.
- Return patient to flat position.
- Repeat on the other side to complete placement.
- Unfold and center the sling—no twisting or bunching.
Alternative: Pre-roll the U-sling and tuck it along the spine before rolling.
U-Sling Strap Cross-Locking
For secure leg positioning:
– Cross leg straps under thighs (left front to right hook, right front to left hook).
– Tighten to prevent leg splaying.
Check: Hips and thighs should be evenly supported.
Position and Attach the Hoyer Lift
Move Lift Under the Bed
- Narrow the base using the spreader handle.
- Roll under the bed.
- Extend legs to widest position and lock.
- Position boom over patient’s shoulders—parallel to body.
Attach Sling to Swivel Hooks
- Back straps → back hooks.
- Front (leg) straps → front hooks.
- Ensure all hooks are closed and face outward.
- Double-check symmetry.
Critical: The sling must be flat, centered, and untwisted.
Begin Lifting the Patient
Support Head and Neck
Place one hand under the patient’s head and neck. This prevents strain during lift.
Operate the Lift
- Manual: Pump handle slowly; turn valve clockwise.
- Electric: Press “Up” gently on remote.
Lift in Stages
- Raise 1–2 inches off the bed.
- Pause to check:
– Sling alignment.
– Patient comfort.
– Lift stability. - Adjust if needed (lower, reattach).
- Continue lifting until patient clears the bed.
Warning: Never leave a suspended patient unattended.
Transfer Over the Wheelchair
Move the Lift Safely
- Unlock Hoyer lift wheels.
- Grasp steering handles.
- Push slowly toward wheelchair.
Align Patient Over Seat
- Stop when patient is centered over the wheelchair.
- Rotate swivel bar so patient faces forward.
- Re-lock all wheels (Hoyer and wheelchair).
Visual Cue: Patient’s hips should line up with the center of the seat.
Lower Into the Wheelchair
Control the Descent
- Manual: Turn valve counterclockwise slowly.
- Electric: Press “Down” gently.
Guide the Seating
- Support legs or knees to prevent forward sliding.
- Help hips settle back into the seat.
- Monitor head clearance from swivel bar.
Stop When Seated
Lower until:
– Patient is fully seated.
– Sling goes slack.
– No pressure on straps.
Tip: If patient leans forward, support their trunk gently from behind.
Remove the Sling
Step 1: Prompt Patient to Lean Forward
If able:
– Ask them to bend slightly at the waist.
– This lifts weight off the sling.
Step 2: Slide Sling Out
- Stand in front of patient.
- Pull the back portion upward from under the buttocks.
- Slide leg sections out from under thighs.
- Fold and store sling.
Opportunity: Perform perineal care or adjust clothing while patient is lifted.
Post-Transfer Safety Checks
Confirm Patient Comfort
Check:
– Hips fully back in seat.
– Feet flat on footrests.
– Legs supported—no dangling.
– No redness or pressure points.
– Clothing adjusted for comfort and dignity.
Secure Equipment
- Lock wheelchair brakes.
- Move Hoyer lift away.
- Store sling properly (clean if soiled).
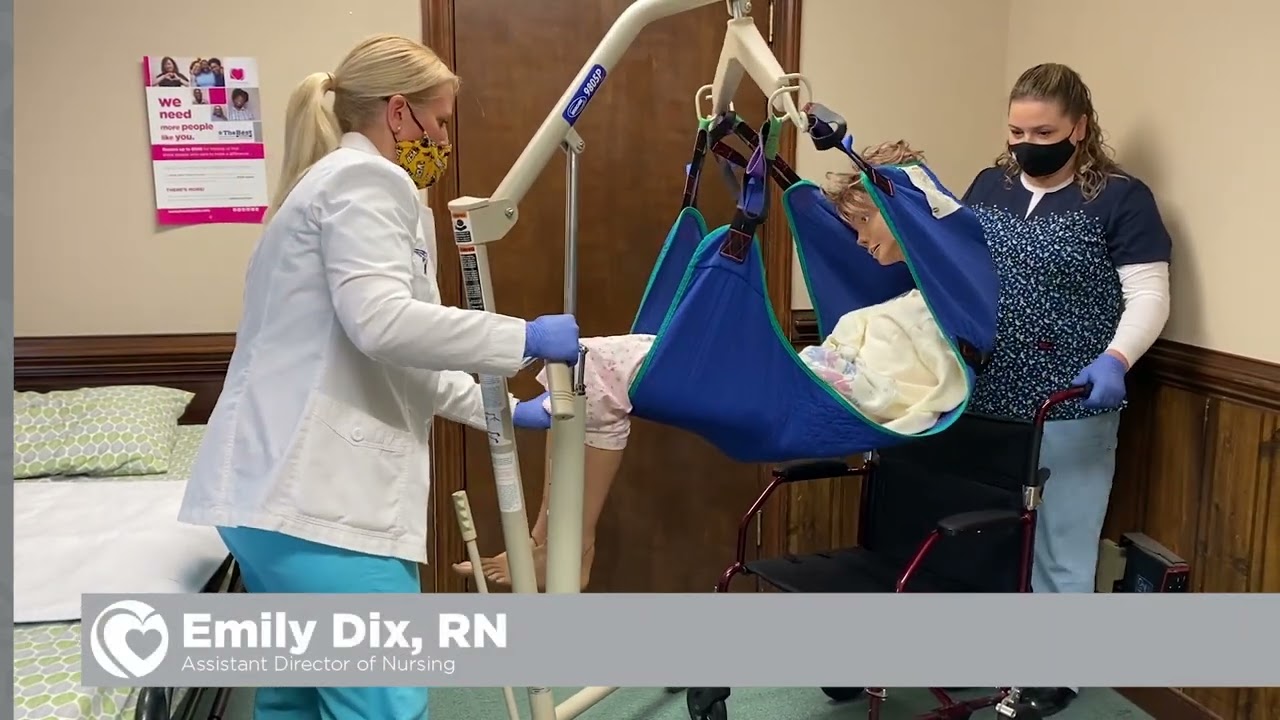
Two-Person Transfer Protocol
When to Use Two Caregivers
Recommended for:
– Patients near the lift’s weight limit.
– First-time transfers.
– Uncooperative or anxious individuals.
– Caregivers with physical limitations.
Roles During Transfer
| Caregiver | Role |
|---|---|
| Operator | Controls lift; manages height and movement |
| Assistant | Supports head; guides body; checks surroundings |
Coordination Tip: Use clear verbal cues: “Lifting on three… 1, 2, 3, lift.”
Adjust Sling for Proper Posture
Head Support Loop (Full Body Sling)
- Short loop = upright (90°).
- Long loop = reclined (60–70°).
- Adjust based on patient comfort and destination.
Leg Strap Position
- Place 3–4 inches above knees.
- Avoid high placement (groin pressure) or low (slipping risk).
Pro Tip: Use the cross-lock method to eliminate strap slack.
Critical Safety Rules
Always Do This
- ✅ Lock all wheels (bed, wheelchair, lift).
- ✅ Support head and neck during movement.
- ✅ Inspect equipment before each use.
- ✅ Move slowly and smoothly.
- ✅ Use two people when in doubt.
Never Do This
- ❌ Pull on boom to lift or lower.
- ❌ Move lift while raising or lowering.
- ❌ Swing lift into walls or furniture.
- ❌ Leave patient suspended unattended.
- ❌ Transfer combative or resisting patients.
- ❌ Exceed weight limits.
Emergency Plan: Know how to use the manual override to lower safely during power failure.
Troubleshoot Common Issues
Lift Won’t Raise
- Cause: Dead battery, clogged valve, overload.
- Fix: Charge battery, check fluid, confirm weight.
Sling Tilts or Slips
- Cause: Twisted sling, uneven straps.
- Fix: Re-center, reattach, check hooks.
Base Wobbles
- Cause: Loose bolts, uneven floor.
- Fix: Tighten hardware, move to flat surface.
Boom Won’t Swivel
- Cause: Obstruction or jam.
- Fix: Clear path, check for debris.
Pro Tip: Keep the user manual nearby for quick reference.
Maintain Equipment Long-Term
Daily
- Inspect sling and lift.
- Wipe down surfaces.
- Test controls.
Weekly
- Lubricate moving parts.
- Check hydraulic fluid (manual lifts).
- Tighten bolts.
Monthly
- Wash slings (machine wash, air dry).
- Inspect casters.
- Test emergency release.
Annually
- Schedule professional inspection.
- Replace aging slings.
- Retrain caregivers.
Battery Tip: Charge electric lifts after every use. Keep a spare if transfers are frequent.
Train and Practice Regularly
Get Proper Training
- Healthcare workers: Require certification.
- Family caregivers: Should complete hands-on training.
Practice Safely
- Use an empty lift first.
- Try with a cooperative partner.
- Record yourself to review form.
Resource: Watch official Hoyer® training videos or download guides from medical suppliers.
Final Transfer Checklist
Before every use, confirm:
- [ ] Hoyer lift inspected and functional
- [ ] Sling matches patient and is undamaged
- [ ] Bed and wheelchair locked and positioned
- [ ] Path is clear and obstacle-free
- [ ] Patient informed and ready
- [ ] Two-person team available if needed
- [ ] Emergency procedure known
Using a Hoyer lift from bed to wheelchair doesn’t have to be intimidating. With the right preparation, equipment, and technique, you can perform transfers that are safe, dignified, and efficient. Mastering this skill protects both patient and caregiver from injury, supports independence, and improves quality of life. Practice regularly, inspect equipment daily, and always prioritize safety—because every transfer matters.