If you’re installing a wheelchair ramp—whether for a family member, patient, or public facility—getting the measurements right is non-negotiable. An incorrectly sized ramp can be unsafe, difficult to use, or even unusable. The key to a successful ramp starts with one critical number: the vertical rise. From there, slope, run, landings, and available space all determine the final design. This guide walks you step by step through how to measure for a wheelchair ramp accurately, avoid common mistakes, and ensure compliance with safety standards like the ADA. Whether you’re planning a portable, modular, or permanent ramp, you’ll learn exactly what to measure, how to calculate ramp length, and what design choices keep users safe.
Measure Vertical Rise First
The vertical rise is the foundation of every ramp measurement. It’s the total height from the ground to the doorstep or landing your ramp must reach. Without this number, you can’t calculate ramp length or slope.
How to Measure Rise Accurately
Use a steel tape measure from the ground to the bottom of the door threshold at the point where the ramp will start and end—never guess. If there are multiple steps, add up each individual riser height, which typically ranges from 4 to 7.75 inches. For entrances with uneven ground, place a level and straight board across the steps or slope to simulate a flat surface before measuring from the board to the ground.
Example: Three 7.5-inch steps = 22.5-inch total rise. At a 1:12 slope, this requires 22.5 feet of ramp run.
Pro Tip: Always measure in inches. Converting to feet only after calculations reduces errors and ensures precision.
Calculate Ramp Run Using Slope Ratio
Once you have the rise, calculate how long the ramp must be. This depends on the slope ratio—the incline steepness. The gentler the slope, the longer (and safer) the ramp.
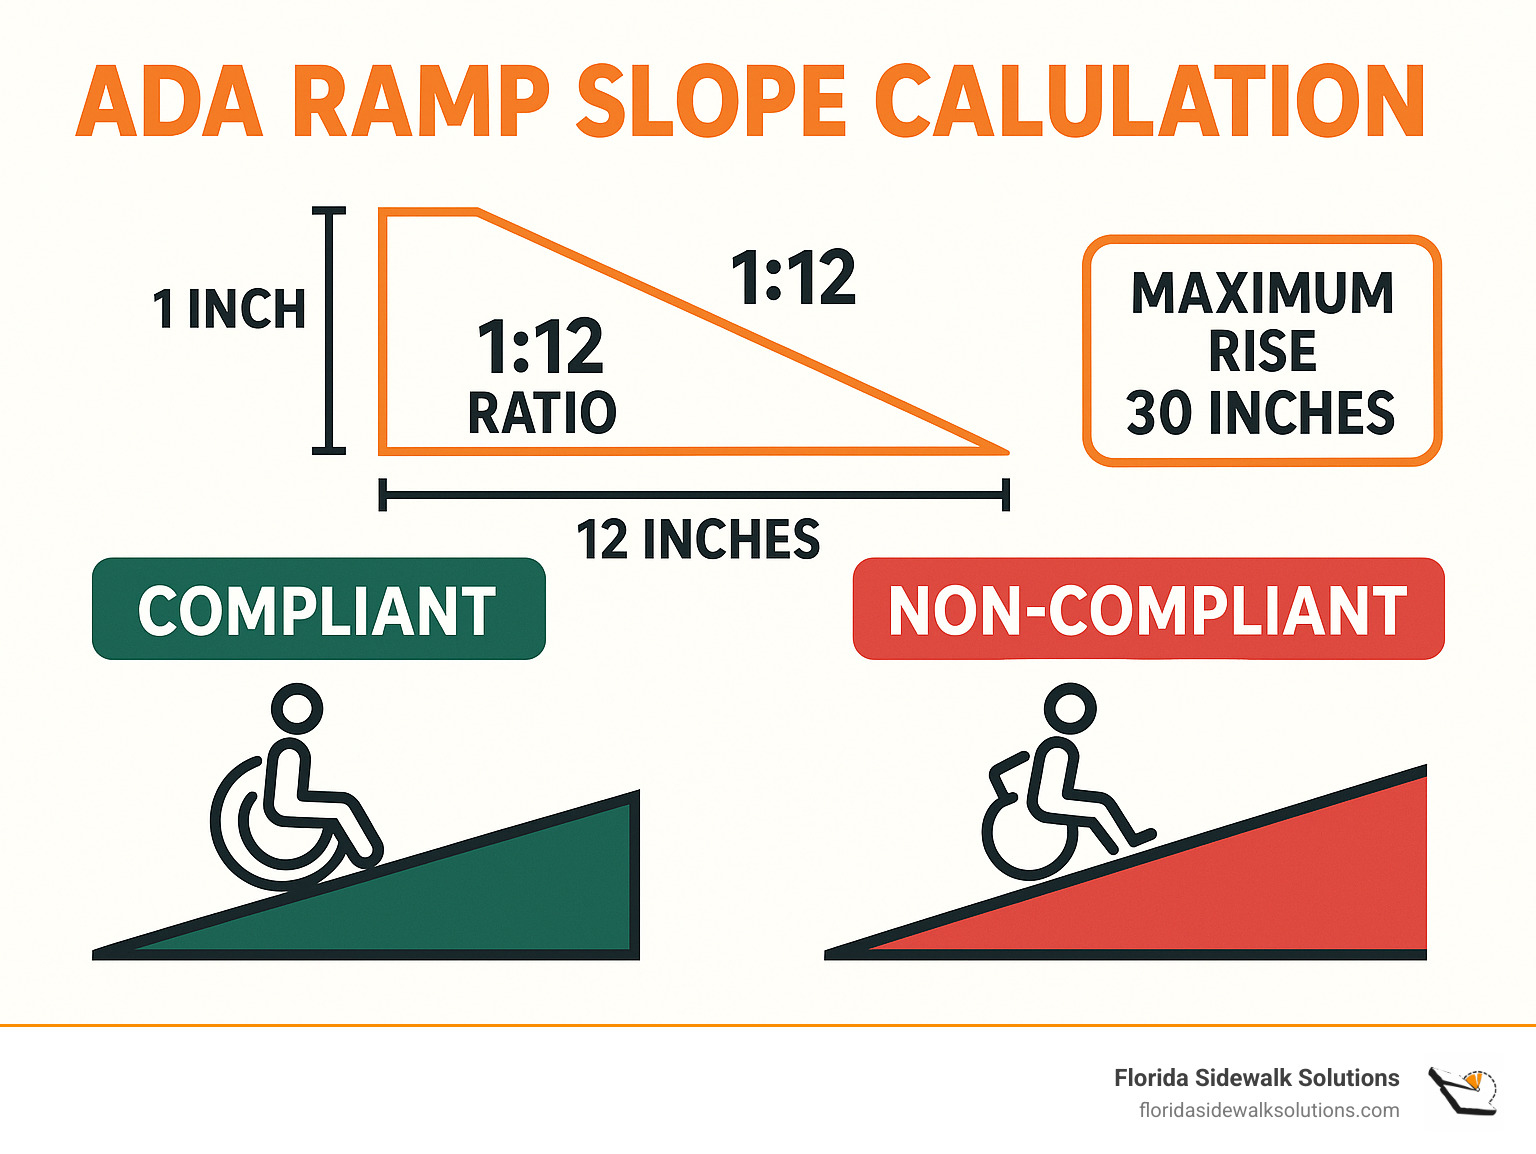
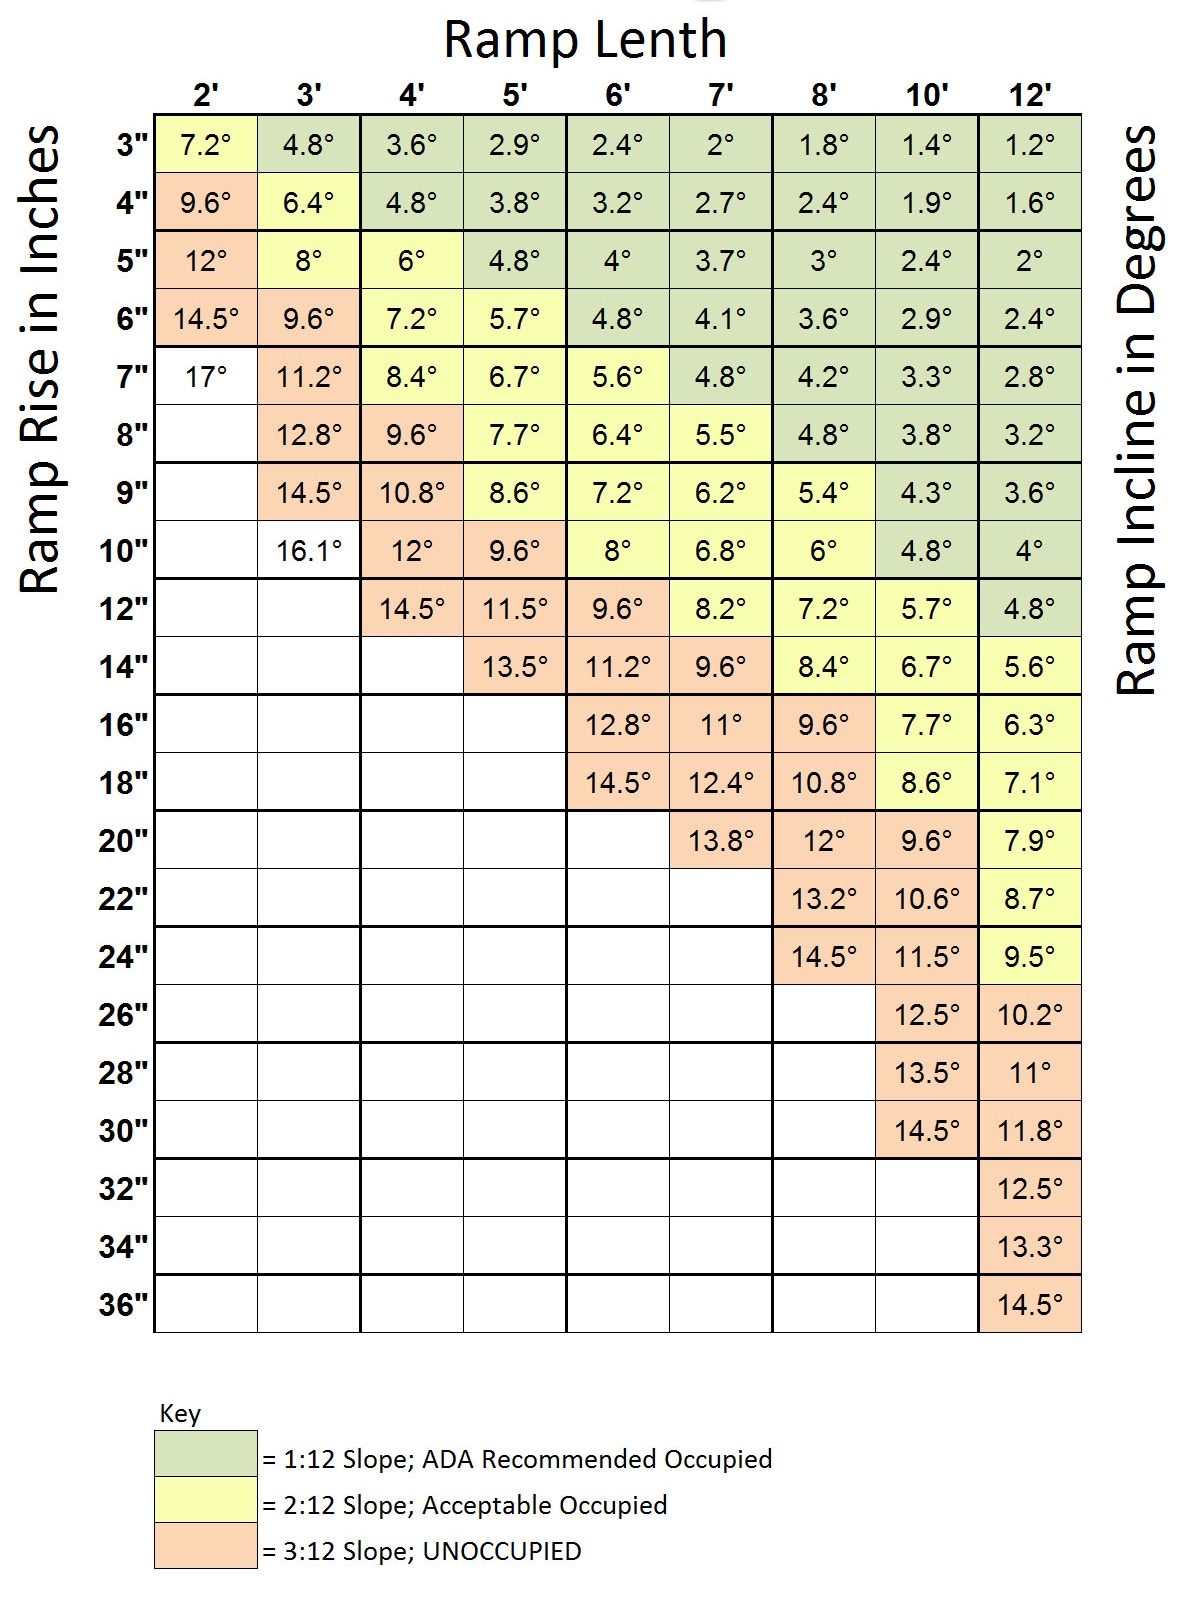
Use the 1:12 Rule for ADA Compliance
The 1:12 slope is the gold standard: for every 1 inch of vertical rise, the ramp must extend 12 inches horizontally. To find the required run in feet:
Formula: Ramp Run (ft) = Rise (in) ÷ 12
Example: A 24-inch rise needs 24 feet of ramp at a 1:12 slope.
This ratio corresponds to about 5 degrees of incline and is required by the Americans with Disabilities Act (ADA) for public and commercial buildings. It’s also strongly recommended for residential use, especially when manual wheelchairs are involved.
Steeper Slopes for Limited Space
In private homes with space constraints, steeper slopes may be acceptable—but only under specific conditions:
| Slope | Run per 12″ Rise | Best For |
|---|---|---|
| 1:12 | 12 feet | Manual wheelchairs, ADA compliance |
| 2:12 | 6 feet | Power chairs, scooters |
| 3:12 | 4 feet | Assisted access, short-term use |
Warning: Slopes steeper than 3:12 (about 14°) are unsafe for unassisted use and can cause tipping, motor strain, or user fatigue.
Include Landings in Your Layout
Landings aren’t optional—they’re essential for safety, rest, and door access. Even if space is tight, they must be included.
Landing Size and Placement
The ADA requires a minimum 5-foot by 5-foot (60″ × 60″) landing at several points:
- Top of ramp: Allows safe entry and full door opening
- Bottom of ramp: Required if the transition to ground isn’t level
- Every 30 feet of run: Prevents user exhaustion
- All turning points: Essential for L-shaped or switchback ramps
Note: A 5-step entrance (~37″ rise) needs:
– 37 feet of run
– Two 5′ landings (top and mid-point)
– Total system length: ~47 feet
Door Clearance Matters
Ensure the landing allows the door to swing fully open. Inward-swinging doors need more space. If the door opens outward, the ramp must end at least 12 inches away from the swing path to prevent collisions.
Measure Available Space
Before finalizing your ramp design, confirm it fits your property. Many people miscalculate because they forget landings and turning space.
Key Dimensions to Check
- Available run distance: How far the ramp can extend from the house
- Total footprint: Ramp run + all landings + turning zones
- Width clearance: At least 42 inches wide for a 36-inch clear path (allows handrails)
- Obstructions: Check for railings, bushes, driveways, or property lines
Space-Saving Solutions
If space is limited:
– Use an L-shaped ramp with a 90° turn and center landing
– Choose a switchback (U-shaped) design for high rises
– Consider modular aluminum ramps—they’re customizable and ADA-compliant
Tip: Sketch your layout on graph paper or use a digital planner to visualize fit.
Check Door and Entryway Dimensions
Even a perfectly sized ramp can fail if it doesn’t align with the doorway.
Essential Entry Measurements
- Door jamb width: Inner frame width—must match ramp width
- Recess depth: Distance from outer jamb to wall—impacts ramp placement
- Jamb thickness: Affects how the ramp connects to the threshold
- Threshold height: Some doors have raised thresholds—include this in total rise
Avoid These Common Mistakes
- ❌ Installing a ramp that’s too narrow for the user’s wheelchair
- ❌ Forgetting handrail clearance (adds 1.5″ per side)
- ❌ Blocking emergency exits or fire escape routes
Pro Tip: Record all entry measurements in one list—rise, width, jamb depth, swing direction.
Estimate Ramp Length by Number of Steps
If you’re unsure where to start, use step count as a rough guide. But always verify with actual rise measurement—step heights vary.
| Steps | Avg. Rise | ADA Run (1:12) | Landings | Total System Length |
|---|---|---|---|---|
| 1 | 7.5″ | 7.5′ | 1 | 12′ |
| 2 | 15″ | 15′ | 1 | 20′ |
| 3 | 22.5″ | 22.5′ | 1 | 27′ |
| 4 | 30″ | 30′ | 1 | 35′ |
| 5 | 37.5″ | 37.5′ | 2 | 47′ |
Note: These assume 7.5″ per step. Measure your actual steps—they may be taller or shorter.
Use a Ramp Calculator or Pro Tool
Save time and avoid math errors with digital tools.
Online Ramp Calculators
- Input: Vertical rise, desired slope (1:12, 1:10, etc.)
- Output: Ramp length, landing needs, total footprint
- Popular options: USA Medical Supply, The Ramp People, EZ-ACCESS
Manual Calculation Shortcut
Ramp Length (ft) = Rise (in) ÷ 12 (for 1:12)
For steeper slopes:
– 2:12 → Divide rise by 6
– 3:12 → Divide rise by 4
Example: 24″ rise at 2:12 = 24 ÷ 6 = 12 feet of run
Choose Between Portable and Permanent Ramps
Your ramp type affects measurement needs and safety.
Portable Ramps: Fast but Limited
- Slopes: 1:6 to 1:8 (up to 15°)—too steep for unassisted use
- Best for: Car access, temporary entry, assisted transfers
- Length: Often 2–6 feet—only suitable for low rises (under 6″)
- Risk: Short ramps on high rises are dangerous—can cause tipping
Rule of Thumb: Never use a 6-foot ramp for a 24-inch rise.
Permanent Ramps: Safe and Compliant
- Slopes: 1:12 (ADA standard)
- Materials: Aluminum, wood, concrete
- Features: Handrails, non-slip surface, landings
- Best for: Daily, independent use
Pro Tip: Modular aluminum ramps combine durability with easy installation.
Avoid Dangerous Short Ramps
A common mistake is buying a short, portable ramp to save space or money. This creates serious safety risks.
Why Steep Ramps Are Unsafe
- Manual wheelchairs: Require extreme upper body strength to climb
- Power chairs: May stall or overheat on inclines over 10°
- Descending: User leans forward—risk of forward tipping
- Walkers/Rollators: No stable footing on steep slopes
Real-World Result: Many users return ramps the same day due to injury risk.
When Steep Ramps Are Acceptable
- Only for assisted use (caregiver pushes)
- Short durations (e.g., car entry)
- With safety straps or brakes
Never leave a steep ramp unattended for independent use.
Schedule a Professional Site Assessment
Even if you plan to DIY, a pro evaluation prevents costly errors.
What Experts Measure
- Exact rise and run
- Ground slope and stability
- Landing and turning radius
- ADA compliance
- Custom design options
Free Assessments Available
Companies like USA Medical Supply and The Ramp People offer:
– On-site visits
– No-obligation quotes
– Layout sketches and 3D models
Benefit: Catches issues you might miss—like soil settling or door interference.
When to Hire a Contractor
DIY works for simple straight ramps. But complex designs need pros.
Projects Requiring Professional Help
- Ramps over 30 feet
- Switchback or multi-level designs
- Concrete or deck-integrated installations
- Permit-required builds (check local codes)
Note: Some municipalities require permits and inspections for permanent ramps.
Final Measurement Checklist
Before ordering or building, verify all dimensions.
✅ Vertical rise (in inches)
✅ Ramp run (based on 1:12 or chosen slope)
✅ Number and size of landings (5′ × 5′ minimum)
✅ Total system length (ramp + landings)
✅ Available space (clear of obstructions)
✅ Door width and swing direction
✅ Handrail clearance (adds 3–4 inches total)
✅ Local building codes (may exceed ADA)
Double-check everything—a 1-inch error in rise can lead to a 1-foot error in run.
Key Takeaways
- Start with vertical rise—it determines ramp length.
- Use 1:12 slope for safety and ADA compliance.
- Include 5′ × 5′ landings at top, bottom, and every 30 feet.
- Total system length includes all ramps and platforms.
- Residential ramps can use 2:12 or 3:12 if space-limited—but 1:12 is safest.
- Portable ramps with 1:6 or 1:8 slopes are for assisted use only.
- Never use a short ramp for high rises—risk of injury is high.
- Use online calculators or pro assessments to avoid mistakes.
- Modular ramps offer flexibility for tight spaces.
- Always verify fit and code compliance before installation.
Accurate measurement isn’t just about numbers—it’s about safety, independence, and long-term usability. Whether you’re helping a loved one or ensuring public access, taking the time to measure correctly ensures a wheelchair ramp that works, lasts, and protects.