If your ROHO wheelchair cushion isn’t inflated correctly, it can’t protect your skin or support your posture. Designed with interconnected air cells, ROHO cushions work by allowing you to sit into the cushion—not on it—so your weight is evenly distributed and pressure on your sit bones (ischial tuberosities) is minimized. But this only works with proper inflation. Too firm, and circulation suffers; too soft, and you risk “bottoming out,” where bones press directly against the wheelchair seat. This comprehensive guide walks you through the exact steps to inflate and adjust your ROHO cushion, based on manufacturer guidelines, clinical standards, and real-world user experience. You’ll learn how to achieve ideal submersion, fine-tune for postural imbalances, and maintain performance—all to prevent pressure sores and stay comfortable all day.
Position Cushion Correctly
Before adding air, ensure the cushion is properly placed to maximize support and accessibility.
Align with Wheelchair Seat
Place the ROHO cushion flat and centered on the seat. Make sure:
– The air cells face upward
– Front, back, and top labels match the wheelchair’s orientation
– The ROHO logo on the cover aligns with the cushion’s branding
– The valve is near your left knee when seated (standard for easy access)
✅ Pro Tip: Rotating the cushion incorrectly can block the valve or shift support zones—always double-check alignment before inflating.
Insert Into Cover Properly
Most users keep the cushion inside a protective cover. To insert:
1. Fold the cushion lengthwise.
2. Slide it into the cover from the open end.
3. Zip the cover closed.
4. Use the small hole near the badge to pull the valve through.
⚠️ Warning: Forcing the valve can tear the cover. If tight, carefully widen the hole with scissors—do not stretch.
Unlock Airflow (If Equipped)
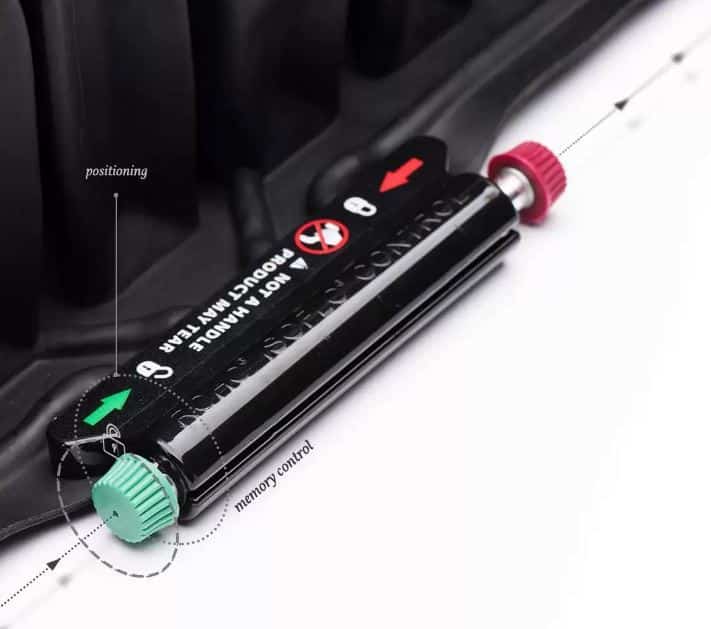
Advanced ROHO models like the Quadtro Select, Contour Select, and Mosaic Rojo feature an ISOFLO Memory Control Valve that must be unlocked before adjustment.
Set Valve to Green (Unlocked)
- Locate the red/green indicator on the front left corner.
- Push the valve to the right until the green side is visible.
- This allows air to flow freely between compartments during inflation.
✅ Why It Matters: If the valve is locked (red), air stays trapped in sections. Adjusting while locked leads to uneven inflation and poor submersion.
Begin Initial Inflation
Now it’s time to add air—use the right technique to avoid over-inflation.
Open the Air Valve
Turn the valve counterclockwise (left) to open. If stiff, use the milled end of the hand pump for better grip.
Attach and Pump
- Press the rubber nozzle of the pump firmly over the valve.
- Begin steady pumping.
- Watch for key visual cues:
– A slight upward arch forms in the center
– Edges begin to scalloped backward
– Corners lift slightly off the seat
🛑 Stop Here: The cushion should feel firm but pliable—like a tennis ball. Do not inflate until rock-hard.
Close Valve and Remove Pump
Pinch the pump nozzle to break suction, then remove. Turn the valve clockwise (right) to seal.
🔁 Multi-Valve Models: Repeat for each valve (e.g., left/right or front/rear sections).
Transfer User Safely
Inflation continues after the user sits down. Never skip this step.
Achieve Natural Sitting Posture
Assist the user in transferring so they:
– Sit centered on the cushion
– Rest feet flat on footrests
– Maintain upright, balanced posture
✅ Wait 2–3 Minutes: Let air redistribute naturally under body weight before fine-tuning.
Fine-Tune Using Fingertip Test

This is the most accurate way to confirm proper submersion.
Slide Hand Under Ischial Tuberosity
- Wear gloves or place a plastic bag over one hand to prevent sticking.
- Gently slide your palm-down hand under the user’s buttock.
- Aim toward the sit bone (ischial tuberosity).
– If hard to locate, lift one leg slightly to feel the bone move.
Release Air Slowly
- Reopen the valve just enough to allow slow air escape.
- Keep hand in place beneath the bone.
- Stop releasing when:
– You can move your fingertips 1–2 mm
– There’s ~1.5 cm (½ inch) clearance between bone and seat
✅ Key Insight: This “fingertip mobility” means bones are suspended—no pressure buildup.
Repeat on Other Side
Check both sides for symmetry. Adjust each side independently if using dual-compartment models.
Balance for Postural Issues

Customize inflation to correct common seating problems.
Fix Pelvic Obliquity (One Side Lower)
- Common in scoliosis or hip contractures.
- If the right side sits lower, reduce air on the right or increase on the left.
- Use dual-valve models for precise side-to-side control.
Correct Forward Slumping
- For users with kyphosis or weak trunk control.
- Adjust rear compartment first to lift the sacrum and support the lower back.
- Slightly under-inflate front section if needed for pelvic stability.
📌 Expert Note: Major postural corrections should be guided by a seating specialist or therapist.
Lock ISOFLO Valve After Adjustment
Once optimal fit is achieved, lock the system in place.
Slide to Red (Locked)
- Push the ISOFLO valve to the left until the red side appears.
- This locks air in each compartment, maintaining your custom shape.
✅ When to Re-Lock: Only after final adjustments—locking too early traps incorrect settings.
Verify Final Setup
Use this quick checklist before daily use.
Confirm Clearance and Symmetry
- No part of the pelvis touches the wheelchair base.
- Both sit bones show equal submersion.
- User feels stable, not sinking too deep or perched high.
Recheck After Use
- Reassess after 1 hour of sitting or position changes.
- Perform a full reset weekly:
“Over-inflate, open valve briefly to equalize, then re-adjust.” — Experienced user tip
Maintain Weekly Inflation
Even without leaks, ROHO cushions lose air over time.
Check Weekly
- Fully deflate and re-inflate at least once per week.
- Daily visual check: Look for flattened cells or reduced scalloping.
Detect Leaks Early
- Inflate and close all valves.
- Submerge in water (bathtub).
- Watch for bubbles—mark with waterproof pen.
- Dry completely before repair.
✅ Repair Small Leaks: Use a ROHO-approved patch kit.
❌ Replace If: Multiple leaks, cracking, or persistent deflation.
Clean Cushion and Cover
Hygiene prevents damage and extends lifespan.
Wipe Down Cushion
- Use warm, soapy water and a soft cloth.
- Rinse and dry thoroughly before use.
- Never use bleach, alcohol, or abrasive cleaners.
Wash Cover Regularly
- Remove and machine wash on cold, gentle cycle.
- No fabric softener—it degrades elastic.
- Air dry only—no dryer heat.
✅ Clean Frequency: Cover every 1–2 weeks; cushion as needed.
Perform Pressure Relief Moves
Even perfect inflation isn’t enough—offload pressure regularly.
Shift Every 30–60 Minutes
Choose one method:
– Side leans (hold 2 minutes per side)
– Forward reach over a table
– Arm-supported push-up (if upper body strength allows)
– Standing transfer or lying on side
🚨 Critical: Small movements (like reaching for coffee) don’t count. You need full offloading.
Seek Professional Help If Needed
Persistent issues may require expert assessment.
Signs You Need a Seating Clinic
- New dark spots or sores appear
- Constant need for re-inflation
- Poor posture despite adjustments
🔍 Get Pressure Mapping: A specialist can test your setup and recommend better options (e.g., gel, hybrid, or custom cushions).
📅 Recommended: High-risk users should get mapped every 3 months.
Know Your Model’s Needs
Different ROHO models have unique features.
Low Profile Single Valve
- Built-in pump
- One inflation point
- Great for active users
Quadtro Select / Mosaic Rojo
- ISOFLO valve
- Dual compartments
- Ideal for postural control
Dual Compartment
- Independent left/right or front/rear
- Best for pelvic obliquity
✅ Always Refer to Manual: Download your model’s guide from roho.com
Replace When Worn
ROHO cushions last up to 5 years—but only with care.
Replace If You Notice:
- Cracks or discoloration in neoprene
- Frequent air loss despite repairs
- Reduced shape retention
- History of pressure injuries with correct use
✅ Maximize Lifespan: Clean regularly, store flat, avoid UV exposure.
Final Checklist: Perfect ROHO Setup
| Task | Done |
|---|---|
| Cushion centered and oriented | ☐ |
| Cover installed with valve exposed | ☐ |
| ISOFLO unlocked (green) before pump | ☐ |
| Inflated to slight arch/scalloping | ☐ |
| User seated in normal posture | ☐ |
| Waited 2–3 min for air settlement | ☐ |
| Hand under sit bone for adjustment | ☐ |
| Air released until 1.5 cm gap | ☐ |
| Valve closed tightly | ☐ |
| Both sides balanced | ☐ |
| ISOFLO locked (red) after tune | ☐ |
| Daily checks scheduled | ☐ |
Final Note: A ROHO cushion is only as good as its setup. Proper inflation isn’t a one-time task—it’s daily maintenance, regular checks, and smart adjustments. By mastering the fingertip test, using the unlock-inflate-adjust-lock sequence, and combining it with pressure relief moves, you dramatically reduce the risk of ulcers and stay comfortable all day. When in doubt, consult a seating specialist—your skin depends on it.