A loose, detached, or collapsing leg rest isn’t just an inconvenience—it can compromise posture, safety, and independence for wheelchair users. When your leg rest won’t stay in position, wobbles under pressure, or falls off unexpectedly, it’s time for a fix. The good news? Most common wheelchair leg rest problems can be resolved at home with basic tools and clear guidance. Whether you’re dealing with a folding, standard, or elevating leg rest, this guide delivers step-by-step solutions to reattach, tighten, adjust, and maintain your leg rests. From realigning dislodged T-nuts to preventing future failures, you’ll gain the confidence to keep your mobility support stable and reliable.
Reattach a Detached Leg Rest
Align With Hanger Pins Correctly
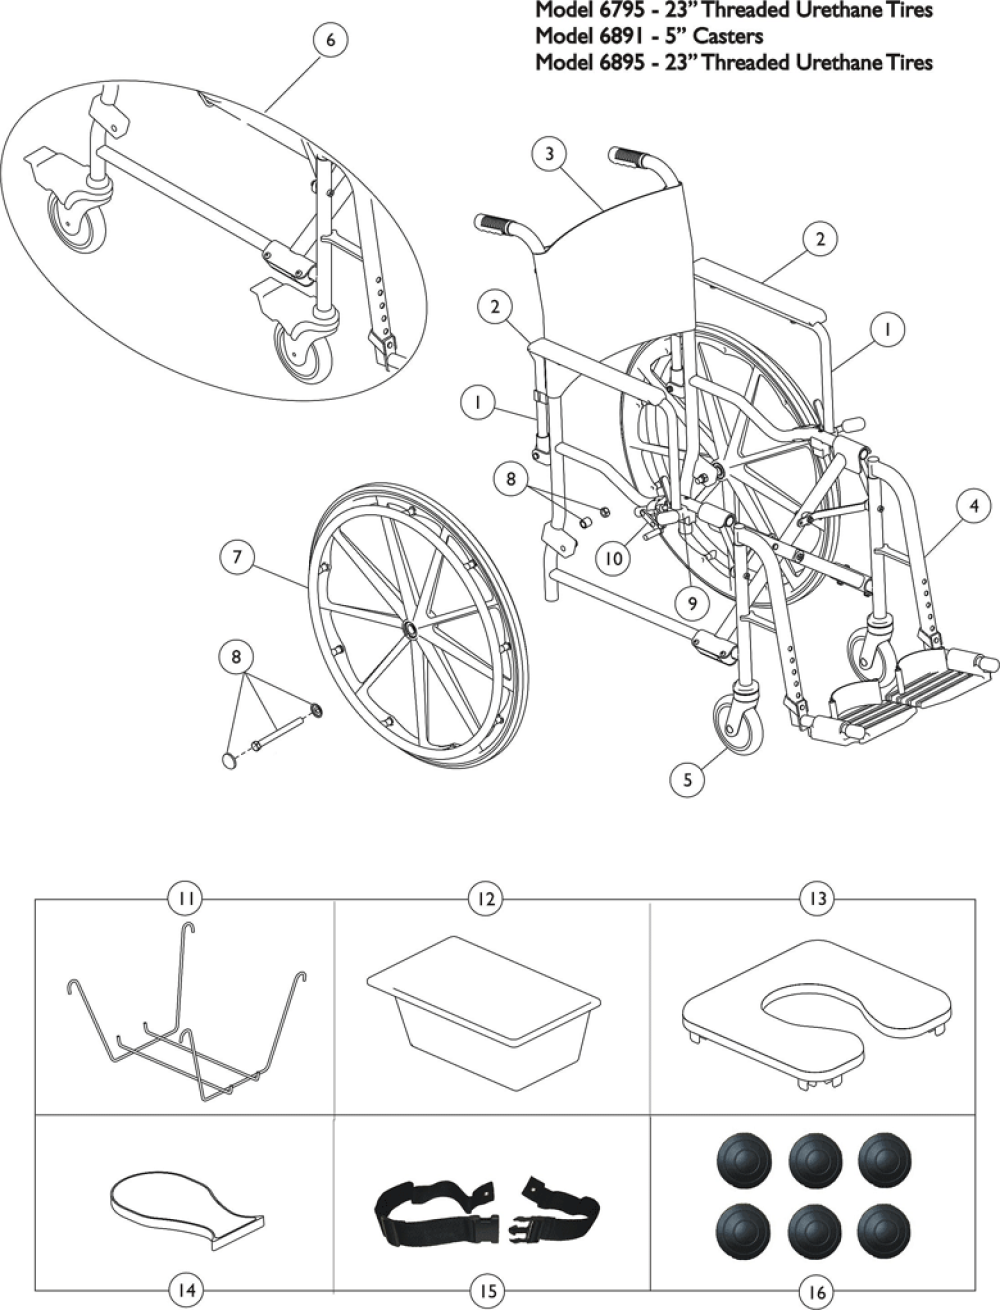
If your leg rest has completely fallen off, the most likely cause is misalignment with the hanger pins—the upper and lower mounting points on the front of the wheelchair frame. These pins are designed to slide through corresponding holes in the leg rest assembly. To reattach:
- Hold the leg rest with the footplate facing inward, toward the center of the chair.
- Match the two mounting holes on the side of the leg rest with the upper and lower hanger pins.
- Gently lower the leg rest until both pins are fully seated in the holes.
Ensure the orientation matches the opposite side. Installing it backward will prevent the locking mechanism from engaging.
Engage the Locking Lever
Once the pins are aligned:
– Swing the leg rest forward until you hear a distinct click.
– This sound confirms the internal lever has snapped over the lower pin and secured the unit.
– Gently tug the leg rest backward to test for stability.
Some models require you to pull the release lever forward before swinging the leg rest into place. If it doesn’t click, check that the pins are fully seated and the lever isn’t obstructed.
Verify Both Sides Are Secure
After reattaching one leg rest:
– Repeat the process on the other side.
– Ensure both units are at the same height and move smoothly.
– Apply light downward pressure to confirm they stay locked.
Pro Tip: Always perform reattachment on level ground with the wheelchair brakes fully engaged.
Tighten a Loose or Wobbly Leg Rest
Identify the Source of Play
Wobbling usually stems from loose hardware. Common culprits include:
– The rear Allen bolt (controls vertical height)
– Top and bottom mounting bolts
– A dislodged or twisted T-nut inside the frame tubing
Begin by inspecting all visible fasteners. If tightening doesn’t resolve the issue, the problem may be internal.
Tighten the Rear Height Adjustment Bolt
Use a 5/32 inch Allen wrench (preferably metric):
1. Locate the bolt at the back of the leg rest mount.
2. Turn clockwise until snug—but avoid over-tightening.
3. Test: the leg rest should move freely when unlocked but stay firm when locked.
Over-tightening can damage threads or prevent smooth adjustment.
Secure Top and Bottom Mounting Bolts
These bolts anchor the leg rest to the frame:
– Top bolt: Tighten with a 5/32 inch Allen wrench.
– Bottom nut: Use a 7/16 inch wrench.
Hold both tools simultaneously and tighten until lateral movement stops. Recheck after several days of use, as vibration can loosen them over time.
Check for Sheared or Dislodged T-Nuts
If bolts won’t hold:
1. Remove the leg rest and inspect inside the frame tubing.
2. Look for metal scraps or floating T-nuts—contoured nuts that clamp from within.
3. If a T-nut is twisted or loose, gently shake it out and reinsert in the correct orientation.
Success Case: A Tilite user fixed recurring detachment by realigning a sideways T-nut and properly tightening the Allen screw.
Replace missing or damaged T-nuts through the manufacturer or a bike shop—many carry compatible hardware.
Fix a Leg Rest That Keeps Folding Down
Diagnose the Pivot Mechanism
If the footrest drops when folded upward, the pivot joint has lost friction. Common causes:
– Worn plastic bushings
– Failed internal spring
– Loose set screw (often hidden under a black plastic cap)
Test the joint: if it moves too freely even when “locked,” friction must be restored.
Apply a Reversible Fix First
Start with non-permanent solutions:
Use Velcro Straps
- Attach adhesive-backed Velcro to the footrest and support tube.
- Wrap when folded to keep it upright.
- Pros: No tools needed, easy to install.
- Cons: May degrade with frequent use.
Insert a Thin Bolt
- Drill a small hole through the pivot point (if not pre-drilled).
- Insert a thin bolt with washers to compress the joint slightly.
- Tighten just enough to add resistance—don’t lock it completely.
This allows adjustable tension without damaging the mechanism.
Try Heat-Based Adjustments
For plastic housings only:
Heat Shrink the Pivot Hole
- Use a heat gun on low setting—never open flame.
- Apply heat evenly around the pivot area.
- As the plastic softens, it may shrink slightly and restore grip.
- Let it cool completely before testing.
Warning: Overheating can warp or melt plastic—proceed with caution.
Create Internal Ridges
- Heat the pivot hole until pliable.
- Insert a flat screwdriver and push inward to form ridges.
- These increase friction when cooled.
This is permanent, so test on one side first.
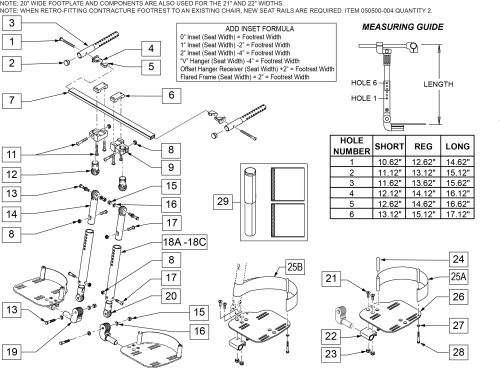
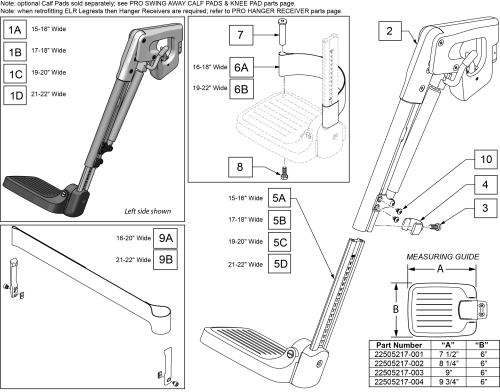
Adjust Leg Rest Height and Length
Set Correct Footplate Height
Improper height leads to poor posture:
– Too high: Feet don’t rest flat, causing forward sliding.
– Too low: Knees lift, increasing pressure on thighs.
To adjust:
1. Pull the side lever forward to unlock.
2. Slide the leg rest up or down.
3. Push the lever back until it clicks to lock.
Ensure both sides match—even a 1/2 inch difference can cause pelvic tilt.
Extend or Shorten the Leg Rest Tube
For leg length discrepancies:
1. Press both adjustment buttons simultaneously.
2. Slide the inner tube to desired length.
3. Release buttons—they should click into new holes.
4. Reattach and test.
Always match extension unless medically advised otherwise.
Clinical Tip: Measure from popliteal fossa (back of knee) to heel for ideal length.
Repair or Replace Damaged Components
Identify Replaceable Parts
You don’t need a new leg rest for most failures. Common replaceable parts:
– Calf pads
– Footplates
– Release levers
– Tension springs
– Mounting bolts and T-nuts
Check manufacturer websites (e.g., Tilite, Quickie, Invacare) or medical supply stores.
Source Parts From Unlikely Places
- Bike shops: Carry T-nuts, bolts, and tools for lightweight frames.
- Online marketplaces: Search by model number and part name.
- Manufacturer support: Call if parts aren’t listed—older chairs (6+ years) may require direct ordering.
Find Your Model Number: Look for a sticker on the crossbar between rear axles.
Prevent Future Leg Rest Problems
Perform Monthly Maintenance
Avoid failures with routine checks:
– Clean pivot points with a dry cloth.
– Lubricate hinges sparingly with silicone spray—never oil-based lubes.
– Tighten all bolts every 4–6 weeks.
– Inspect T-nuts by removing leg rests and checking for movement.
Pro Tip: Carry a small Allen wrench in your seat pouch for on-the-go adjustments.
Avoid Common Mistakes
- Don’t over-tighten bolts—this can damage threads or crush plastic bushings.
- Don’t use elevating leg rests unnecessarily—prolonged elevation causes posterior pelvic tilt and poor circulation.
- Never use only one leg rest—this leads to pelvic obliquity and spinal misalignment.
When to Seek Professional Help
Signs of Serious Damage
Seek expert repair if you notice:
– Cracked or bent frame tubing
– Broken welds at mounting points
– Missing internal hardware with no way to retrieve or replace
– Persistent instability despite tightening
These may require welding, custom fabrication, or full assembly replacement.
Get Clinical Support for Fit Issues
If leg rests cause:
– Pressure sores
– Foot drop
– Joint contractures
Consult an occupational therapist or rehabilitation engineer. They can assess seating alignment and recommend specialized supports like contoured footplates or medial/lateral leg guides.
Alternative Resource: Many bike repair shops now offer wheelchair maintenance—they’re experienced with lightweight frames and precision hardware.
Optimize for Transfers and Transport
Swing Out for Easier Transfers
To clear your path:
1. Pull the inner release lever.
2. Gently swing the leg rest outward.
3. Complete transfer.
4. Swing back and ensure lever clicks into place.
Useful for car entries, bed transfers, or tight spaces.
Fold Footplates Upward in Tight Areas
When side clearance is limited:
– Fold footplates upward instead of swinging out.
– Keeps legs supported while reducing width.
– Ideal for narrow doorways or small bathrooms.
Prepare for Wheelchair Folding
Before collapsing the frame:
1. Remove or fold up leg rests.
2. Lock brakes.
3. Remove seat cushion to reduce bulk.
4. Grab seat frame, bend knees, and pull upward—use legs, not back.
To unfold:
1. Push armrests slightly apart.
2. Press down on seat ends until frame locks.
3. Reattach leg rests and cushion.
Summary: Key Fixes and Best Practices
- Reattach a fallen leg rest by aligning holes with hanger pins and swinging forward until it clicks.
- Stop wobbling by tightening rear Allen bolts and checking for dislodged T-nuts.
- Fix a dropping footrest with Velcro straps, heat shrink, or a thin bolt to increase pivot friction.
- Adjust height and length so feet rest flat, knees at 90°, and shins vertical.
- Replace individual parts—no need to buy a whole new leg rest.
- Maintain monthly with cleaning, lubrication, and bolt checks.
- Seek help for cracked frames, missing internal hardware, or clinical fit issues.
Final Note: A stable, properly aligned leg rest isn’t just about comfort—it’s essential for posture, pressure relief, and safe mobility. Address issues immediately, and never compromise on fit. When in doubt, consult a therapist or technician.