If you rely on a power wheelchair for mobility, regular cleaning isn’t just about looks—it’s essential for safety, hygiene, and long-term performance. Dust, sweat, spills, and outdoor grime accumulate on high-touch surfaces like the joystick, armrests, and tires, creating a breeding ground for bacteria and accelerating wear on mechanical parts. A well-maintained chair operates more efficiently, reduces the risk of infection, and lasts significantly longer. This comprehensive guide provides a step-by-step, expert-backed method to clean your power wheelchair safely—without damaging electronics or voiding warranties. You’ll learn exactly what supplies to use, how to disinfect properly, and when to perform critical maintenance checks—all based on manufacturer guidelines and real-world user experience.
Power Down and Disconnect Battery
Before you touch any part of your wheelchair with a cloth, ensure it’s completely safe to clean.
Turn Off and Isolate Power
Always begin by turning off the joystick and control system. Next, disconnect the battery if it’s removable—this is a crucial step to prevent short circuits from accidental moisture. If your chair has a circuit breaker, flip it off to fully de-energize the system. This triple-check process ensures no electrical current is flowing during cleaning.
⚠️ Never skip this step: Even a small amount of water near live electronics can cause permanent damage or create a shock hazard.
Remove Cushions and Covers
Take off seat and backrest cushions if they’re detachable. For pressure-relief cushions like ROHO models, close the air valves before cleaning to prevent moisture from entering the cells. Set these components aside for separate hand-washing—never machine wash unless explicitly labeled safe by the manufacturer.
Blow Out Debris With Compressed Air

Start with dry cleaning to remove dust, hair, and debris that could turn into mud if wet.
Target Key Areas
Use a can of compressed air to clean:
– Motor housings
– Wheel hubs and caster joints
– Undercarriage and footplate crevices
– Around the joystick base and control panel
Use Proper Technique
Hold the can upright and use short bursts to avoid liquid discharge. Keep the nozzle at least 6 inches from surfaces to prevent forcing grit deeper into joints. Do not use high-pressure air guns—they can damage seals or push debris into sensitive motor areas.
✅ Pro Tip: Do this outdoors or in a garage to contain flying dust and hair—especially helpful for users with pets.
Wipe Down Frame and High-Touch Surfaces
Now clean the metal and plastic parts safely without risking water damage.
Prepare Cleaning Solution
Mix warm water and mild dish soap in a bucket. Dip a microfiber cloth into the solution—never spray directly onto the chair, as mist can seep into electronics.
Clean These Areas
Wipe down:
– Chassis and footplate
– Armrests and push handles
– Control box and side panels
For Stubborn Grime
Use a soft-bristled brush or toothbrush on textured footplate tape. Apply foaming cleaner sparingly, then wipe immediately with a damp cloth. Always finish by drying all surfaces with a second microfiber towel to prevent corrosion.
❌ Avoid: Harsh chemicals like bleach, ammonia, or window cleaners—they degrade plastic and rubber over time.
Clean Joystick and Control Panel Safely
The joystick is one of the dirtiest parts of your chair—clean it with care.
What You’ll Need
- Slightly damp microfiber cloth
- Dry soft-bristled toothbrush
- Compressed air
Cleaning Steps
- Wipe the joystick cap and base with a cloth dampened in soapy water.
- Use the toothbrush to remove grime from around the pivot point.
- Blow out dust from crevices with compressed air.
- Wipe dry immediately—no moisture should linger.
⚠️ Never use alcohol, solvents, or disinfectant sprays directly—they can cloud screens or damage internal circuitry.
Disinfect Non-Porous Surfaces
After cleaning, kill germs on frequently touched components.
Use EPA-Registered Disinfectants
Choose hospital-grade wipes (e.g., Clorox, Lysol) or spray applied to a cloth. Always confirm compatibility with plastics and electronics.
Disinfect These Areas
- Joystick and control panel
- Push handles
- Armrests
- Footplate
Follow Contact Time
Leave disinfectant on the surface for 1–10 minutes (check product label). Then wipe dry—never let liquid pool near seams or joints.
❌ Limitation: Disinfectants only work on non-porous surfaces—they can’t sanitize foam, fabric, or cushion interiors.
Hand Wash Upholstery and Cushions

Upholstery requires gentle care to preserve fire-retardant properties and structure.
By Material Type
Vinyl Upholstery
Wipe with warm, soapy water. Dry immediately to prevent cracking. Avoid soaking or using abrasive pads.
Leather Upholstery
Lightly mist with a 3:1 vinegar-water solution from 12+ inches away. Wipe with a soft cloth—do not saturate. Condition occasionally to prevent drying.
Fabric Upholstery
Mix hot water, mild soap, and cleaning soda. Use a soft brush to gently scrub. Blot excess moisture—never wring. Air dry completely (24+ hours) before reattaching.
✅ Expert Advice (Prof. Von Heiser): Machine washing removes fire-retardant coatings—always hand wash unless the care tag says otherwise.
Clean Wheels and Tires Without Water Damage
Wheels pick up dirt, oil, and road grime—clean them safely.
Safe Cleaning Method
Dampen a microfiber cloth with soapy water. Wipe tires, rims, and pushrims thoroughly. Use a soft brush for stuck-on debris.
User-Tested Shortcut
Hold Lysol wipes between both hands and push the chair forward—the wipes clean the tires as they roll.
❌ Avoid: Driving over wet towels or using car wash hoses—risk of entanglement or water intrusion.
Optional: Tire Shine
Apply non-abrasive tire cleaner every few months. Buff with a dry cloth for a clean look.
Check Tire Pressure and Moving Parts
Use cleaning time to inspect critical mechanical systems.
Tire Pressure Check
Find the recommended PSI on the tire sidewall or near the axle. Use a hand pump or tire gauge to check and inflate. Solid (non-inflatable) tires require no pressure check.
✅ Best Practice: Check weekly—underinflated tires reduce battery range and cause uneven wear.
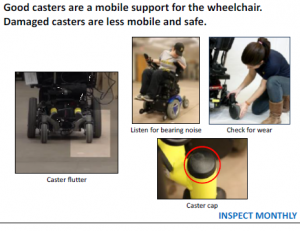
Caster and Joint Maintenance
Remove front casters if clogged with hair or string. Clean the axle and reattach securely. Apply WD-40 or manufacturer-approved lubricant only if specified—avoid overuse, which attracts dirt.
Dry and Reassemble Completely
Moisture is the enemy—ensure everything is dry before powering up.
Final Drying Steps
Use compressed air one last time on joints and crevices. Wipe all metal surfaces to prevent rust. Allow cushions to air dry fully—do not rush with heaters or dryers.
Reassemble in Order
- Reattach seat and backrest.
- Reconnect battery.
- Power on and test joystick function.
✅ Rule of thumb: If any part feels damp, wait longer. Never operate a wet wheelchair.
Follow a Cleaning Schedule for Longevity
Consistency prevents buildup and catches problems early.
| Task | Frequency |
|---|---|
| Wipe joystick and armrests | Daily |
| Full frame cleaning | Weekly |
| Deep clean (undercarriage, motors) | Monthly |
| Wax frame (optional) | Every 3 months |
| Tire pressure check | Weekly |
| Battery charge | Every night |
✅ Survey Insight (PatientsLikeMe, 2017): 56% of users reported avoidable mechanical failures due to poor maintenance.
Know What Never to Do
Avoid these common mistakes that can damage your chair.
Prohibited Practices
❌ Using hoses, pressure washers, or buckets of water
❌ Spraying liquids near electronics or battery compartment
❌ Machine washing upholstery or cushions (unless approved)
❌ Using alcohol, ammonia, or abrasive pads on controls
❌ Ignoring cracked tires, loose bolts, or sticky joysticks
⚠️ User Warning (JD_Roberts): Compressed air with solvent sprays can blast grit into motor seals—use dry air only.
Consult Manufacturer Guidelines
Cleaning methods vary by brand and model.
Model-Specific Tips
- Permobil: Use only mild soap and soft cloths—no solvents.
- ROHO Cushions: Close air valves and avoid submersion.
- Pride/Quantum: Check manual for electronic shielding levels.
✅ Best Move: Contact your dealer or manufacturer (e.g., Permobil Care) if unsure—better safe than sorry.
Final Checklist: Clean, Inspect, Maintain
Use this list every time you clean:
- ✅ Powered off and battery disconnected
- ✅ Cushions removed and valves closed
- ✅ Debris blown out with compressed air
- ✅ Frame wiped with damp, soapy cloth
- ✅ Joystick and controls cleaned and dried
- ✅ High-touch surfaces disinfected (contact time observed)
- ✅ Upholstery hand washed and air dried
- ✅ Wheels cleaned with damp cloth and brush
- ✅ Tire pressure checked and adjusted
- ✅ Caster wheels cleared of hair/debris
- ✅ All parts completely dry before reassembly
- ✅ Battery reconnected and system tested
Final Note: Cleaning your power wheelchair isn’t just about hygiene—it’s a vital act of self-care and equipment preservation. By following these steps regularly, you ensure safer mobility, smoother performance, and a longer lifespan for your chair. Stick to manufacturer advice, use the right tools, and never rush drying. A few minutes of maintenance today can prevent costly repairs tomorrow.