Setting up a wheelchair correctly is essential for safety, comfort, and long-term independence. Whether you’re assembling a new manual wheelchair or adjusting it for optimal fit, every step—from unboxing to final inspection—matters. This guide walks you through the full process using clear, actionable steps based on manufacturer best practices and clinical recommendations. You’ll learn how to assemble, adjust, and safely use your wheelchair, ensuring it supports your mobility needs with confidence.
Unbox with Care
Begin by carefully opening the top of the carton and removing any plastic wrap or protective cardboard. Avoid using sharp tools that could scratch the frame or damage components.
Turn the box on its side and gently pull the wheelchair out using the hand grips, allowing the rear wheels to roll it smoothly onto the floor. Inside, locate the small brown box (common in Everest & Jennings models), which typically contains:
– Rear wheels
– Front caster wheels
– Front rigging (footrest supports)
– User manual
– Adjustment tool
Keep all parts organized and verify nothing is missing before proceeding. A clean, open space will make assembly easier and reduce the risk of losing small components.
Attach Front Rigging Securely
Align and Lock the Hinges
Position the front rigging so the hinge plates match the hinge pins above the front caster forks on both sides. Swing the rigging inward until you hear a distinct click, indicating it’s locked in place.
Ensure the release lever is fully engaged in the rearward position. This prevents accidental disengagement during transfers or movement.
Pro Tip: Test stability by gently tugging the rigging—no wobble should occur.
If the rigging doesn’t click or feels loose, reposition it and try again. A secure connection is vital for maintaining balance and preventing footrest collapse during use.
Install Caster and Rear Wheels
Mount Front Caster Wheels
Insert the caster forks into the front fork tubes. Secure them with the provided pins or bolts according to your model’s instructions. Make sure both casters rotate freely and align forward.
Misaligned casters can cause drifting or difficulty steering. If one wheel turns more easily than the other, double-check that both are seated properly.
Attach Rear Wheels
Press the center button on the hub and push outward to remove (if pre-installed). To install:
1. Align the wheel with the axle.
2. Push the wheel firmly onto the axle until it clicks securely.
3. Repeat on the other side.
Spin each wheel to confirm smooth rotation without wobbling.
Warning: Keep fingers clear of the seat-frame gap when attaching wheels to avoid pinching.
The rear wheels are critical for propulsion—ensure they’re tight and centered to prevent strain during movement.
Know Your Wheelchair Parts
Understanding each component ensures proper use and maintenance. Key parts include:
| Part | Purpose |
|---|---|
| Frame | Supports structure; folding frames enhance portability |
| Seat | Holds user; width/depth must match body size |
| Backrest | Supports spine; height affects mobility and posture |
| Armrests | Aid sitting balance and transfers |
| Footrests | Maintain leg alignment and circulation |
| Rear Wheels | Propel chair via hand rims |
| Casters | Enable steering (5–8” diameter) |
| Brakes | Lock wheels for safety during stops and transfers |
| Anti-Tip Wheels | Prevent backward tipping on inclines |
| Push Handles | Allow caregiver-assisted movement |
| Step Tube | Reinforced bar for curb climbing |
Some models include accessories like cup holders or oxygen mounts.
Familiarity with these parts helps you troubleshoot issues quickly and communicate effectively with caregivers or medical professionals.
Adjust Seat for Proper Fit

Set Correct Seat Width
The seat should be 1–2 inches wider than your hips. Measure hip width and compare.
- Too wide? You’ll strain reaching the hand rims.
- Too narrow? Risk pressure sores and difficulty sitting.
A properly fitted seat improves posture and reduces shoulder fatigue over time.
Set Seat Depth
When seated, there should be 1–2 inches between the front edge of the seat and the back of your knees. This prevents pressure behind the knees and supports circulation.
To test: Sit fully back in the chair. Slide your hand between the seat edge and the back of your knee—there should be slight resistance but no tightness.
Set Seat Height
Your hips should sit slightly higher than your knees when feet are supported. This promotes a healthy hip-knee angle for propulsion and comfort.
Higher seats aid transfers; lower seats improve stability. Adjust based on your daily activities and transfer surfaces.
Customize Backrest and Armrests
Choose Backrest Height
Lower backrests allow full arm motion for self-propulsion. Higher backrests offer more support for users with limited trunk control.
Ensure at least 2–3 inches of space between shoulders and top of backrest for effective pushing.
Adjust Armrests
Height should let arms rest comfortably with shoulders relaxed.
To remove:
– Press front and back levers simultaneously.
– Lift straight up.
To reattach:
– Align posts with brackets.
– Push down firmly until you feel a click.
Flip-back or removable armrests aid easier transfers, especially when moving to a toilet or car seat.
Configure Footrests for Posture
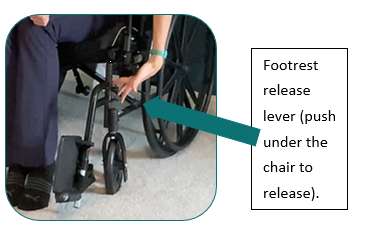
Adjust Leg Rest Length
- Unlatch the lever below the adjustment holes.
- Press both buttons on the support bar.
- Slide bar up or down to desired length.
- Ensure buttons click into new holes.
- Re-secure the lever.
Both sides must be adjusted equally to maintain balance.
Position Footplates
Feet should rest flat with knees bent at 90 degrees. Ensure footplates face inward toward the chair’s centerline.
Check that the lowest point of the footplate is at least 2.5 inches above the ground to avoid scraping.
Proper leg positioning prevents swelling, improves circulation, and reduces strain on the lower back.
Pre-Use Safety Checklist
Perform this quick check before every use:
- Engage brakes: Push levers forward—chair should not roll when nudged.
- Position footrests: Swung in or reattached, angled inward.
- Verify ground clearance: Minimum 2.5 inches under footplates.
- Inspect tires: No punctures, cracks, or wobbling; inflate if pneumatic.
- Confirm all parts secure: Rigging, wheels, armrests, and footrests.
- Test anti-tip wheels (if equipped): Should touch ground slightly after rear wheels on inclines.
Pro Tip: Make this a habit—like checking seatbelts in a car.
This routine takes less than a minute but can prevent serious accidents.
Transfer Safely In and Out
Getting Into the Wheelchair
- Position chair close to transfer surface (bed, toilet, chair).
- Lock brakes and move footrests aside.
- Back up until seat touches back of legs.
- Grasp armrests and lower yourself slowly.
- Sit fully back with thighs supported and spine against backrest.
Getting Out
- Lock brakes again.
- Move footrests out of the way.
- Use armrests to push up, shifting weight forward.
- Stand slowly—watch for footplates.
- Step away only when balanced and clear.
Transfer Angle Tip: Angle chair 45° to 90° to target surface for safer pivoting. Avoid 180° turns.
For users with limited strength, a caregiver should assist using proper lifting techniques or transfer aids.
Propel and Steer Effectively
Self-Propulsion Basics
- Forward: Grip hand rims just behind you. Push forward and down with both hands.
- Backward: Pull hand rims upward.
- Turning:
- Turn right: Hold right wheel, push left.
- Turn left: Hold left wheel, push right.
Never use spokes—only hand rims—for propulsion. Fingers can get caught.
Use smooth, controlled motions to conserve energy and maintain balance.
Caregiver Pushing Tips
Use push handles at the back.
– For doorways: pull chair backward to open door first.
– Move smoothly—avoid jerks or sudden stops.
– Communicate with the user during movement.
Clear communication ensures safety and comfort during assisted transport.
Climb and Descend Curbs Safely
Going Down a Curb
- Face away from curb.
- Move backward slowly.
- Lower rear wheels first, then front casters.
- Lean body toward the back of the chair for balance.
Going Up a Curb
- Approach straight on.
- Lean slightly backward.
- Use the step tube (reinforced rear bar) as leverage.
- Lift front casters up first, then rock forward to bring rear wheels up.
Caution: Only attempt curbs within the wheelchair’s rated limit (usually 2–4 inches). Use ramps when possible.
Practice curb navigation in a safe, supervised environment before attempting independently.
Fold and Unfold Correctly
How to Fold
- Lock brakes.
- Remove or swing aside footrests and cushions.
- Stand in front, feet shoulder-width apart.
- Bend knees, keep back straight.
- Grasp seat frame in the center.
- Pull upward until frame collapses.
- Press armrests together to close fully.
Note: On many models, lifting the seat activates the folding mechanism.
How to Unfold
- Place on level ground.
- Hold armrests and pull slightly apart.
- Place palms on seat frame ends, fingers toward back.
- Push down and outward until frame locks open.
- Confirm it’s fully extended and stable.
- Reattach footrests and cushion.
Final Check: Always test that the frame is locked before sitting.
Transport in a Vehicle
Prepare for Travel
- Remove footrests using release levers.
- Fold the frame by pulling up on the seat.
- Remove rear wheels if needed:
– Press hub button and pull outward. - Store parts securely in vehicle.
Loading Tips
- Keep wheelchair close to your body.
- Position near the car boot to reduce lifting distance.
- Use proper lift technique: bend knees, keep back straight.
- Get help if the chair is heavy or awkward.
Alternative: Consider a wheelchair van or vehicle lift for independent transport.
Maintain and Clean Regularly
Weekly Inspection
Check:
– Brakes: Engage/disengage smoothly.
– Wheels/Tires: No leaks, cracks, or wobbling.
– Hinges/Joints: Tight and rust-free.
– Footrests/Armrests: Secure and functional.
– Frame: No bends or damage.
Cleaning Routine
- Wipe frame and seat with mild soap and water.
- Avoid harsh chemicals that degrade fabric or metal.
- Dry thoroughly—especially joints and axles—to prevent rust.
Storage Best Practices
- Store indoors, away from moisture and extreme temperatures.
- Keep upright or folded to prevent frame warping.
- Avoid placing heavy items on top.
Avoid Common Safety Risks
Must-Do Safety Steps
✅ Always lock brakes before transfers.
✅ Use hand rims only—never fingers in spokes.
✅ Balance weight during turns and transfers.
✅ Check footplate clearance (2.5″ minimum).
Dangerous Actions to Avoid
❌ “Wheelies” unless trained—can lead to falls.
If attempting, keep upper body perpendicular to ground.
❌ Overloading beyond weight capacity.
❌ Steep slopes without assistance or training.Fall Preparedness: If you have reduced leg sensation, learn the brace position (face to knees, arms crossed) and practice righting the chair with help.
Demonstrate Skills for Loan Programs
Some rental or loan programs require proof of competency. Be ready to show:
- Correct brake use (lock/unlock).
- Safe folding and unfolding.
- Leg rest removal and reattachment.
- Proper transfer techniques.
- Basic maneuvering (forward, backward, turning).
Mastering these ensures safe, independent use and reduces injury risk.
Follow Model-Specific Guidelines
Everest & Jennings Notes
- Serial number is located under the frame—match with carton label for warranty.
- Refer to the included manual for model-specific adjustments.
- Contact customer support for unresolved issues.
Golden Rule: Always follow manufacturer instructions for assembly, adjustment, and maintenance.
Get Professional Support
Consult an occupational therapist or clinical nurse specialist for personalized setup and training. They can help with:
- Optimal seat dimensions.
- Pressure-relief cushion selection.
- Efficient propulsion techniques to reduce shoulder strain.
In many countries, insurance or government programs cover wheelchairs with a doctor’s prescription.
Medical Disclaimer: This guide does not replace professional medical advice. Always consult a healthcare provider before starting or changing mobility aid use.
Key Measurements at a Glance
| Feature | Recommended Setting |
|---|---|
| Footplate Ground Clearance | At least 2.5 inches |
| Hip-Knee Angle | Around 90 degrees |
| Seat Width | 1–2 inches wider than hips |
| Seat Depth | 1–2 inches from back of knees |
| Transfer Angle | 45° to 90° to surface |
| Braking Effectiveness | Chair must not roll when engaged |
Final Note: A properly set up and maintained wheelchair is a gateway to independence. Keep your user manual, perform regular checks, and practice skills in a safe space before heading out. With attention to detail and consistent care, your wheelchair can provide safe, reliable mobility for years to come.