Every year, 7,239 wheelchairs are damaged, lost, or delayed during air travel in the U.S. alone. If you rely on a manual wheelchair—whether it’s a TiLite TR, Aero T, ZRA, or GTM Jaguar—this isn’t just a statistic. It’s a real risk that could leave you stranded without your essential mobility device. But here’s the good news: most damage is preventable. Knowing how to pack wheelchair for flight correctly is your best defense.
This guide walks you through exactly what to do—before, during, and after your flight—to protect your chair, assert your legal rights, and ensure it arrives intact. From disassembling components to supervising loading, we’ll cover every critical step so you can travel with confidence.
Know Your Legal Rights When Flying with a Wheelchair
Air Carrier Access Act: Your Protection Under U.S. Law
Under the Air Carrier Access Act (ACAA), you have the right to gate check your wheelchair at the aircraft door, not at the ticket counter. Airlines must:
- Accept your wheelchair free of charge.
- Load it last and unload it first.
- Repair or replace it if damaged.
- Provide a loaner wheelchair while repairs are made.
These rights are enforced under 14 CFR §382.67 and apply to all U.S. carriers and flights departing from the U.S. If airline staff push back, calmly say:
“I’m requesting to gate check per ACAA regulations. Please contact your Complaints Resolution Officer (CRO) if needed.”
What International Travelers Need to Know
While Canada, the UK, EU, and Australia have similar protections, enforcement varies—especially on regional flights (e.g., to Cuba or the Caribbean). Always confirm policies with your airline before booking. Request a CRO at the airport if your chair is mishandled.
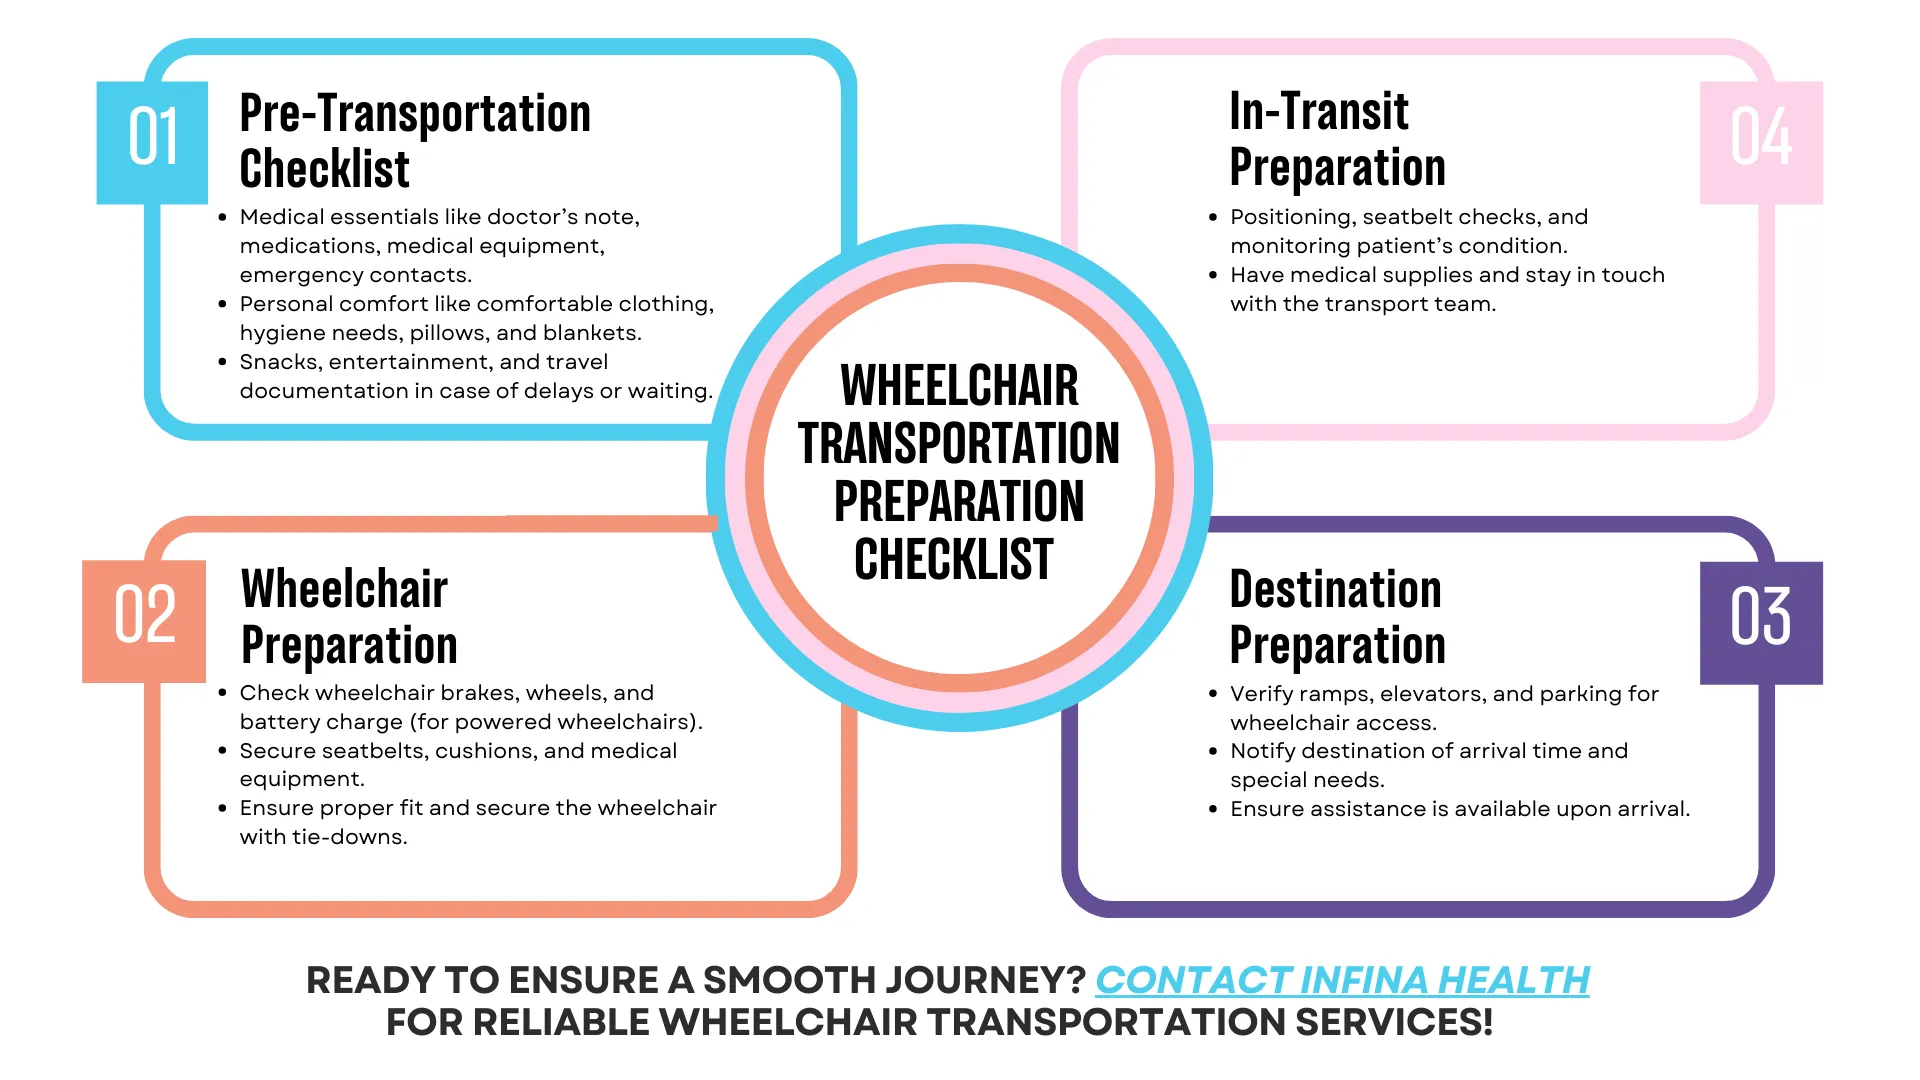
Prepare Your Travel Plan Before You Fly
Book Special Assistance Early—Don’t Wait
Request a Special Service Request (SSR) when booking your flight. Specify:
- Your manual wheelchair type (rigid or folding).
- Need for an aisle chair.
- Assistance with boarding, deplaning, and transfers.
Confirm the SSR appears on your boarding pass. Do this directly with the airline—third-party agents often don’t process these correctly.
Choose the Best Seat for Easy Transfers
Opt for a bulkhead or front-row aisle seat. These offer:
- More legroom for smoother transfers.
- Proximity to restrooms.
- Faster deplaning.
Airlines often assign these automatically, but request them early to guarantee placement.
Avoid Tight Connections
Allow at least 1 hour between connecting flights. This gives time for:
- Slower deplaning.
- Wheelchair retrieval.
- Staff to assist with reboarding.
Tight connections increase the risk of your chair being left behind.
Fly During Off-Peak Times
Avoid holidays and peak travel days. Fewer passengers mean:
- Faster check-in and boarding.
- More attentive staff.
- Less congestion at the gate.
How to Disassemble & Pack Your Wheelchair for Flight
Remove All Detachable Parts—Carry Them Onboard
Never check high-value or essential components. Carry these in a medical duffel or carry-on bag:
| Component | Why Carry On |
|---|---|
| Seat cushion | Prevents pressure sores; use on plane |
| Armrests, side guards | Easily damaged or lost |
| Footrests, leg rests | Frequent breakage point |
| Anti-tippers | Small, easily misplaced |
| Bags, pouches, SmartDrive | High-value electronics |
| Lithium battery (if applicable) | FAA requires removal |
You’re entitled to two free disability-related carry-ons: your wheelchair and one additional bag. No limits apply.
Keep the Frame Intact and Wheelchair-Shaped
Handlers treat a recognizable chair better than a pile of parts. Follow these steps:
Fold & Lock the Chair
- Fold the backrest (if your model allows, like TiLite TR or Aero T).
- Lock both wheels to prevent rolling.
- Fold push handles (if foldable) to reduce snag risk.
Secure with Bungee Cords or Transit Straps
Attach diagonal bungee cords from the push handles to the front frame corners. This:
- Prevents luggage from being stacked on the seat.
- Secures the folded backrest.
- Protects front forks from impact.
Pro Tip: Use bushing straps (elastic straps with hooks) to tightly bind the frame and prevent shifting.
Remove Wheels? Only If You Can Store Them Safely
Quick-release wheels can be removed, but only if you can carry them in the overhead bin or mobility closet. Otherwise, leave them on and protect with bungees.
Protect Your Wheelchair from Damage

Add Physical Protection
Install Front Frame Covers
Use rubber sleeves or impact caps on front frame tubes to prevent dents and scratches.
Wrap Joints with Foam
Apply pipe insulation foam around frame joints or axles. It’s lightweight and offers minor impact absorption.
Avoid bubble wrap at the gate—it’s too time-consuming and risks part loss.
Consider a Frame Bag (If Available)
Some travelers use modified padded duffel bags. Pre-pack at home if possible.
Track & Identify Your Chair
Attach an AirTag or Tile
Place a GPS tracker in the seat post or under the seat. This helps locate your chair if lost.
Label Clearly
Tape a durable tag to the back rigidizer bar with:
- Your name.
- Destination airport.
- Phone number.
Include contact info in English, Spanish, and French for international travel.
Use the Airline’s Wheelchair Tag
Get the official tag at the gate and ensure it’s securely attached.
Document Your Chair
Take photos or video before check-in:
- Capture all angles.
- Include digital signage (for timestamp).
- Show serial number and unique features.
Keep receipts, manuals, and service records in your carry-on for claims.
Gate Check Process: What to Do at the Airport
Arrive Early
- Domestic flights: Arrive 2 hours early.
- International flights: Arrive 3 hours early.
This ensures time for special assistance, security screening, and gate coordination.
Transfer at the Gate
Use the aisle chair for boarding. Transfer as close to the aircraft door as possible.
Keep your seat cushion—ask flight attendants to place it on your seat.
Supervise Loading
- Watch your wheelchair being loaded.
- Ask a ramp supervisor to confirm it’s on the correct side.
- Offer a small token (e.g., chocolates) to flight attendants—builds goodwill.
Request In-Cabin Storage (If Possible)
Some aircraft have:
- Cabin closets for wheelchair storage.
- Seat strapping systems to secure chairs in empty rows.
Availability is first-come, first-served. Rigid or oversized chairs rarely fit, but ask anyway.
During the Flight: Stay Comfortable & Safe
Manage Toileting Needs
Most short-haul planes lack accessible restrooms. For long flights:
- Use airport restrooms before boarding.
- Consult a urologist about medications for continence if needed.
- Airlines like Qantas (A380) and Virgin (Dreamliner) have accessible toilets—but space is tight.
Prevent DVT
Wear compression socks and perform ankle pumps every 30 minutes to reduce the risk of deep vein thrombosis.
Carry Medications & Snacks
- Keep meds in original packaging with a doctor’s note.
- Check medication legality at your destination (e.g., UK Medicines Checker).
- Bring familiar snacks and a refillable water bottle (empty before security).
After Landing: Retrieve & Inspect Your Wheelchair
Stay on the Plane Until You See Your Chair
Do not deplane until your wheelchair is at the door. Airlines must have it ready before other passengers disembark.
Inspect Immediately
Check for:
- Bent axles or handrims
- Cracked frame or forks
- Missing parts (anti-tippers, footrests)
Compare to your pre-flight photos.
Report Damage or Loss Immediately
In the U.S.:
- Report to airline staff at the gate.
- File a Property Irregularity Report (PIR).
- Demand full repair or replacement—no out-of-pocket costs.
- Request a loaner wheelchair.
- Ask for direct payment (not reimbursement) to avoid delays.
Outside the U.S.:
Contact the airline’s Complaints Resolution Officer (CRO) at the airport.
Note: Delayed reporting reduces your chances of a successful claim.
Rent vs. Bring Your Own Wheelchair: What’s Best?
Bring Your Own: Pros & Cons
Pros:
– Perfect fit and comfort.
– No learning curve.
– No rental fees.
– No liability for damage.
Cons:
– Risk of damage or loss.
– Requires disassembly and protection.
Rent a Travel Chair: Pros & Cons
Pros:
– No transport hassle.
– Chair suited to local terrain (e.g., beach, cobblestones).
– Local support and delivery to hotel.
Cons:
– May not fit your body or needs.
– Learning curve.
– Costs add up over time.
Smart Move: Have a backup rental plan in your destination in case of damage.
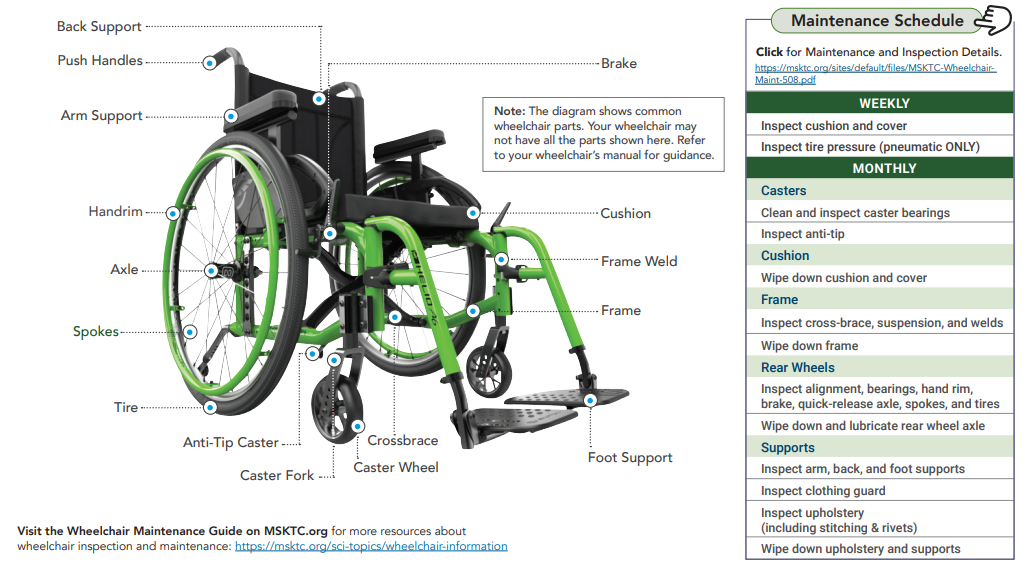
Keep Your Chair Travel-Ready: Maintenance & Smart Habits
Pre-Flight Maintenance Checklist
Schedule a service before travel. Check:
- Brakes – Ensure they engage smoothly.
- Tire pressure – Prevent flats during transit.
- Wheel alignment – Prevent wobbling.
- Bolt tightness – Prevent loosening in flight.
Bring a portable toolkit with:
- Allen keys.
- Tire pump.
- Spare inner tube or patch kit.
Travel-Friendly Chair Features
Look for models with:
- Folding backrest
- Quick-release wheels
- Foldable push handles
- Lightweight frame (titanium or carbon)
Top Travel Models:
– Motion Composite – Folding, adjustable
– TiLite Aero Z, ZRA, TR series – Ultralight, durable
– GTM Jaguar – Rugged, but heavier
Pro Tips for Stress-Free Air Travel
- Keep it wheelchair-shaped—never fully disassemble.
- Record loading/unloading from your seat—great evidence for claims.
- Use a flat neck pillow—fits better and is more comfortable.
- Pack parts in a duffel bag—counts as a medical carry-on.
- Be assertive, not aggressive—say:
“I need to gate check at the aircraft door per ACAA rules.”
Final Note: Flying with a manual wheelchair is challenging, but not impossible. By following these steps—disassembling correctly, protecting the frame, asserting your rights, and documenting everything—you drastically reduce the risk of damage. Whether you’re flying domestically or internationally, preparation is your best defense. Pack smart, travel confident, and never accept less than what you’re legally entitled to.