If your manual wheelchair rolls backward during transfers, you’re facing a serious safety risk—one that affects thousands of users daily. Installing an anti-rollback device eliminates this hazard by automatically locking the rear wheels the moment you stand up. Unlike traditional hand brakes that rely on memory and dexterity, anti-rollback systems work silently and instantly, engaging only when the seat is unoccupied. This makes them ideal for individuals with dementia, Parkinson’s, balance disorders, or limited hand strength.
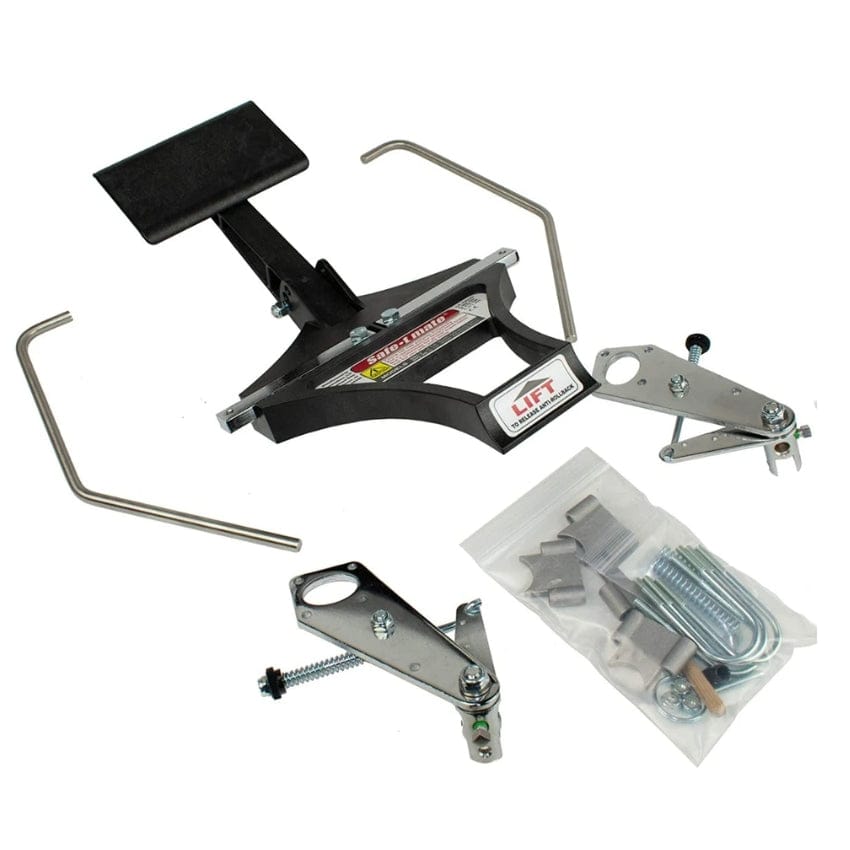
The system uses a weight-activated mechanism: when you rise from the seat, pressure is released from an under-seat paddle, triggering steel locking pins to drop into discs mounted on the rear wheels. This stops all motion in seconds. When you sit back down, your body weight depresses the paddle, lifting the pins and freeing the wheels—no effort required. The entire installation takes less than 90 minutes, requires no permanent modifications, and works seamlessly with most standard manual wheelchairs.
This guide walks you through every step of installing a fully automatic anti-rollback system, using real-world specifications from leading manufacturers like Pratiko Medical (WABSY), Direct Supply, and Safety Mate. You’ll learn how to mount locking discs, align brake blocks, install the activation paddle, and test the system for reliable performance—all while avoiding common mistakes that compromise safety.
Choose the Right Anti-Rollback System for Your Wheelchair

Not all anti-rollback devices are created equal. Selecting the right model ensures compatibility, ease of use, and long-term reliability.
Compare Top Models: WABSY, Direct Supply, Safety Mate
| Feature | WABSY (Pratiko Medical) | Direct Supply | Safety Mate |
|---|---|---|---|
| Locking Mechanism | Steel pins + discs | Pin-based system | Metal bar + paddle |
| Weight Activation | Yes (under-seat paddle) | Yes | Yes |
| Folds Without Removal | Yes | Yes | Varies |
| Installation Time | <90 minutes | <60 minutes (pre-assembled) | ~75 minutes |
| Universal Fit | Adjustable brackets | Sliding mounts | Strap/bracket system |
| Add-Ons Available | Propulsion rings, brake extensions | None listed | None listed |
| Starting Price (CAD) | $635.00 | Not public (institutional) | Contact seller |
WABSY stands out for individual buyers with transparent pricing and online ordering. Direct Supply targets healthcare facilities and offers bulk deployment support. Safety Mate, available through Progressive Mobility, provides personalized compatibility checks and product demos.
Key Buying Considerations
- Pin vs. Screw Mechanisms: Opt for pin-based systems—they resist vibration loosening better than screws.
- Folding Compatibility: Ensure the unit stays attached when folding your wheelchair for transport.
- Seat Weight Threshold: Most systems activate between 40–80 kg; verify it aligns with your body weight.
- Frame Clearance: Check that mounting doesn’t interfere with footrests or leg supports.
✅ Pro Tip: Watch manufacturer installation videos first. Pratiko Medical offers downloadable PDF guides and demo videos at pratikopratik.com.
Install Locking Discs on Rear Wheels
The foundation of the anti-rollback system lies in the locking discs attached to each rear wheel. These metal rings provide the engagement surface for the locking pins.
Remove and Prepare Rear Wheels
- Flip the wheelchair upside down or secure it in a service position.
- Depress the quick-release levers on both rear wheels and slide them out of the frame.
- Lay the wheels flat on a clean surface.
🔍 Visual Cue: Look for a central hub or axle where the disc will align. Most systems use 4–6 bolt holes matching standard mag wheel patterns.
Attach Locking Discs
- Place the locking disc over the wheel hub, aligning bolt holes.
- Insert provided bolts evenly around the ring to prevent warping.
- Tighten with a wrench in a star pattern until snug—do not over-tighten.
- Reinstall both wheels firmly into the frame and confirm they rotate freely.
⚠️ Common Mistake: Misaligned discs cause inconsistent locking. Spin the wheel and check for wobble—if the disc wobbles, loosen and reseat it.
Mount the Brake Block Assembly
This component delivers the actual locking force. The brake block houses the steel pins that engage the discs when the user stands.
Position the Brake Blocks
- Locate the lower rear section of the wheelchair frame, just above the rear axle.
- Slide adjustable mounting brackets onto the frame tubes.
- Position the brake block so the locking pin aligns vertically with the disc’s teeth or holes when engaged.
- Adjust left/right spacing to center the pin over the disc.
🔍 Visual Cue: When the chair is empty, the pin should rest fully inside a disc slot. When seated, the pin lifts completely clear.
Secure and Align the Mechanism
- Tighten all bracket bolts firmly using an Allen key or wrench.
- Test alignment by manually pressing the activation paddle (if accessible).
- Observe whether the pin engages and disengages smoothly without scraping.
✅ Pro Tip: Use thread-locking compound on bolts if vibration is a concern—especially for outdoor use.
Set Up the Under-Seat Activation Paddle
This is the safety trigger—a pressure-sensitive paddle that detects when you’re seated or standing.
Mount the Pressure Paddle
- Slide under the wheelchair seat and locate the central frame crossbar.
- Attach the activation paddle using U-bolts or straps, positioning it directly beneath the seat cushion.
- Ensure the paddle arm points upward, ready to be pressed by the seated user.
🔍 Visual Cue: When no one is sitting, the paddle should be in its upward (released) position, allowing the lock to engage.
Connect the Linkage System
- Attach a linkage rod or cable from the paddle to the brake block’s release lever.
- Connect using clevis pins or quick-disconnect hardware as specified.
- Ensure there is no slack—but also no pre-tension that prevents full engagement.
Calibrate Sensitivity
Adjust so:
– Lock releases fully when a person (~50–70 kg) sits down.
– Lock engages immediately upon standing.
To calibrate:
1. Sit in the chair and have someone observe the pin—ensure it fully retracts.
2. Slowly stand up—within 1–2 seconds, the pin should drop into the disc.
3. If too sensitive (locks mid-transfer), shorten the linkage slightly.
4. If unresponsive, lengthen the rod to increase paddle travel.
⚠️ Warning: Over-tightening the linkage can prevent full lock engagement—test repeatedly.
Test the Anti-Rollback Functionality
Never assume it works—verify every safety function before regular use. Perform these four tests in order.
Empty Chair Test
- With no one seated, try pushing the wheelchair forward and backward.
- Wheels should not move—pins must be fully engaged in discs.
- Listen for a solid “click” when force is applied.
❌ Failure Sign: Wheel turns freely → check paddle position or linkage tension.
Seated Movement Test
- Sit normally in the wheelchair.
- Push the hand rims to propel forward and backward.
- Wheels should rotate freely in both directions.
❌ Failure Sign: Dragging or resistance → pin may not be lifting completely; adjust linkage.
Stand-Up Re-Engagement Test
- Sit in the chair and begin to stand slowly.
- Immediately after rising, attempt to push the chair.
- Lock should engage within 1–2 seconds, preventing movement.
✅ Success Indicator: Consistent, automatic locking every time.
Folding Test (If Applicable)
- Fold the wheelchair as you normally would for transport.
- Unfold and inspect the anti-rollback components.
- Confirm:
– No parts have detached
– Linkage remains intact
– System functions normally after folding
✅ Design Win: Direct Supply and WABSY models are designed to fold without removal, saving time and reducing wear.
Maintain Long-Term Reliability
An anti-rollback device is built to last, but routine care ensures years of dependable performance.
Monthly Inspection Checklist
- ✅ Check pin alignment with discs—no bending or wear
- ✅ Inspect locking discs for cracks or stripped teeth
- ✅ Examine linkage rods for rust or binding
- ✅ Verify mounting brackets are tight and secure
- ✅ Test paddle movement—should pivot freely
Lubrication and Cleaning
- Every 3–6 months, apply light machine oil to:
– Pivot points on the paddle
– Linkage joints
– Pin sliding mechanisms - Wipe down metal parts with a dry cloth to remove dust and moisture.
- Avoid heavy grease—it attracts dirt and slows response.
✅ Pro Tip: After rainy or outdoor use, clean and dry the discs and pins to prevent corrosion.
Why Anti-Rollback Beats Manual Brakes
Traditional wheel locks require memory, dexterity, and consistent use—three things many users lack. Here’s how automatic rollback prevention wins.
| Factor | Manual Locks | Anti-Rollback Device |
|---|---|---|
| Activation | User must remember to engage | Fully automatic |
| Reliability | Low (often forgotten) | High (consistent) |
| Transfer Safety | Risk of rollaway | Prevents all unintended motion |
| Ease of Use | Requires hand strength | Zero effort required |
| Best For | Independent users with good cognition | Cognitive impairments, fall risks |
“It supports user independence while ensuring safety—allowing individuals to transfer with confidence.” — Pratiko Medical
For caregivers and long-term care facilities, this shift reduces liability and staffing demands. For users, it means safer, more dignified mobility.
Where to Buy and Get Support
Pratiko Medical (WABSY)
- Website: pratikopratik.com
- Product Page: WABSY Anti-Rollback System
- Includes: Installation video, PDF guide, add-ons (propulsion rings, brake extensions)
- Price: Starting at $635.00 CAD
Safety Mate (via Progressive Mobility)
- Website: progressivemobility.com
- Phone: 724-228-4568
- Offers: Compatibility checks, product demos, direct ordering
Direct Supply (Institutional)
- Sold exclusively through Direct Supply, a healthcare distributor
- Contact your account manager for:
- Facility-wide rollout
- Product demos
- Bulk pricing
✅ Best For: Nursing homes, rehab centers, group homes
Final Note: Installing an anti-rollback device is one of the most impactful safety upgrades for a manual wheelchair. It takes less than 90 minutes, requires no permanent changes, and delivers automatic protection during transfers. By following this guide, you ensure proper alignment, reliable activation, and long-term durability. Whether you’re a caregiver, clinician, or user, this system brings peace of mind—one seamless lock at a time.