If you’re wondering how to build a wheelchair ramp, you’re likely doing it for someone you care about—whether it’s a family member recovering from surgery, a loved one with a disability, or an aging parent who wants to stay independent at home. A well-built ramp removes barriers, restores mobility, and ensures safe entry and exit from the house, especially in emergencies. But building a wheelchair ramp isn’t just about attaching wood to your porch—it’s a structural project that must support heavy loads (often 500+ pounds) and withstand weather, time, and daily use.
The good news? With careful planning, the right materials, and attention to safety standards, even beginners can construct a durable, ADA-compliant wheelchair ramp in a weekend. This guide walks you through every step: measuring your rise, calculating slope, choosing materials, installing supports, and adding essential safety features like handrails and non-slip surfaces. You’ll also learn real-world lessons from DIYers—like why 2×4 joists fail under weight, how frost depth affects footings, and when it’s smarter to call a pro.
By the end, you’ll know exactly how to build a wheelchair ramp that’s safe, functional, and built to last.
Measure Your Vertical Rise and Calculate Ramp Length
Before cutting any wood, start with precise measurements. The vertical rise—the height from the ground to your doorway—is the foundation of your entire design. Use a tape measure from the finished floor level (including thresholds or steps) down to the ground directly below. Measure on both sides of the door; if your porch slopes, use the highest point.
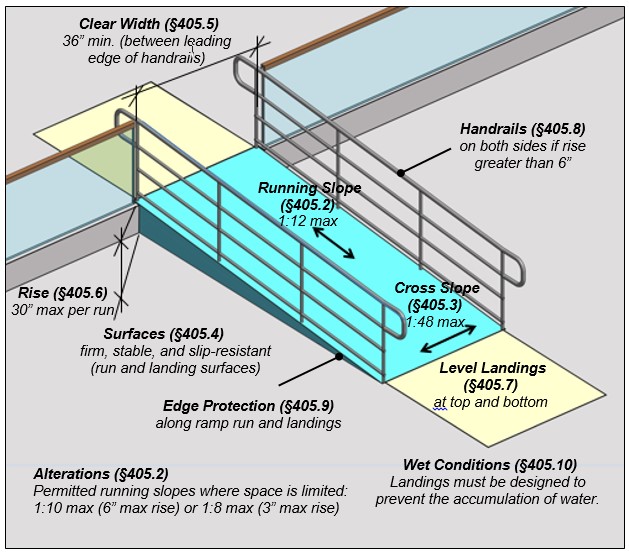
Once you have the rise, calculate the ramp length using the 1:12 slope rule—1 inch of vertical rise for every 12 inches of horizontal run. This is the ADA-recommended standard and ensures safe access for manual and power wheelchairs.
- 6-inch rise → 6 feet of ramp
- 12-inch rise → 12 feet of ramp
- 24-inch rise → 24 feet of ramp
- 31-inch rise → 31 feet of ramp
If space is limited, a steeper 1.7:12 slope (~1:7) may be acceptable for assisted use only—but never exceed this without professional input. Steeper slopes are dangerous and not ADA-compliant.
Choose the Right Ramp Layout for Your Space
Not every home has room for a 30-foot straight ramp. When space is tight, consider alternative designs:
- L-shaped ramp: Includes a 90° turn with a 60″×60″ landing
- U-shaped ramp: Doubles back with two runs and one central landing
- Switchback ramp: Multiple turns for multi-level entries
One builder used a two-ramp system with a 40″×40″ platform to step down around an obstacle—proving flexibility is possible with smart planning. Use stakes and string lines to map your ramp’s path. Tie a line from the door frame to the ground, adjusting its height by subtracting the decking thickness (e.g., ¾”). This gives you the true ramp surface level and helps avoid costly mistakes.
Follow ADA and Safety Standards for Maximum Accessibility
Even for private homes, following ADA guidelines ensures safety, usability, and long-term compliance. These standards are based on decades of accessibility research.
Stick to a 1:12 Slope and Limit Rise Per Segment
- Maximum slope: 1:12 (1″ rise per 12″ run)
- Max rise per segment: 30″
- After 30″ of rise, install a level resting platform at least 60″ long
This prevents fatigue and allows users to rest mid-ramp.
Ensure Minimum Ramp Width is 36 Inches
The clear width between handrails must be at least 36 inches. That means your total ramp width should be 42 inches to allow:
– 1.5″ clearance between railing and structure
– 1.5″ for each 2×4 or 2×6 handrail
Narrower ramps (e.g., 31″) may fit tight doorways but can block wider mobility devices.
Install Level Landings at Critical Points
Landings are required at:
– Top and bottom of every ramp
– Any directional change (L, U, or switchback)
Minimum size:
– 60″ long × ramp width (straight ramps)
– 60″×60″ (for turns)
Ensure landings are level and allow full door swing—especially for outward-opening doors. Extend the landing 12″ beyond the door swing to prevent pinch points.
Choose Durable, Weather-Resistant Materials

Your material choice affects cost, durability, maintenance, and safety. The three most common options are wood, concrete, and aluminum.
Build with Pressure-Treated Wood for DIY Projects
Wood is the most popular DIY choice due to low cost and ease of use.
Recommended materials:
– Stringers: 2×8 or 2×10 pressure-treated lumber
– Decking: 5/4×6 or 2×6 boards, spaced ≤ 1/8″ apart
– Posts: 4×4 or 6×6 pressure-treated, set below frost line
– Fasteners: Exterior-grade galvanized screws (no nails)
Pros:
– Affordable ($100–$500)
– Easy to modify or repair
– Can build in modular sections
Cons:
– Requires annual sealing/staining
– Prone to rot, warping, insects
– Lifespan: 3–10 years depending on climate
❌ Never use 2×4s for joists—they lack strength under load.
Pour a Concrete Ramp for Permanent Access
For high-traffic or permanent use, concrete offers unmatched durability.
Steps:
1. Build wooden forms to shape the slope
2. Add rebar or wire mesh for strength
3. Pour and level concrete
4. Broom-finish surface for slip resistance
5. Cure for 7+ days before use
Pros:
– Lasts decades
– High weight capacity
– Minimal maintenance
Cons:
– Labor-intensive
– Not adjustable
– Can crack in freeze-thaw cycles
✅ Attach handrails using Kee Klamp fittings or concrete anchors.
Install Aluminum Modular Ramps for Quick Setup
Prefabricated aluminum ramps offer fast, low-maintenance solutions.
Features:
– Lightweight, corrosion-resistant
– Textured surface for grip
– Easy to assemble/disassemble
– Often ADA-compliant out of the box
Best for:
– Renters
– Temporary needs
– Homes with limited build space
💡 Smart move: Get a free quote for a permanent metal ramp before building DIY—sometimes it’s more cost-effective.
Build a Strong Frame with Proper Supports
The ramp’s structural integrity depends on solid footings, stringers, and joists.
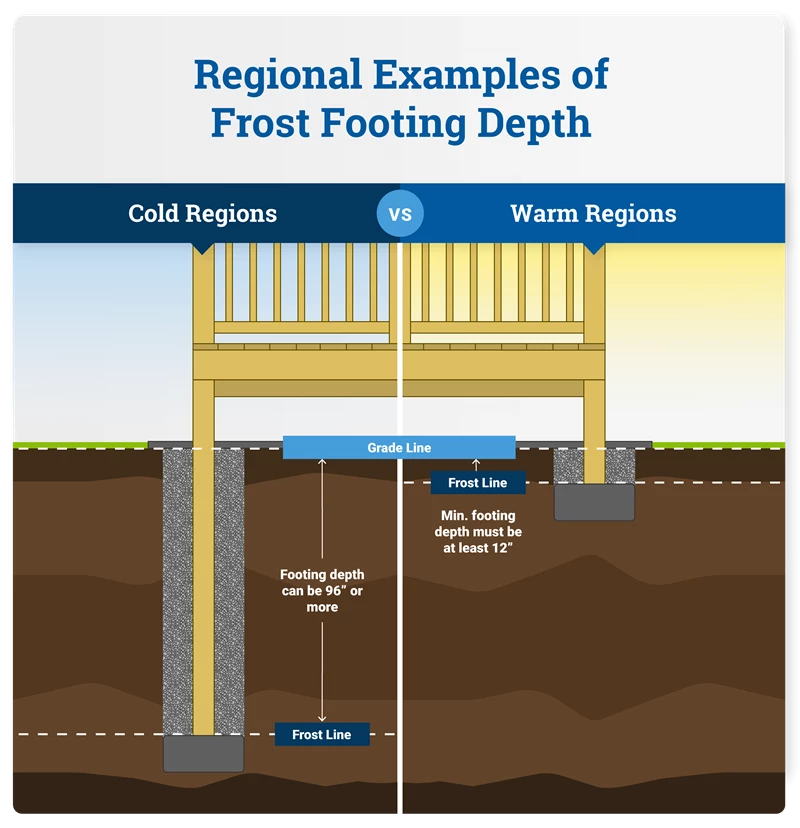
Dig Footings Below Frost Line to Prevent Shifting
To avoid winter heaving, set posts below the frost line (varies by region—check local code).
Steps:
1. Call 811 to mark underground utilities
2. Dig holes 8–12″ in diameter
3. Insert 4×4 or 6×6 pressure-treated posts
4. Fill with concrete; allow 24+ hours to cure
5. Space posts every 6–8 feet
Cross-brace posts for added stability.
Cut and Install Stringers with Precision
Stringers are the ramp’s backbone. Use 2×8, 2×10, or double 2×6 boards.
How to cut:
1. Use a speed square to mark a 1:12 angle (approx. 4.76°)
2. Cut the top and bottom ends
3. Notch (bird’s mouth) where needed to sit flush on posts
4. Attach with joist hangers or hurricane ties
Use three stringers for a 36″–42″ wide ramp.
Install Joists Every 16 Inches to Prevent Sagging
Attach 2×6 joists perpendicular to stringers, spaced no more than 16″ apart. This prevents sagging under load. Secure with exterior screws—never nails, which loosen over time. Add cross-bracing every 4 feet to resist lateral movement.
Install a Slip-Resistant Surface and Decking
The walking surface must be solid, smooth, and slip-resistant.
Lay Decking Boards Flush and Secure
Use 5/4×6 or 2×6 pressure-treated boards or ¾” exterior plywood/OSB.
Installation tips:
– Run boards lengthwise along the ramp
– Leave ≤ 1/8″ gap between boards for drainage
– Screw every board into every joist
– Bevel front edge to prevent tripping
One builder used leftover material to fill small gaps—smart and cost-effective.
Add Non-Slip Protection for All-Weather Safety
Slippery surfaces are dangerous, especially in rain or snow.
Options:
– Non-slip tape: Easy to apply; replace every 1–2 years
– Polyurethane + sand: Mix fine sand into finish for grip
– Roofing granules: Sprinkle on wet paint or sealer
– Textured paint: Use commercial non-slip coatings
– Heated mats: Prevent ice buildup in winter
✅ Winter tip: Install heated mats or plan for snow removal.
Install Handrails and Edge Guards for Safety
Handrails are required if the rise exceeds 6″ or the run is longer than 72″.
Mount Handrails at 34–38 Inches Above the Ramp
Height is critical:
– Minimum: 34″
– Maximum: 38″
– Use 2×4 or 2×6 lumber
– Install posts every 6–8 feet
– Secure with carriage bolts or heavy-duty brackets
Extend handrails at least 12″ beyond top and bottom of ramp.
Add Side Rails to Prevent Wheel Slippage
Install 2×6 edge guards along both sides to:
– Prevent wheels from slipping off
– Provide extra structural support
– Serve as secondary handholds
One builder added vertical legs and side rails—doubling down on safety.
Anchor the Ramp to Prevent Movement
A wobbly ramp is dangerous. Permanent anchoring prevents shifting.
Bolt Ramp to the House or Concrete Slab
Use:
– Concrete anchors (for slab or porch)
– Lag bolts (to secure to framing)
– Hurricane straps (to tie stringers to structure)
Ensure no movement when pushed. Test under load before final use.
Prevent Gaps at Transitions
Smooth transitions prevent tripping or catching.
- Top: Shim or notch ramp to meet threshold flush
- Bottom: Bevel leading edge or add small lip
- Landing joints: Align surfaces level—no step-ups
One builder fixed a ¾” gap by adding shims—simple fix, big safety win.
Maintain and Inspect Your Ramp Regularly
Even the best-built ramp degrades over time. Regular maintenance extends life and ensures safety.
Inspect Monthly for Damage
Check for:
– Loose screws or bolts
– Rot, warping, or splinters (wood)
– Rust (metal)
– Cracks (concrete)
– Worn non-slip surfaces
Tighten or replace components immediately.
Winterize for Snow and Ice
In cold climates:
– Shovel regularly
– Use calcium chloride (safe for concrete and metal)
– Avoid rock salt on aluminum
– Clear ice from handrails
– Wrap rails with foam for better grip
Have a backup entrance if possible.
Perform Annual Structural Checks
Once a year:
– Test handrail stability
– Recheck slope and level
– Reapply sealant or paint
– Confirm compliance with user’s needs
Know When to Hire a Professional
DIY is rewarding—but not always safe or legal.
Hire a Pro If:
- Rise exceeds 30″
- Complex design (switchbacks, multi-level)
- Local permits require engineered plans
- You lack tools or experience
- Frost depth or soil conditions are uncertain
💬 One builder said: “Post in your local Facebook group. Kind people exist!”
Many communities offer free or low-cost help through:
– Veterans organizations
– Churches
– Disability advocacy groups
– State ombudsman programs
Building a wheelchair ramp is more than a construction project—it’s an act of care. By following ADA standards, using strong materials, and prioritizing safety, you create not just access, but dignity and independence. Whether you build it yourself or get help, you’re building something far greater than wood and screws: you’re building freedom.