For individuals using wheelchairs, scooters, or walkers, a properly built ramp isn’t just a convenience—it’s a gateway to independence. A poorly designed ramp can be dangerous, difficult to navigate, or even unusable. That’s why wheelchair ramp design plans must go beyond basic construction and focus on safety, accessibility, and long-term durability.
Whether you’re building for a family member, client, or future home modification, this guide delivers step-by-step, ADA-compliant wheelchair ramp design plans grounded in real-world construction best practices. From calculating slope to choosing materials and avoiding common mistakes, you’ll gain everything needed to create a safe, accessible, and code-compliant ramp—whether it’s temporary or permanent.
Calculate Slope and Run Correctly
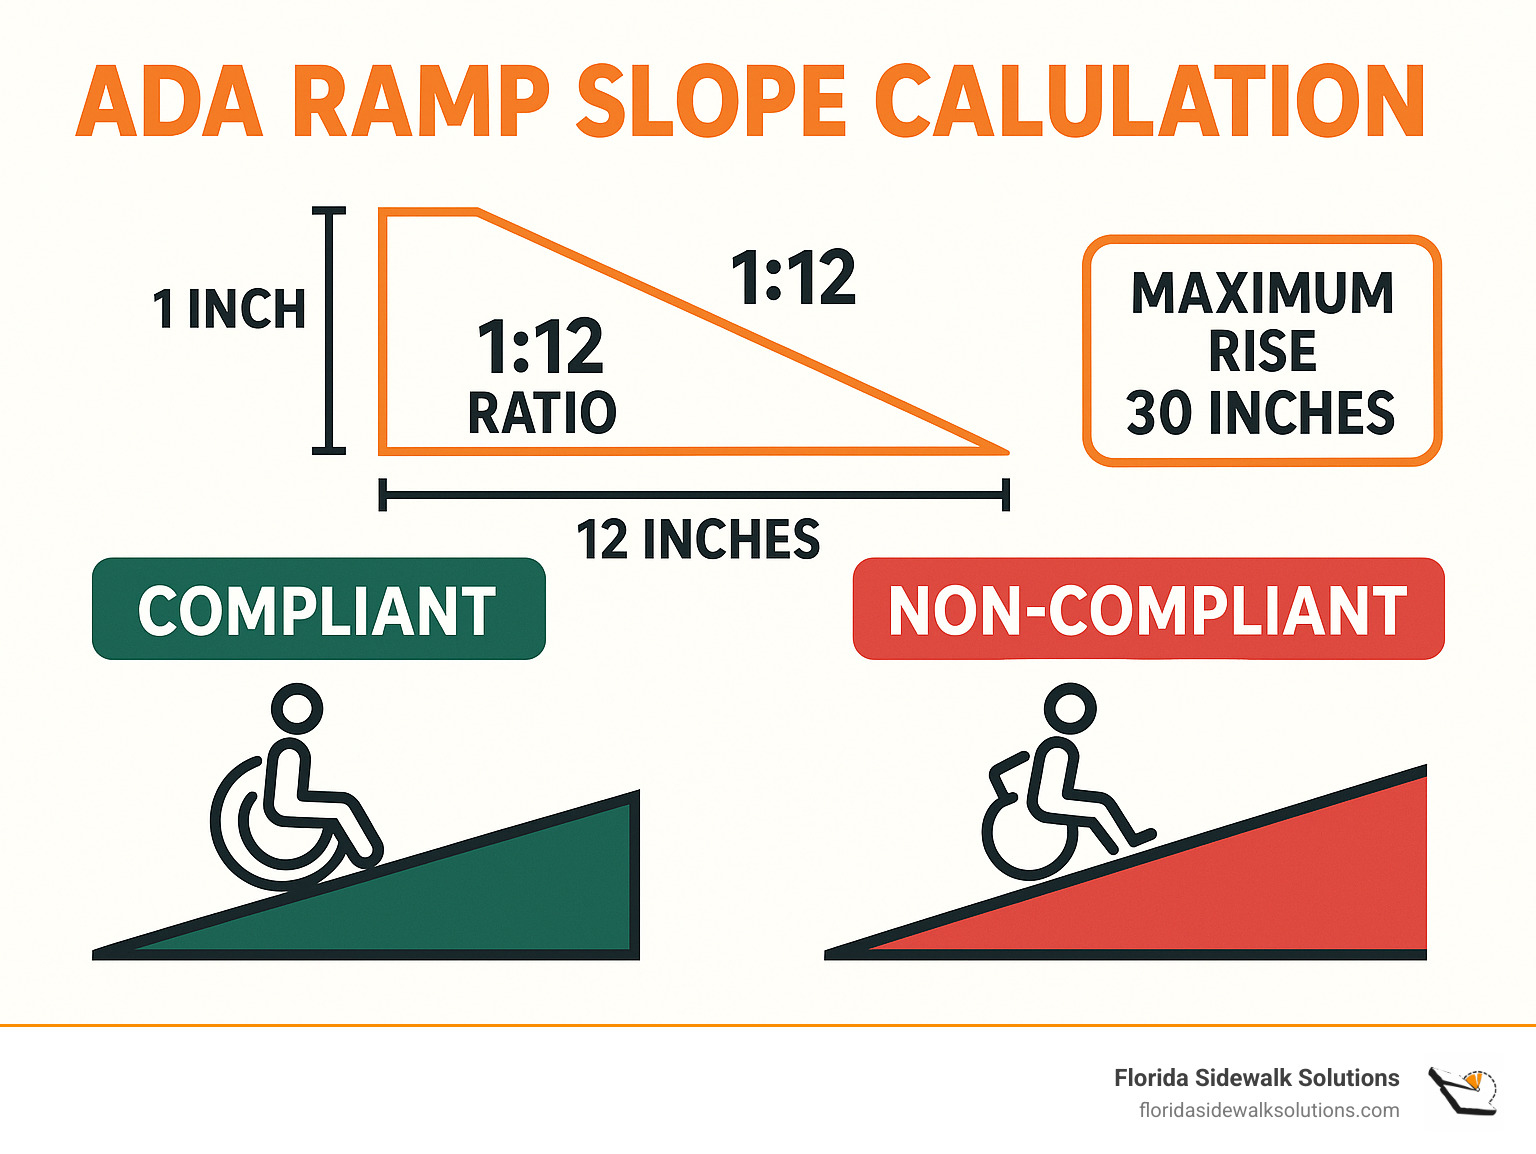
The most critical factor in any ramp is the slope. Get it wrong, and the ramp becomes unsafe or inaccessible.
Use the 1:12 Slope Rule
The ADA requires a maximum slope of 1:12—meaning every inch of vertical rise needs one foot of horizontal ramp. This ratio ensures safe, manageable access for manual and power wheelchair users.
- Example: A 24-inch rise requires a 24-foot run.
- Maximum single segment rise: 30 inches—after that, a level landing is required.
- Gentler alternative: Use a 1:20 slope (24″ rise = 40 ft run) if space allows, especially for users with limited upper-body strength.
Measure Rise Before Planning
Start by measuring the vertical distance from the ground to the threshold—including steps, landings, or uneven surfaces.
- Use a tape measure and level.
- Double-check your measurement—errors here affect the entire design.
- Include any changes in elevation near doors or porches.
Avoid Steeper Slopes
Ramps steeper than 1:12 are not ADA-compliant and pose serious risks:
– Manual wheelchairs may roll backward.
– Power chairs can overheat motors.
– Risk of tipping or falls increases dramatically.
Pro Tip: If space is limited, don’t shorten the ramp. Instead, use an L-shaped or switchback design to fit within your footprint.
Design Required Landings and Turns
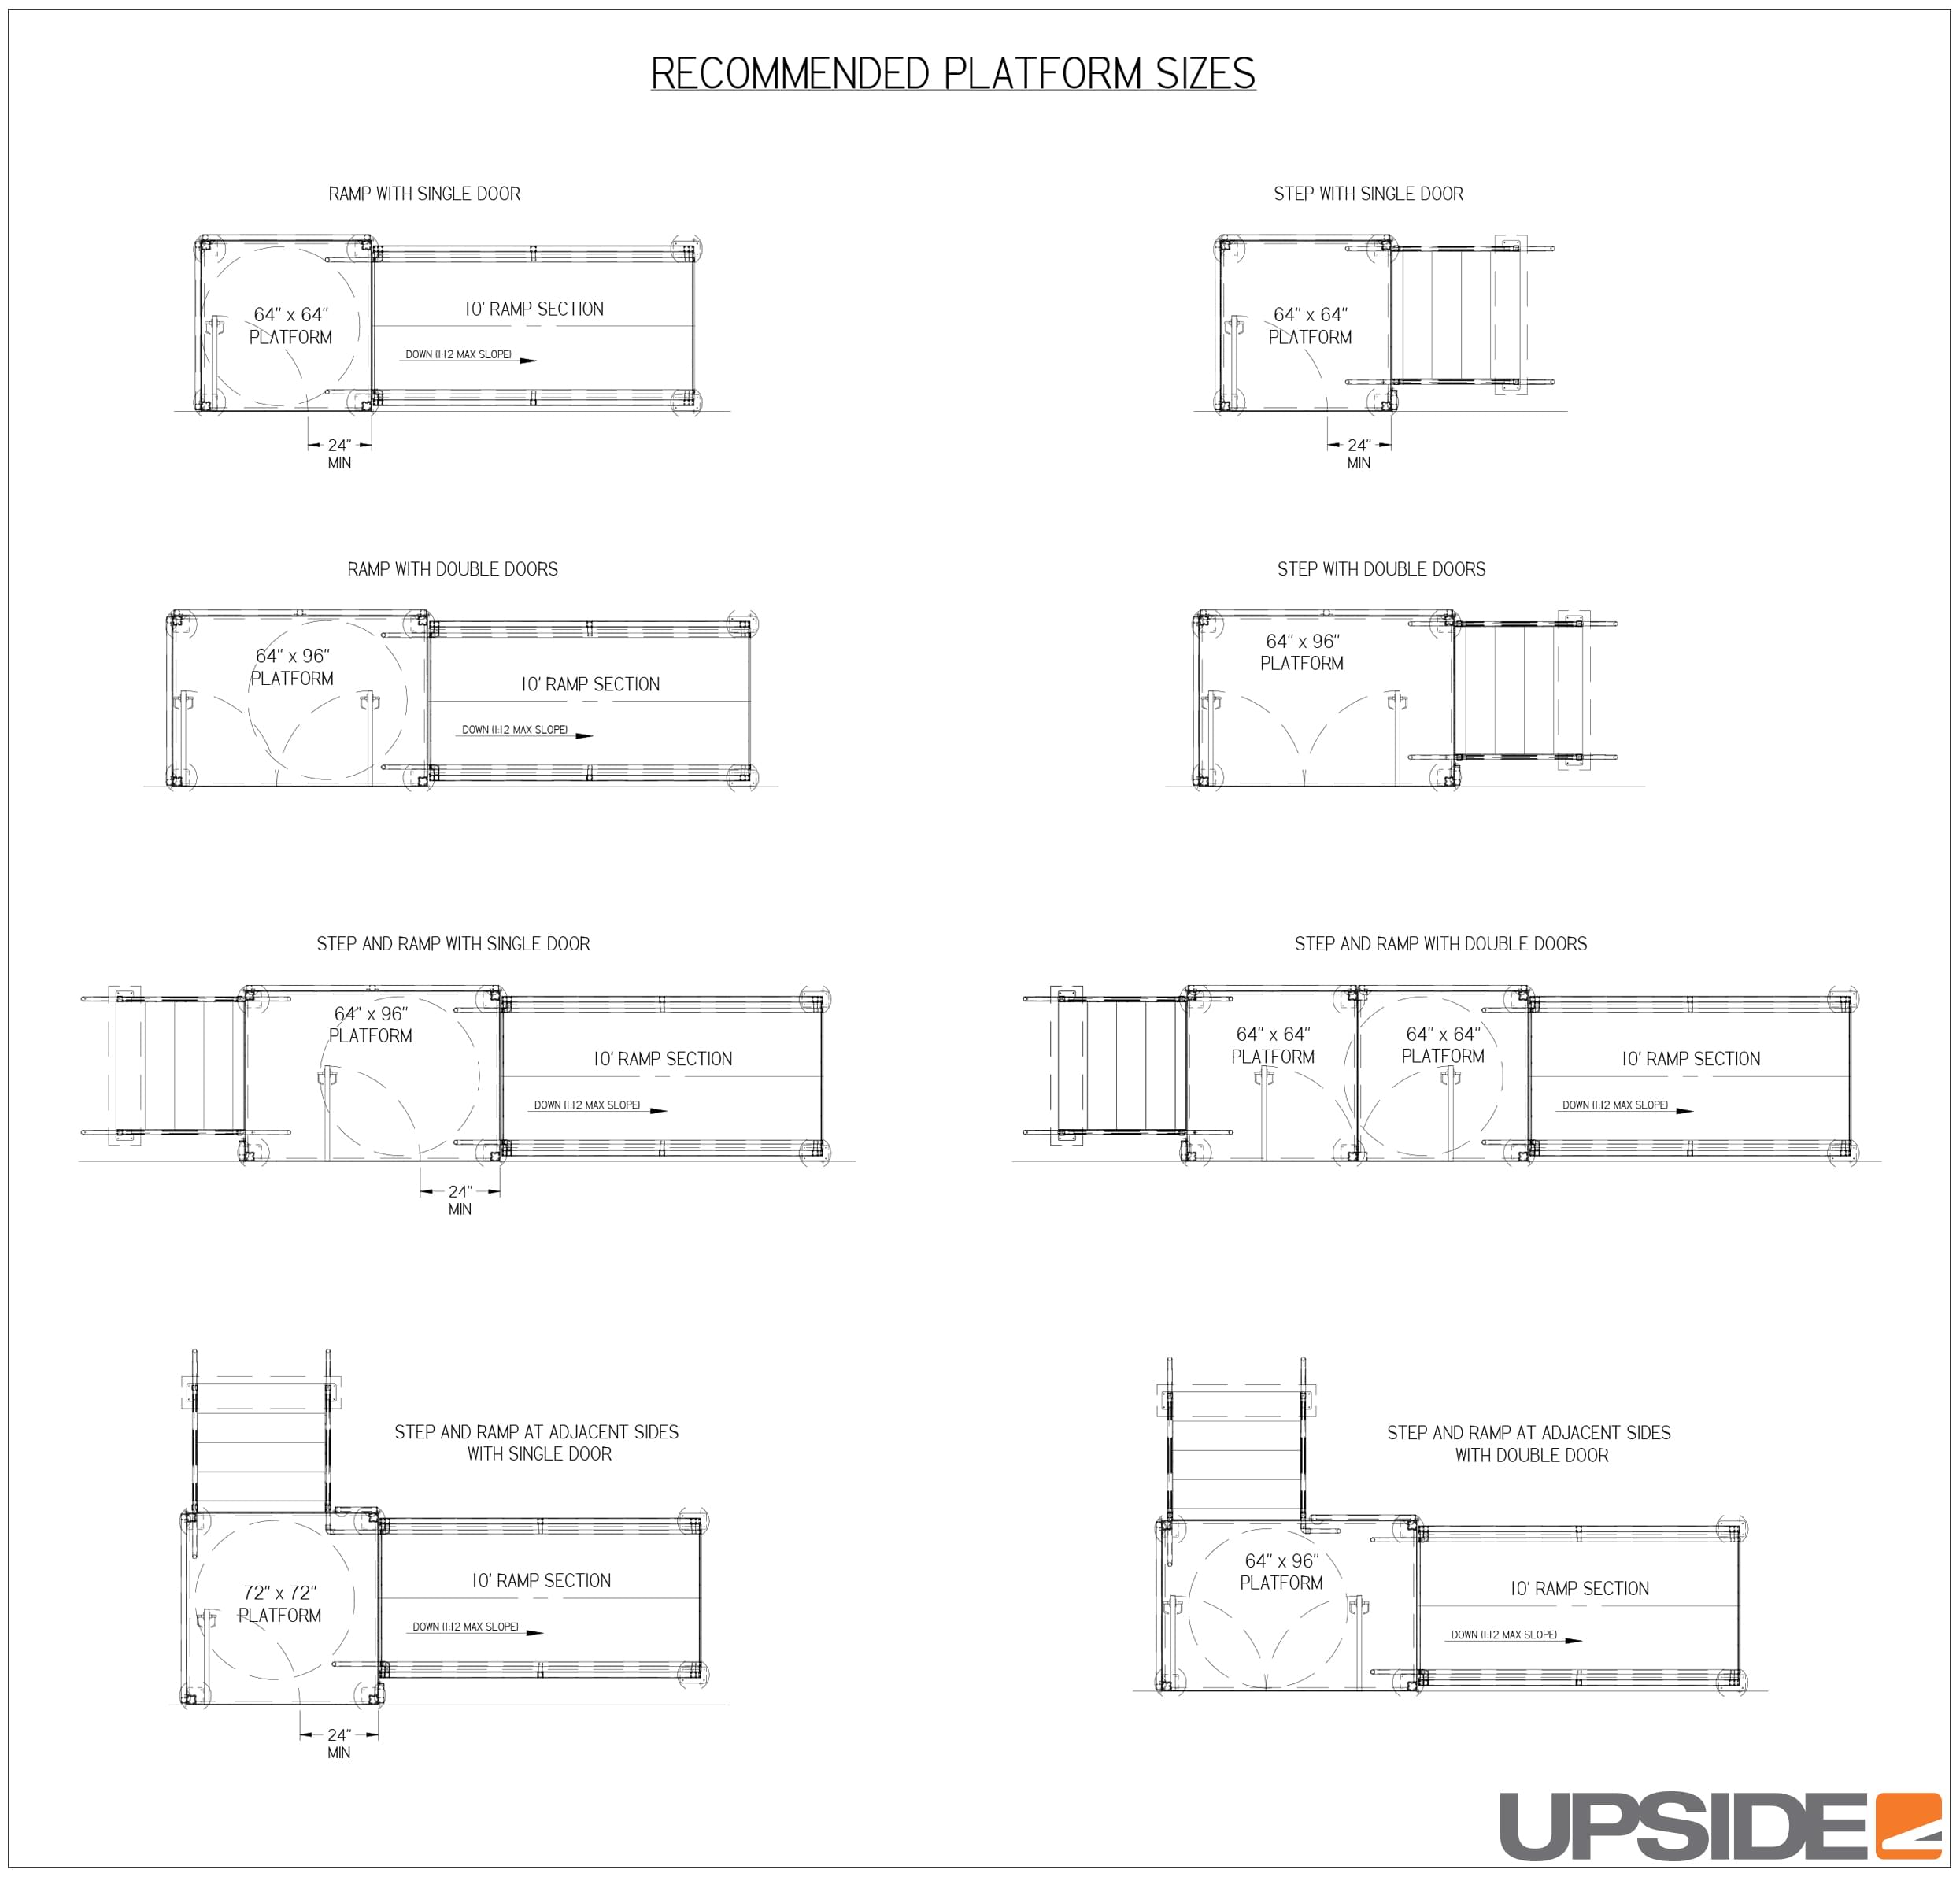
Landings are essential for safety, rest, and maneuverability—not optional add-ons.
Install Landings Every 30 Inches of Rise
After 30 inches of vertical climb, a level landing must be installed. This prevents fatigue and allows users to pause safely.
- Required for multi-segment ramps.
- Must be at least 60 inches long and as wide as the ramp.
Size Landings to Fit User Needs
- End landings (top and bottom): Minimum 60 inches long.
- Turning landings (L-shaped or U-turns): Must be 60×60 inches to allow a full 180° wheelchair turn.
- Ensure no obstructions interfere with turning radius.
Allow Door Swing Clearance
The top landing must accommodate door operation.
- For inward-swinging doors, allow at least 54 inches beyond the door swing.
- Outward-swinging doors don’t need extra space unless the threshold blocks access.
Warning: Never install a ramp directly against an outward-swinging door—users won’t be able to open it from the inside.
Choose the Right Ramp Width
Too narrow, and the ramp is hazardous. Too wide, and it wastes materials and space.
Minimum Clear Width: 36 Inches
This is the space between handrails, allowing standard wheelchairs (24–30 inches wide) to pass easily.
Build Structural Width: 42 Inches
To achieve a 36-inch clear width:
– Add 1.5-inch handrails on both sides.
– Include 1.5-inch clearance between rail and ramp edge.
– Total frame width = 42 inches.
Wider Ramps for Special Needs
Consider 48–60 inches wide if:
– Two-way traffic is expected.
– Bariatric wheelchairs or scooters will be used.
– Caregivers need side access for support.
Build a Stable Frame with Proper Support
A shaky or sagging frame compromises safety and longevity.
Use 6×6 Pressure-Treated Posts
- Why 6×6? Stronger than 4×4, allows notching for secure joist support.
- Set posts on concrete footings (5–6 inches thick).
- Never let wood touch soil—use gravel beds or piers to prevent rot.
Cut and Space Stringers Accurately
- Use 2×10 or 2×12 pressure-treated lumber.
- Space stringers 16–24 inches apart, closer for wider ramps.
- Mark 8.5-inch rise lines to account for 1.5-inch tread thickness.
Install Joists with Secure Fastening
- Use joist hangers and construction adhesive (PL Premium).
- Set joists inboard from frame edges to allow full hanger nailing.
- Space joists 16 inches on-center for even load distribution.
Expert Note: Always dry-fit the frame before final assembly. Misaligned stringers cause uneven slopes and instability.
Select Foundation Type: Permanent vs. Temporary
Your foundation determines the ramp’s lifespan and stability.
Permanent: Concrete Piers
- Best for long-term installations (10+ years).
- Requires excavation, formwork, and curing.
- Prevents settling and maintains slope over time.
- Ideal for homes with high usage or commercial access.
Semi-Permanent: Wooden Posts with Concrete Footings
- Posts rest on poured concrete slabs, not surrounded by concrete.
- Allows future removal without breaking concrete.
- Suitable for temporary ramps (4–6 year use).
- Lower cost, faster installation.
Avoid These Foundation Mistakes
- ❌ Resting posts directly on soil (leads to sinking).
- ❌ Using cinder blocks as supports (they crush under load).
- ❌ Skipping footings on slopes or clay soil.
Visual Cue: After rain, check for gaps under posts. If present, the foundation is failing.
Install a Slip-Resistant, Durable Surface
The ramp surface must remain safe in rain, snow, and ice.
Use 2×6 or 2×8 Decking Boards
- Pressure-treated wood: Cost-effective, lasts 10–15 years.
- Composite decking: Low-maintenance, rot-resistant, ideal for wet climates.
- Leave 1/8–1/4 inch gap between boards for drainage.
Add Diamond Plate at Transitions
- Install aluminum diamond plate at top and bottom.
- Provides superior traction on concrete, asphalt, or indoors.
- Notch decking boards so metal sits flush with surface.
- Secure with aluminum wedges to prevent springing.
Include Raised Edge Protection
- Use 2×12 fascia boards as raised ledges.
- Top edge should extend 1/2 inch above decking.
- Prevents wheels, crutches, or walkers from slipping off.
- Required by many local codes for ramps over 6 inches high.
Install Code-Compliant Handrails
Handrails are mandatory for safety and ADA compliance.
When Are Handrails Required?
- If rise > 6 inches.
- If ramp length > 72 inches.
- Required on both sides.
Set Handrail Height: 34–38 Inches
- Measure from ramp surface to top of rail.
- Ideal height: 36 inches (fits most users).
- Use 2×4 or 2×6 lumber for durability.
Add a Mid-Rail for Extra Safety
- Install a second rail 18–24 inches above surface.
- Prevents crutches or canes from slipping through.
- Adds structural rigidity at minimal cost.
Ensure Continuous Rail on Switchbacks
- Handrails must continue through turns without gaps.
- Use curved rails or mitered corners for smooth transitions.
- Ends should extend 12 inches beyond ramp start/end or return to post.
Warning: Gaps in handrails can cause falls. Never leave open sides on elevated ramps.
Choose the Right Ramp Configuration

Your space and rise determine the best layout.
Straight Ramp
- Best for: Low rises (10–24 inches), open entryways.
- Pros: Simple, fast to build.
- Cons: Needs long, unobstructed space.
L-Shaped (90° Turn)
- Includes one 60×60-inch landing.
- Breaks up long inclines.
- Reduces footprint by turning perpendicular to entry.
U-Shaped (Switchback)
- Two ramp runs with a central landing.
- Fits narrow lots or tight corners.
- Allows longer ramps in compact areas.
Modular/Sectional Design
- Built in pre-cut, bolt-together sections.
- Easy to assemble, disassemble, or relocate.
- Ideal for rentals, temporary use, or DIY kits.
Pro Tip: Use modular designs if you lack tools or experience. Many kits include all hardware and plans.
Compare Materials and Costs
Your material choices impact cost, durability, and maintenance.
Recommended Materials by Component
| Part | Material |
|---|---|
| Frame | 6×6 or 4×4 pressure-treated lumber |
| Stringers | 2×10 or 2×12 PT lumber |
| Decking | 2×6, 2×8, or composite boards |
| Handrails | 2×4 or 2×6 PT lumber |
| Footings | 5–6″ thick concrete slabs |
| Fasteners | Galvanized or stainless screws, bolts, joist hangers |
| Adhesive | PL Premium or equivalent |
Estimated DIY Costs (Materials Only)
- 10-foot ramp: ~$220 (no handrails)
- 16-foot ramp: ~$275
- With handrails and landing: Add $75–$120
- DIY kits: $300–$600 (pre-cut, no measuring)
Note: Contractor-built ramps cost 2–3x more but ensure code compliance and structural safety.
Avoid Common Design and Build Mistakes
Even small errors can make a ramp unsafe.
❌ Incorrect Slope
- Too steep = unusable.
- Too shallow = wastes space and materials.
- Fix: Recalculate rise and run using 1:12 ratio.
❌ Missing Landings
- No rest platform after 30″ rise = fatigue risk.
- Fix: Add 60″×60″ landing at every 30″ vertical gain.
❌ Poor Foundation
- Posts in dirt = settling and slope change.
- Fix: Use concrete footings or piers.
❌ No Edge Protection
- Open sides = wheel slippage.
- Fix: Install 2×12 fascia as raised ledge.
❌ Gaps in Handrails
- Breaks in rail = fall hazard.
- Fix: Ensure continuous handrails on both sides.
Get Free Design Help and Resources
You don’t have to figure it out alone.
Free Phone Consultation
- Call (913) 553-1488 (7 days/week, 9 a.m. – 7 p.m. CST).
- Experts provide custom ramp plans based on your site.
- Free handrail plans and documentation available.
Downloadable Plans and Videos
- Access Ramp Plans (PDF): 4-part detailed guide.
- Video Tour: “Wheelchair Access Ramp Plans Tour” shows real builds.
- Construction Videos: Step-by-step assembly for pre-cut kits.
Use This If: You’re unsure about layout, slope, or materials.
Final Checklist: Is Your Ramp Safe and Compliant?
Before finalizing your build, verify these key points:
- ✅ Slope is 1:12 or gentler.
- ✅ Rise per segment ≤ 30 inches.
- ✅ Landings are 60×60 inches for turns, 60″ long at ends.
- ✅ Width is at least 42 inches (36″ clear between rails).
- ✅ Handrails are 34–38 inches high, on both sides.
- ✅ Surface is slip-resistant with diamond plate at transitions.
- ✅ Edge has raised fascia to prevent falls.
- ✅ Foundation uses concrete footings or piers.
- ✅ No gaps in structure or handrails.
Final Note: A well-designed wheelchair ramp restores independence and ensures safe access for years. Always check local codes—they may exceed ADA standards. When in doubt, consult a professional or use free design support. Even “temporary” ramps should be built to last—because they often become permanent. With the right wheelchair ramp design plans, you’re not just building a ramp—you’re building freedom.