Transferring from a wheelchair to a toilet is one of the most essential—and challenging—daily tasks for individuals with mobility impairments. Done incorrectly, it can lead to falls, back injuries, or loss of dignity. But with the right technique, tools, and preparation, this transfer can be performed safely, smoothly, and independently. Whether you’re a caregiver or managing your own transfers, knowing how to move from wheelchair to toilet correctly is critical for safety, comfort, and long-term well-being. This guide breaks down every step, from positioning and body mechanics to assistive devices and emergency planning—so you can approach each transfer with confidence.
Prepare the Bathroom for a Safe Transfer
Before any movement begins, the environment must be set up to minimize risks and maximize control.
Clear the Path and Ensure Space
Remove rugs, bathmats, and any obstacles between the wheelchair and toilet. These items create tripping hazards, especially during pivoting. Make sure there’s at least 30 inches of clearance around the toilet to allow room for maneuvering and turning. A clutter-free space reduces hesitation and increases stability.
Position the Wheelchair at the Right Angle
Angle the wheelchair 45° to 90° relative to the toilet. A 90-degree angle often works best, allowing a clean pivot to the stronger side. Push the chair as close as possible—ideally, the armrest should nearly touch the toilet seat. This minimizes the distance the person must move, reducing strain and fall risk.
Lock Brakes and Remove Footrests
Always lock both wheelchair brakes before starting. Then, swing or remove the footrests completely. Leaving them in place can block leg movement and cause instability when standing. This simple step prevents many common transfer accidents.
Use Proper Body Mechanics to Prevent Injury
Safe transfers protect both the person moving and the caregiver. Using correct body mechanics is non-negotiable—especially for caregivers who perform this task repeatedly.
Stand on the Weaker Side for Maximum Support
Position yourself on the side of the person with less strength or mobility. If their right leg is weaker, stand to their right. This lets you support their most unstable side during the stand and pivot. It also helps you guide their movement more effectively.
Use a Gait Belt for Secure Control
A gait belt (or transfer belt) is one of the most important tools in safe transfers. Fasten it snugly around the person’s waist, over clothing. Grip the belt—not their arms, clothing, or shoulders—during the transfer. This gives you secure control, reduces strain, and prevents sudden slips.
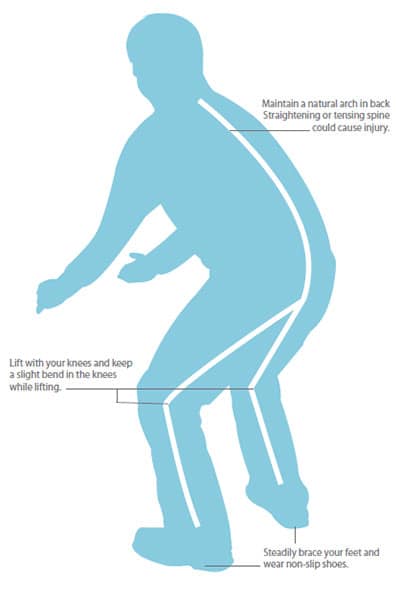
Lift with Your Legs, Not Your Back
Never bend at the waist. Stand with feet shoulder-width apart, knees slightly bent. Keep the person close to your body and use your leg muscles to lift, not your back. This protects your spine and provides smoother, stronger support. Remember: the goal is to assist, not carry. The person should push up with their arms while you guide and stabilize.
Perform the Transfer: Step by Step
With everything in place, follow these steps to safely move from wheelchair to toilet.
Scoot Forward and Get Ready
Have the person scoot to the front edge of the wheelchair seat. Feet should be flat on the floor, knees bent at 90 degrees. Instruct them to lean slightly forward and place hands on the armrests or your forearms—never on your shoulders. This forward lean shifts their center of gravity and makes standing easier.
Stand Together on a Count
Place your hands on the gait belt. Say “1, 2, 3” and coordinate the lift. On “3,” the person pushes up with their arms while you assist by lifting with your legs. Keep your back straight and guide them upward in one smooth motion. Avoid jerking or rushing—control is key.
Pivot Toward the Stronger Side
Once standing, pivot the person in small steps, turning them toward their stronger side. Keep your knee lightly in front of their weaker knee to prevent buckling. Move slowly—don’t rush the turn. Maintain close contact and steady support throughout the pivot.
Lower Onto the Toilet Gently
When the toilet is behind their legs, guide them to sit by bending your knees and lowering them slowly. Let them reach back with one hand at a time to feel for the seat. Ensure they are fully seated before releasing support. This prevents sudden drops and maintains dignity.
Return to the Wheelchair Safely
The transfer back to the wheelchair carries the same risks—especially if fatigue sets in.
Reapply Clothing and Scoot Forward
Help reposition undergarments if needed. Have the person scoot to the front of the toilet seat and lean slightly forward. This shifts their center of gravity toward you, making the stand easier. Ensure privacy when possible, but remain nearby and attentive.
Stand and Pivot Back
Use the same technique: grip the gait belt, keep your back straight, lift with your legs. Pivot back in small steps until the wheelchair touches the back of their legs. Keep communication clear—let them know each step as it happens.
Sit Down Slowly
Guide them to lower themselves gently into the seat. Once fully seated, replace the footrests and unlock the brakes only after they’re stable. Rushing this final step can undo an otherwise perfect transfer.
Use Assistive Devices When Needed

Not all transfers can be done manually. Devices can make the process safer, easier, and more independent.
Install Grab Bars for Stability
Mount horizontal and vertical grab bars near the toilet (33–36 inches from the floor). These give the person something strong to hold during standing and sitting. Never rely on towel bars or toilet paper holders—they can’t support body weight.
Try a Transfer Board for Sliding
If the person has good upper body strength, a transfer board (like a Beasley board) allows sliding from wheelchair to toilet. Works best with a drop-arm wheelchair and commode. Requires practice and proper positioning.
Consider a Mechanical Lift
For those who can’t bear weight or assist in transfers, a Hoyer or ceiling lift is the safest option.
When to Use a Lift
- No leg strength or balance
- Caregiver at risk of back injury
- Two-person transfers aren’t possible
- Fear or pain during manual transfers
Benefits of Lift Systems
- Single caregiver can perform transfer
- Reduces fall risk by over 70%
- Preserves dignity with toileting slings
- Medicare may cover with doctor’s prescription
Adapt for Special Needs
Every individual’s abilities are different. Adjust techniques based on strength, cognition, and fatigue.
Limited Upper Body Strength
If the person can’t push up from armrests, a mechanical lift is required. Two caregivers may attempt a stand-pivot transfer only if both are trained and the person can bear partial weight.
Cognitive Impairment
For individuals who can’t follow instructions (e.g., dementia), use a two-person transfer team. One caregiver leads the movement, the other supports from behind. A gait belt or lift is essential.
Manage Fatigue and Timing
Strength often dips in the afternoon or after meals. Schedule transfers during peak energy times, like morning. Watch for signs of dizziness or weakness—delay the transfer if needed.
Dress for Easy Transfers
Clothing matters. Hard-to-remove pants increase struggle and risk.
Choose Adaptive Clothing
Use pants with elastic waistbands, Velcro closures, or side snaps. These allow quick removal without full undressing. Avoid belts or tight jeans.
Use Disposable Undergarments at Night
For nighttime toileting, consider incontinence products or bedside commodes. This reduces risky transfers in low light or when fatigued.
Train with Professionals
Most caregivers learn transfer techniques on the job—without training. That’s dangerous.
Get Help from Therapists
Work with an occupational therapist (OT) or physical therapist (PT). They’ll teach:
– Correct body mechanics
– Safe use of gait belts and lifts
– Emergency response if a fall occurs
Practice Regularly
Even with training, skills fade. Rehearse transfers weekly, especially if using a lift or transfer board. Make sure all caregivers use the same method.
Prevent Caregiver Injury
Caregivers lift the equivalent of over 100 pounds during transfers. Without protection, back injuries are common.
Rotate Caregiving Duties
Transfers are physically taxing. Share responsibilities among family or hire professional aides. For full-time care, two aides may be needed.
Use Equipment to Reduce Strain
A gait belt reduces strain by up to 30%. A ceiling lift reduces injury risk by over 70%. Invest in tools that protect your health.
Know When to Skip the Transfer
Sometimes, safety means avoiding the transfer altogether.
Use Bedside Commodes
A bedside commode can be placed next to the bed. The person transfers once—into the commode—without needing to reach a bathroom.
Try Urinals or Bedpans
For high-risk individuals, use urinals (for men) or bedpans during nighttime or when weak. Reduces fall risk and caregiver strain.
Install a Ceiling Lift in the Bathroom
For long-term care, a Voyager ceiling lift with a toileting sling allows direct transfer over the toilet. No manual lifting required. Requires installation but pays off in safety and independence.
Summary: Best Practices Checklist
| Action | Why It Matters |
|---|---|
| Lock wheelchair brakes | Prevents rolling during transfer |
| Remove footrests | Eliminates tripping hazard |
| Use a gait belt | Improves grip, reduces injury |
| Lift with legs, not back | Prevents caregiver back strain |
| Pivot to stronger side | Increases balance and control |
| Install grab bars | Provides stable support |
| Train with a therapist | Builds safe, confident technique |
| Consider a lift system | Essential for non-weight-bearing users |
Moving from a wheelchair to a toilet doesn’t have to be dangerous or stressful. With the right preparation, technique, and tools, transfers can be safe, dignified, and repeatable. Whether you’re using a gait belt, grab bars, or a full lift system, the goal is the same: protect both the individual and the caregiver. Start with proper training, use the equipment available, and never hesitate to choose a safer alternative. Your health—and theirs—depends on it.