If you’re wondering how to build a wheelchair ramp over stairs, you’re likely looking for a solution that restores mobility and independence—whether for a loved one recovering from surgery, a family member with a disability, or an aging parent. A properly built ramp eliminates the need for dangerous stair navigation and allows safe, effortless access to the home. The good news is that with accurate measurements, the right materials, and a clear plan, you can build a durable, code-compliant ramp yourself. This guide walks you through every step—from measuring your stairs and choosing between a DIY wooden ramp or modular system, to installing handrails, landings, and non-slip surfaces. Whether you need a temporary fix or a long-term accessible entryway, you’ll learn how to do it safely, affordably, and correctly.
Measure the Staircase Rise and Run
Before buying materials or breaking ground, precise measurements are essential. The vertical height and horizontal space available will dictate your ramp’s design and compliance with safety standards.
Determine Total Vertical Rise
Use a tape measure to find the distance from the ground to the top landing—typically the doorstep or porch floor. Measure at the center and both ends, as uneven surfaces can affect the final build. This number is crucial: every inch of rise requires one foot of ramp under ADA guidelines.
Example: A 24-inch rise = 24 feet of ramp (minimum), not including landings.
Calculate Required Ramp Length
Follow the 1:12 slope rule:
– For every 1 inch of vertical rise, you need 12 inches (1 foot) of horizontal run.
– This ensures a safe incline that manual and power wheelchairs can navigate.
Pro Tip: If space is limited, consider an L-shaped or U-shaped ramp to reduce linear footprint.
Choose the Right Ramp Type

Your choice depends on budget, space, frequency of use, and whether the solution is temporary or permanent.
Portable Folding Ramps
Ideal for short-term needs or travel, these lightweight ramps fold for storage. Made from aluminum or composite materials, they’re placed over stairs and removed after use.
- Best for: 1–3 steps, occasional access
- Pros: No installation, affordable ($100–$500)
- Cons: Not slip-resistant in rain, can shift under load
Warning: Never rely on a portable ramp in icy or wet conditions without added traction.
Modular Aluminum Systems
Pre-engineered kits snap together to form durable, weather-resistant ramps. They include handrails, landings, and non-slip surfaces.
- Best for: Permanent home access, ADA compliance
- Pros: Corrosion-resistant, 25+ year lifespan
- Cons: Expensive ($2,000–$10,000+ with installation)
Pro Tip: Some suppliers offer custom configurations for complex staircases.
DIY Wooden Ramps
Custom-built from pressure-treated lumber, these are the most cost-effective permanent option.
- Best for: Full-time wheelchair users, code-compliant builds
- Pros: Fully customizable, sturdy, long-lasting (10–15 years)
- Cons: Labor-intensive, requires carpentry skills
Plan the Ramp Layout and Shape

Once you know your rise and available space, decide on the ramp’s shape. This affects footprint, usability, and structural design.
Straight Ramp Design
A single continuous slope from ground to door.
- Requires: Long, clear path
- Best when: You have ample front yard space
- Advantage: Simplest to build and navigate
Note: If the rise exceeds 30 inches, a resting landing is required mid-run.
L-Shaped (Quarter-Turn) Ramp
Uses a 90° turn with a central landing.
- Requires: At least a 60″ x 60″ turning platform
- Best when: Space is narrow but deep
- Advantage: Reduces forward run by 50%
Key: Ensure landing is level and large enough for wheelchair turning.
U-Shaped (Switchback) Ramp
Two parallel runs connected by a central landing.
- Requires: Wide side yard or courtyard
- Best when: High rise (e.g., 3+ steps) and limited depth
- Advantage: Maximizes rise while minimizing footprint
Warning: Handrails must extend 12 inches beyond top and bottom for safety.
Prepare the Site and Ground
A stable foundation is essential. Even the strongest ramp will fail on soft, uneven, or poorly drained soil.
Clear and Level the Area
Remove vegetation, rocks, and debris. Use a shovel and rake to grade the soil, sloping it slightly away from the house to prevent water pooling.
Tip: Lay down landscape fabric to inhibit weed growth under wooden ramps.
Check for Drainage Issues
Standing water weakens wood and creates slip hazards. If the area tends to flood:
- Install a French drain along the ramp edge
- Use gravel base (4–6 inches) under supports
- Elevate the ramp slightly above ground level
Mark Layout with Batter Boards
Set up wooden stakes and string lines at top and bottom to outline the ramp’s path. Use a 4-foot level to confirm slope accuracy before digging.
Visual Cue: String should drop exactly 1 inch for every 12 inches of horizontal distance.
Install Footings and Supports
Structural integrity starts underground. Improper footings lead to shifting, sagging, or collapse—especially in freeze-thaw climates.
Dig Below Frost Line
Holes must extend below the local frost depth (typically 36–48 inches). This prevents heaving during winter.
- Diameter: 8–12 inches
- Spacing: Every 4–6 feet along ramp and landing
- Reinforcement: Insert rebar for added strength
Pour Concrete Footings
Mix and pour concrete into each hole. Insert galvanized post anchors before the concrete sets.
- Allow 24–48 hours to cure
- Check anchors with level—must be perfectly aligned
Warning: Never attach posts directly to concrete without anchors—this risks rot and instability.
Secure Vertical Posts
Use 4×4 or 6×6 pressure-treated posts. Cut to length, attach to anchors, and brace with temporary 2x4s until the frame is complete.
Pro Tip: Wrap post bases with roofing felt to reduce moisture absorption.
Frame the Ramp and Landings

The frame carries the load. Precision here ensures a smooth, safe ride.
Cut and Install Stringers
Stringers are the diagonal beams that support the ramp’s slope. Use 2×10 or 2×12 pressure-treated lumber.
- Cut to match rise and run
- Attach at top to house ledger and bottom to support post
- Secure with structural screws or through-bolts
Visual Cue: Stringers should be parallel and plumb when viewed from the side.
Add Joists and Cross Bracing
Install 2×6 or 2×8 joists perpendicular to stringers, spaced 16 inches on center.
- Use joist hangers for secure connections
- Add diagonal 2×4 braces under long spans for lateral stability
Warning: Gaps or loose joints cause flexing—dangerous for power wheelchairs.
Build Landing Platforms
Construct frames for top, bottom, and intermediate landings using 2×6 joists.
- Must be 60 inches long and as wide as the ramp
- Attach to support posts; ensure perfectly level
- Reinforce corners with angle brackets
Install the Ramp Surface
The walking surface must be firm, stable, and slip-resistant in all weather.
Choose Decking Material
| Material | Pros | Cons |
|---|---|---|
| 5/4×6 Pressure-Treated Wood | Affordable, easy to work with | Requires sealing, can warp |
| Composite Decking | Low maintenance, slip-resistant | More expensive |
| Aluminum Treads | Rust-proof, pre-textured | Higher cost |
Lay and Secure Decking Boards
- Stagger joints to avoid weak spots
- Leave 1/8-inch gap between boards for drainage
- Use exterior-grade screws (3-inch), not nails
Pro Tip: Run boards lengthwise along the ramp—never crosswise.
Add Non-Slip Features
Even dry wood can be slick. Enhance traction with:
- Adhesive grit tape (black or silver)
- Textured paint (epoxy with sand mix)
- Aluminum nosing strips on edges
- Router-cut grooves in wood (1/4″ deep, 2″ apart)
Critical: Cover all surfaces—including landings and transitions.
Install Handrails and Edge Protection
Handrails are not optional for safe, independent use.
When Are Handrails Required?
- Rise exceeds 6 inches
- Ramp length exceeds 72 inches
- User has balance or mobility challenges
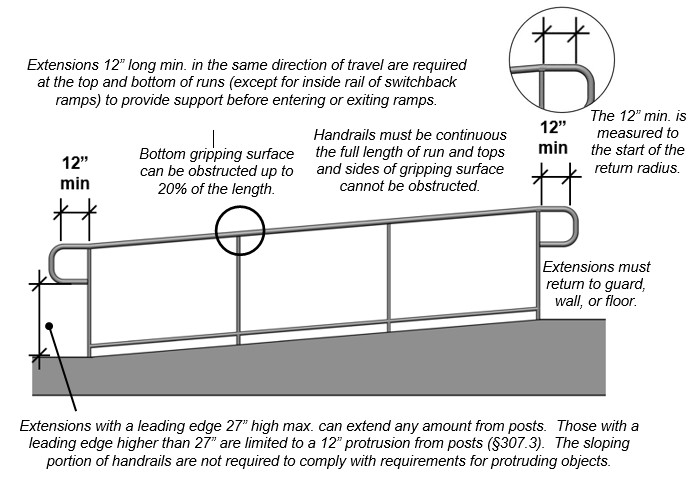
Build Code-Compliant Handrails
- Height: 34 to 38 inches above surface
- Diameter: 1.25 to 2 inches for easy grip
- Continuous: No breaks along the full ramp length
- Extend 12 inches beyond top and bottom—return to wall or post
Pro Tip: Use pre-bent handrail kits for corners to ensure smooth transitions.
Add Guardrails and Curbs
Prevent wheels from slipping off the side.
- Curbs: 4-inch minimum height on both edges
- Balusters: If ramp is over 30 inches high, add spindles or mesh
- Gaps: No more than 4 inches between verticals
Warning: Open edges are a major fall risk—never skip edge protection.
Finalize Landings and Transitions
Landings are rest zones and turning points. They must be safe and functional.
Top Landing Requirements
- Size: 60″ x ramp width (minimum)
- Clearance: Must accommodate door swing—don’t block entry
- Surface: Level, no thresholds or bumps
Tip: Extend landing slightly under roof overhang for weather protection.
Bottom Landing Setup
- Place on solid, level ground
- Avoid grass or soft soil—use pavers or concrete pad
- Ensure clear path to sidewalk or driveway
Intermediate Rest Platforms
Required after every 30 inches of vertical rise.
- Allow user to pause safely
- Enable direction changes
- Must be level and obstacle-free
Visual Cue: If the ramp climbs more than waist-high, it needs a landing.
Test and Inspect the Ramp
Before first use, conduct a full safety check.
Perform a Stability Test
- Walk the ramp and apply weight to joints
- Push on handrails—no wobbling or flexing
- Check posts for movement
Fix any loose screws, brackets, or braces immediately.
Verify Slope and Dimensions
Use a level to confirm the 1:12 ratio. Measure:
- Ramp width (minimum 36″ between handrails)
- Handrail height (34–38″)
- Landing sizes (60″ minimum)
Simulate Real-Use Conditions
Have someone test it in a wheelchair or scooter.
- Approach straight on
- Use handrails for balance
- Engage brakes when stopping
- Test in dry and wet conditions (if possible)
Note: Users should feel secure and in control at all times.
Maintain the Ramp Year-Round
Even the best-built ramp degrades without care.
Monthly Inspection Checklist
- Loose screws or bolts – tighten as needed
- Rot, warping, or rust – replace damaged parts
- Worn non-slip surfaces – reapply tape or paint
- Handrail stability – check anchors and connections
- Debris buildup – remove leaves, snow, ice
Annual Maintenance Tasks
- Reapply water sealant (wood ramps)
- Clean surface with mild detergent
- Check footings for settling or cracking
- Inspect for insect damage (termites, carpenter ants)
Pro Tip: Schedule maintenance each spring and fall.
Safety Tips for Ramp Users
A safe ramp requires safe use.
Do’s and Don’ts
✅ Do:
– Approach ramp straight on
– Use handrails for balance
– Keep tires inflated and in good condition
– Clear snow and ice before use
❌ Don’t:
– Use in icy conditions without traction aids
– Carry passengers or overload beyond capacity
– Angle across the ramp—this increases tipping risk
– Leave obstacles on landings
Critical: Always engage wheelchair brakes when stopped.
Cost Comparison and Budgeting
Know what you’re investing in.
| Type | Material Cost | Labor | Lifespan |
|---|---|---|---|
| DIY Wooden Ramp | $200–$800 | DIY or $1,500 pro | 10–15 years |
| Portable Aluminum | $100–$500 | None | 5–10 years |
| Modular System | $2,000–$8,000 | $1,000–$3,000 | 25+ years |
Note: Some Medicaid waivers, veterans benefits, or nonprofits (e.g., Rebuilding Together) offer financial assistance.
Final Recommendations
Building a wheelchair ramp over stairs is more than a construction project—it’s a step toward independence. Here’s how to get it right:
- For emergencies: Use the 30-minute plywood and 2×4 method—fast, strong, and effective.
- For daily use: Build a pressure-treated wooden ramp with concrete footings and handrails.
- For zero maintenance: Invest in a modular aluminum system.
- Always follow ADA guidelines—even if not legally required for homes.
- When in doubt, consult a professional—especially for high rises or complex layouts.
A well-built ramp isn’t just wood and screws. It’s dignity. It’s access. It’s peace of mind. Build it safe. Build it right.