Imagine trying to use the bathroom but being blocked by a narrow doorway, struggling to reach the sink, or fearing a fall every time you transfer to the toilet. For millions of Americans who use wheelchairs—whether temporarily or permanently—these aren’t hypothetical concerns. They’re daily realities. A thoughtfully designed wheelchair accessible bathroom removes these barriers, promoting safety, dignity, and independence. With 80% of home falls occurring in the bathroom, accessibility isn’t just a convenience—it’s a necessity.
Creating an accessible bathroom doesn’t mean sacrificing style for function. Today’s designs blend ADA-compliant standards with modern aesthetics, turning what could be a clinical space into a warm, inviting, and highly functional retreat. Whether you’re planning an aging-in-place remodel, adapting a home for a loved one, or building new, this guide delivers practical, code-informed wheelchair accessible bathroom ideas that balance safety, usability, and beauty.
Widen Doorways for Seamless Entry
Expand to 36 Inches for Optimal Access
The first step in any accessible bathroom remodel is ensuring the doorway allows easy passage. While the ADA requires a minimum 32-inch clear width, experts recommend 36 inches to accommodate wheelchairs and provide room for turning. That extra 4 inches can make the difference between a tight squeeze and smooth, stress-free access.
Widening a doorway typically costs $1,000 to $3,000, depending on wall structure and whether studs need reinforcement. If you’re moving plumbing or reconfiguring walls, it’s best to address this early in the renovation process.
Choose the Right Door Type
Swinging doors eat up valuable floor space. Instead, consider:
– Pocket doors: Slide into the wall, eliminating swing radius.
– Barn doors: Mount on external tracks—stylish and space-saving.
– Outward-swinging doors: Critical for safety, allowing emergency access if someone falls inside.
Avoid inward-swinging doors in compact layouts. All doors should have a minimum 80-inch height clearance and lever-style handles—easier to operate with limited hand strength or dexterity.
Maximize Layout With Smart Clearances
Ensure a 60-Inch Turning Radius
A 60-inch diameter clear floor space is essential for a wheelchair to turn 180 degrees. This isn’t optional—it’s a cornerstone of accessible design. In smaller bathrooms (like a 5’ x 8’ powder room), achieve this by:
– Using wall-mounted toilets and floating vanities.
– Arranging fixtures in an L- or U-shape.
– Eliminating floor clutter like rugs and baskets.
Measure from wall to wall, accounting for all fixtures. Even a small obstruction can disrupt maneuverability.
Maintain Minimum Clearance Around Fixtures
Each fixture needs dedicated space:
– Toilet: 30″ x 48″ in front, with 30″ clearance on the transfer side.
– Sink: Same front clearance, plus knee space underneath.
– Shower: At least 30″ x 60″ for roll-in access.
Avoid placing towel bars or shelves where they could interfere with transfers. Every inch counts.
Install Barrier-Free Showers for Safe Entry
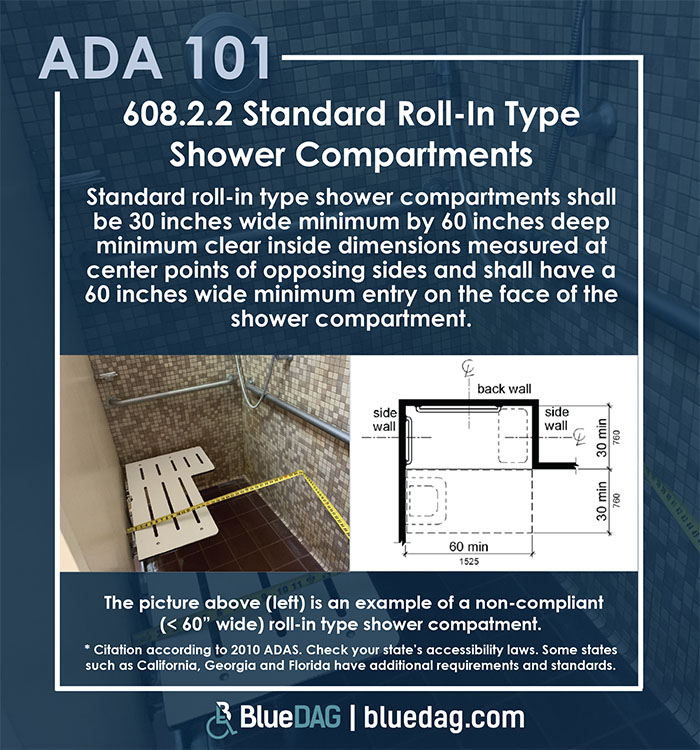
Choose Roll-In or Zero-Threshold Showers
A roll-in shower with no curb or a low threshold (≤½ inch) allows seamless entry. The minimum interior size should be 30″ x 60″, providing room to enter, turn, and position a shower chair. The floor should slope 1–2% toward the drain to prevent water pooling.
For a sleek, modern look, consider an infinity drain—a linear strip that creates a seamless floor appearance while enhancing drainage.
Select the Right Shower Seat
Safety and comfort depend on proper seating:
– Built-in benches: Permanent, durable, ideal for frequent use.
– Fold-down seats: Save space in smaller bathrooms.
– Fixed wall-mounted seats: Allow users to roll their wheelchair underneath before transferring—maximizing independence.
Avoid portable stools unless necessary—they can tip and are harder to clean.
Position Controls Within Reach
Shower controls must be usable from a seated position. Mount them on a vertical bar between 38″ and 48″ from the floor. Pair with a handheld showerhead on a slide bar for adjustable height and targeted spray.
Opt for single-lever or pressure-balanced faucets—they’re easier to operate than thermostatic valves requiring fine motor skills.
Explore Aesthetic Drainage Options
Drains can be both functional and beautiful:
– Linear strip drains: Modern, often aligned with grab bars.
– Central square drains: Elegant, with radial tile slopes.
– Stone or wood-effect grates: Blend with high-end finishes.
Ensure drains are wide and easy to clean—clogged drains increase slip risk.
Upgrade Toilets for Easier Transfers
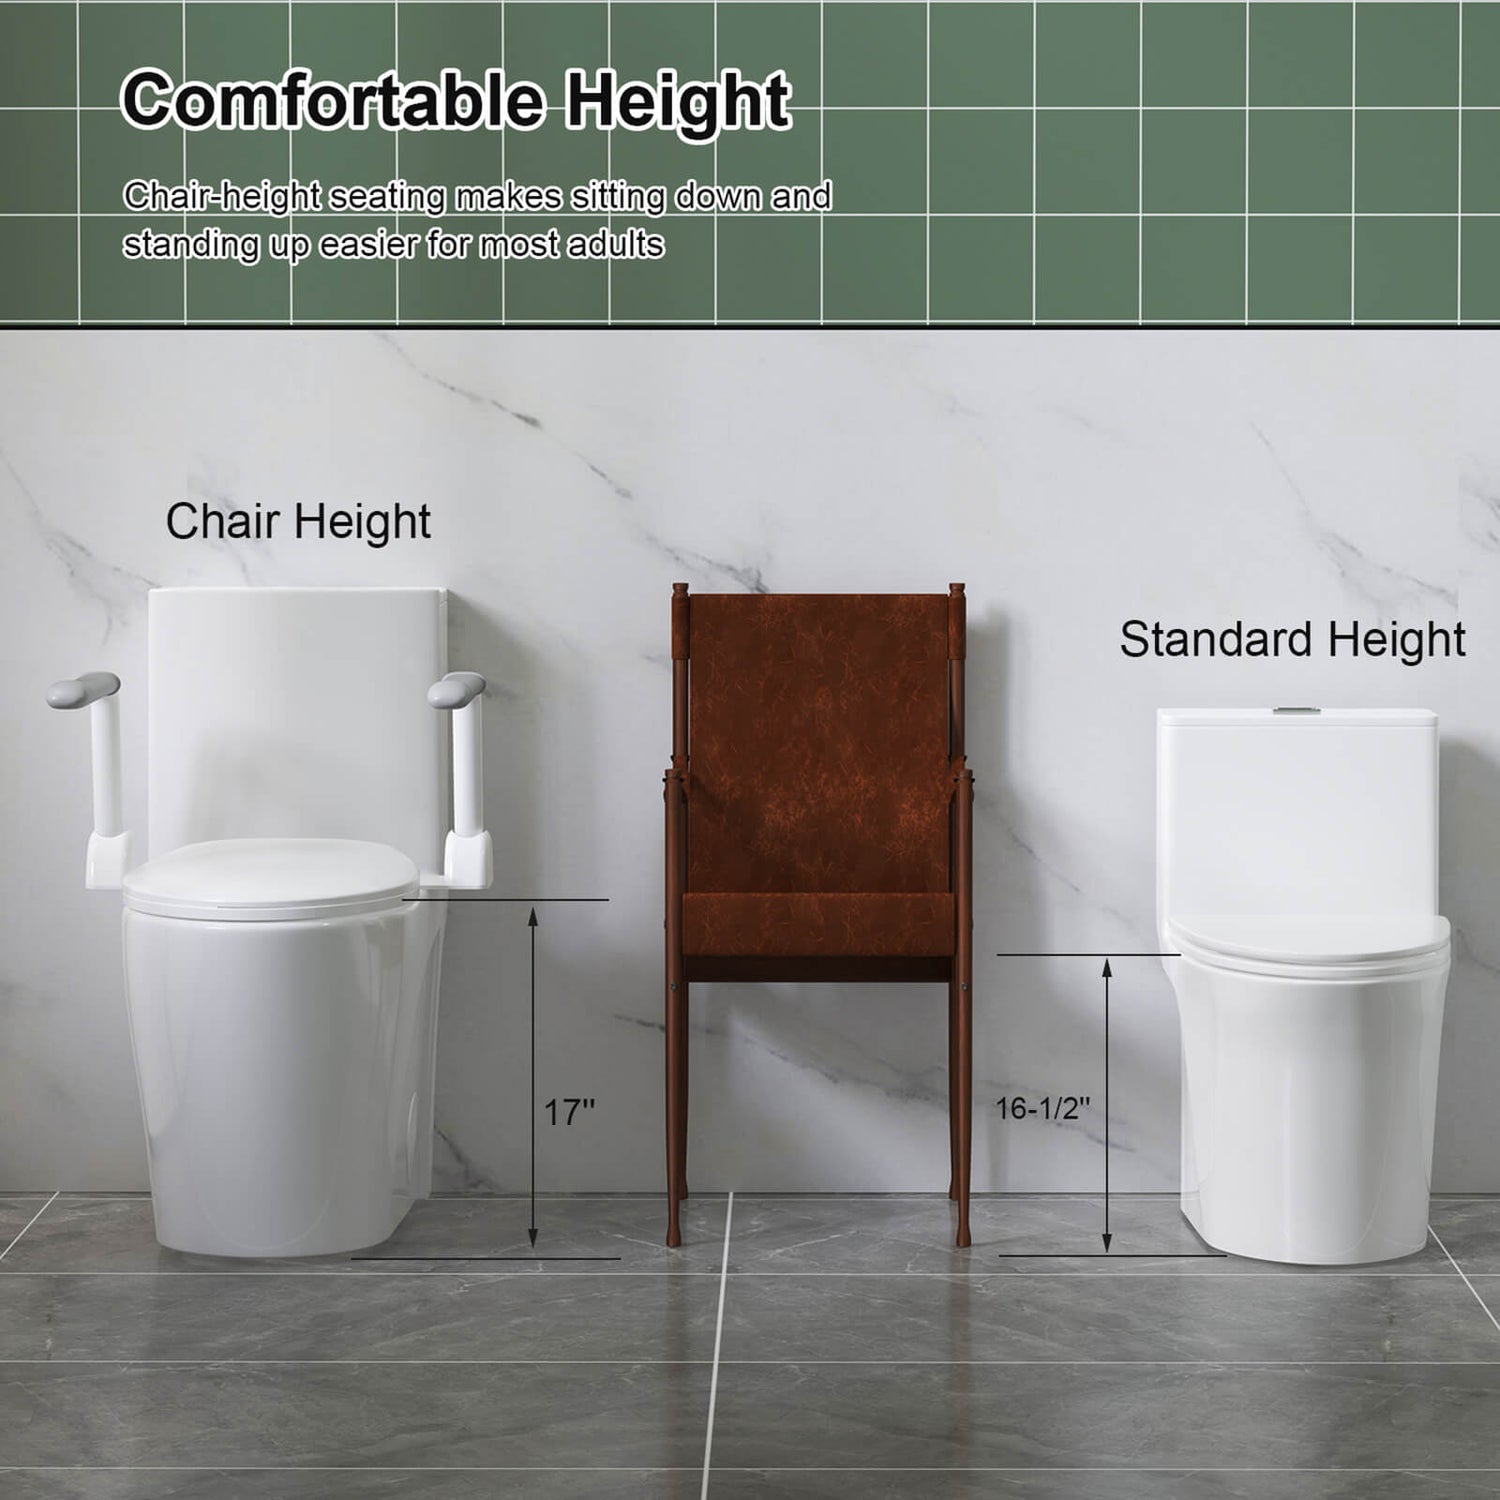
Install Chair-Height Toilets
Standard toilets are too low for most wheelchair users. Choose a comfort-height model (17″ to 19″ high)—matching the seat height of most wheelchairs. Look for ADA-compliant models, which meet strict standards for rim height and flushing power.
Wall-hung toilets save floor space and make cleaning easier.
Place Grab Bars Strategically
Grab bars are essential for stability. Install:
– A horizontal bar behind the toilet, 33″–36″ from the floor.
– A horizontal bar on the transfer side wall.
– Optional L-shaped or vertical bar for added support.
Never use towel bars—they’re not load-bearing. All grab bars must be anchored into studs or reinforced backing to support up to 250 pounds.
Add a Bidet for Independence
A bidet toilet seat enhances hygiene and reduces reliance on others. Features like warm water wash, air drying, and remote controls make it easy to use. Place the toilet paper holder within 24 inches of the front of the toilet and no more than 44″ high—some models double as support bars.
Design Accessible Sink & Vanity Areas

Use Roll-Under or Roll-Up Vanities
A roll-under vanity provides knee clearance (minimum 27″ high, 30″ wide, 11″–25″ deep). For closer access, a roll-up vanity positions the sink edge at the front, allowing direct alignment with the wheelchair.
Pair with wall-mounted faucets to avoid pipe collisions. Floating vanities maximize floor space and simplify cleaning.
Choose Easy-Use Fixtures
Replace knobs with lever handles or motion-sensor faucets—ideal for users with limited dexterity. Touchless models reduce contamination and are easy to operate with an elbow or wave.
Install a tilting mirror or a lowered secondary mirror for seated viewing. Use durable, non-porous countertops like quartz or solid surface—easy to clean and resistant to stains.
Select Safe, Non-Slip Flooring
Prioritize Slip-Resistant Materials
Wet floors are dangerous. Choose:
– Textured porcelain tile: Large format reduces grout lines.
– Luxury vinyl plank (LVP): Waterproof, cushioned, warm underfoot.
– Cork: Naturally slip-resistant; seal properly.
– Stone slab: Luxurious and non-slip when finished correctly.
Avoid glossy tiles or smooth marble—they become slick when wet.
Use Color Contrast for Safety
Contrasting floor and wall colors help users with low vision detect edges. Examples:
– Light walls with dark flooring.
– Mosaic border strips to mark shower zones.
– High-contrast grout for transitions.
Add heated flooring for comfort and safety—keeps surfaces dry and warm, reducing stiffness and fall risk.
Install Smart Lighting & Electrical Features
Optimize Brightness and Automation
Poor lighting increases fall risk. Use:
– Recessed LED ceiling lights for even coverage.
– Task lighting around the mirror and shower.
– Natural light from frosted windows or skylights.
Install motion-sensor lights that turn on automatically—perfect for nighttime use. Choose adjustable brightness to prevent glare.
Place Outlets at Accessible Heights
All outlets must be GFCI-protected and mounted 36″ to 48″ from the floor—within reach from a seated position. Avoid placing them behind fixtures where water could splash. Consider USB outlets for charging bidets, electric toothbrushes, or phones.
Reinforce Walls for Grab Bars & Support
Anchor Grab Bars Securely
ADA-compliant grab bars must:
– Be 1.25″ to 1.5″ in diameter.
– Mounted 33″ to 36″ high.
– Have at least 1.5″ clearance from the wall.
– Be anchored into studs or reinforced backing.
Use multi-functional bars that double as towel racks or soap holders—saving space and blending with décor.
Reinforce During Renovation
If walls weren’t prepped, install plywood or steel backing before tiling. This ensures grab bars won’t pull out under stress. While adjustable mounting systems exist, stud anchoring is always safest.
Blend Function With Beautiful Design
Create a Spa-Like, Accessible Retreat
An accessible bathroom doesn’t have to look institutional. Modern design lets you create a luxurious, calming space:
– Neutral palettes (white, gray, beige) enhance brightness.
– Bold accents (dark blue, forest green) add character.
– Symmetrical layouts improve navigation.
Use floating vanities, frameless glass showers, and minimalist hardware for a clean, contemporary look.
Add Luxury Touches
Elevate comfort with:
– Rainfall showerheads paired with handheld sprayers.
– Heated towel bars.
– Alcove niches for storage.
– Natural materials like wood-look flooring or stone countertops.
These features benefit everyone and increase home value.
A wheelchair accessible bathroom is more than a compliance project—it’s a space that restores independence, prevents injury, and supports dignity. By following ADA guidelines, prioritizing clearances, and integrating smart, stylish solutions, you can create a bathroom that’s both safe and beautiful.
Start with the essentials: 36-inch door, 60-inch turning radius, non-slip flooring, and proper fixture clearances. Then layer in comfort and luxury. Consult an occupational therapist or accessibility specialist to tailor the design to the user’s needs. With thoughtful planning, your accessible bathroom can become one of the most functional, calming, and elegant rooms in the home.