If your loved one or patient keeps slumping forward, leaning to one side, or sliding down in their wheelchair, you’re not alone. Poor posture in a wheelchair is a common challenge—especially for individuals with Parkinson’s, dementia, ALS, stroke, or general muscle weakness. Left unaddressed, this can lead to discomfort, skin breakdown, difficulty breathing, and even falls. But the good news is: most postural problems can be corrected or managed with the right approach. This guide reveals how to keep someone upright in a wheelchair using clinically proven techniques, supportive products, and smart positioning—without compromising comfort or dignity.
The key isn’t just adding more straps or cushions. It’s about starting at the foundation: the pelvis. If the pelvis isn’t stable, nothing above it will stay aligned. From there, targeted supports—like lateral wedges, trunk harnesses, and headrests—can make all the difference. Whether you’re a caregiver at home or a clinician in a rehab setting, this step-by-step breakdown gives you practical, actionable solutions based on real-world use and clinical best practices.
Fix the Pelvic Base First
Use a Stable, Non-Sagging Seat
A sagging or hammocked seat causes sliding, poor weight distribution, and loss of posture. Many standard wheelchairs come with sling seats that stretch over time, making proper alignment impossible.
- Replace or reinforce with a solid seat insert or rigid base under the cushion
- Try a Sit-Straight™ cushion, which has a convex bottom that fills in gaps under sagging seats
- Avoid flat foam pads on sling seats—they compress and worsen instability
Visual cue: If the cushion sags in the middle or the person sinks into a “hammock,” the base is compromised.
Choose the Right Cushion Shape
Cushion geometry matters more than material alone. A flat cushion won’t correct posture—but a wedge-shaped or contoured one can.
| Cushion Type | Best For | Why It Works |
|---|---|---|
| Wedge cushion | Forward sliding, sacral sitting | Tilts hips slightly down, encouraging upright posture |
| Contoured cushion | Pelvic instability, asymmetry | Has built-in pelvic well and thigh supports |
| Flat/linear cushion | Minimal support needs | Not ideal for postural control |
Pro tip: Wedge cushions should slope downward toward the backrest (not the front) to prevent sliding.
Correct Common Postural Problems
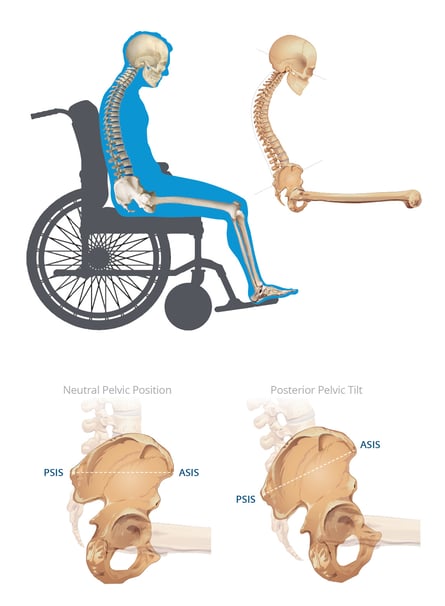
Stop Forward Slumping (Sacral Sitting)
When someone slides forward and ends up sitting on their tailbone, it’s called sacral sitting. This increases pressure on the spine and raises the risk of pressure injuries.
How to Fix:
- Ensure seat depth allows 1–2 inches between the back of the knee and the seat edge
- Use a wedge cushion to tilt the pelvis forward
- Add a firm lumbar roll at the small of the back to support natural spine curve
- Consider a tilt-in-space wheelchair to shift center of gravity
Warning: Never use pillows behind the back—they compress and create more slumping.
Correct Lateral Leaning (Side-to-Side Tilt)
Leaning to one side often stems from pelvic obliquity or muscle imbalance after stroke or spinal injury.
Solutions:
- Place a cell foam wedge under the cushion on the lower hip side to level the pelvis
- Attach plush lateral wedges or side cushions to the backrest
- Use width extensions to move supports outward for better reach
- Secure with hook-and-loop straps at the PSIS (hip bone level)
Expert note: Support should gently guide the trunk back to midline—not force it.
Address Pelvic Rotation or Windswept Posture
Twisted pelvis or legs splayed in opposite directions require custom solutions.
- Use asymmetric contouring in the cushion
- Add medial thigh abductors to control leg position
- Consider custom-molded seating if the posture is fixed
Fact: These issues often co-occur with scoliosis—always assess the spine.
Add Trunk and Chest Support
Use a Trunk Harness for Forward Lean
When pelvic and cushion fixes aren’t enough, a chest or full-body harness can prevent forward sliding.
Recommended Product: Jeelathy Full Body Harness
- Adjustable shoulder straps (up to 42″) and waist belt (up to 97″)
- Padded chest and waist sections for comfort
- Two wear modes:
- Front release: User can remove it—ideal for light support
- Back release: Caregiver-controlled—functions as a restraint
User feedback: Many report improved posture during meals and transport. But some note buckle durability issues and poor fit for smaller adults.
Caution: If the harness prevents standing or self-release, it may be classified as a restraint—especially in care facilities.
Avoid Double Restraints
Combining a chest harness with a tray table or lap tray can create a double restraint, which is legally risky.
- A tray alone is not a restraint—but when used to block rising, it becomes one
- In nursing homes, double restraints require physician orders and documentation
- At home, consider dignity and autonomy
Caregiver warning: “You can do that in private, but people will question it.”
Support the Head and Neck

Start With Trunk Stability
Head control depends on trunk and pelvic alignment. Never add head support first—fix the base first.
Once the pelvis and trunk are stable:
– Use posterior headrests for mild head drop
– Add suboccipital support to prevent neck hyperextension
– For no head control, consider anterior forehead straps with rigid frame
Types of Head Support
| Need | Support Type | Function |
|---|---|---|
| Mild head lag | Occipital pad | Supports back of head |
| Neck extension | Suboccipital block | Prevents chin from lifting |
| No control | Forehead strap + swing-away arm | Stabilizes front of head |
Goal: Enable better swallowing, breathing, and eye contact—not just to keep the head up.
Upgrade the Wheelchair If Needed

Try a Geri Chair for Frail Users
Geri chairs (geriatric recliners) are designed for elderly or non-ambulatory individuals.
Features:
- Tilt-in-space function to redistribute pressure
- Reclining backrest for napping
- Built-in lateral trunk and head supports
- Tilted seat to discourage standing attempts
Real use: One caregiver loved it because it kept her mother upright, supported her head, and stopped sliding.
Downside: Less mobility and social engagement—best for supervised settings.
Switch From Transport to Rehab Wheelchair
Transport chairs are for short-term use—they have poor back support and sling seats.
Rehab Wheelchairs Offer:
- Solid frame and adjustable components
- Compatibility with custom cushions, back inserts, and support accessories
- Better long-term comfort and posture control
Rule of thumb: If the person spends more than 2 hours daily in the chair, upgrade to a rehab model.
Try DIY and Low-Cost Fixes
Use Foam Wedges and Pillows
When commercial products don’t fit or are too expensive, caregivers get creative.
Effective DIY Options:
- Bed wedge cut to size and placed laterally to support the trunk
- Memory foam travel pillow shaped around the neck or back
- Bead-filled neck pillow—moldable and conforms to body
Real example: One caregiver wrapped a child-sized travel pillow around the neck and secured it with fabric ties—stopped forward lean.
Adaptive Clothing: Handle With Care
Historical “upright jackets” with long ties were used to keep people straight—but they’re now seen as restraints.
- Wrapping clothing tightly around the chair restricts movement
- May be acceptable at home but not in care facilities
- Risk of ethical and legal issues if used without consent
Expert note: These should only be used if they allow self-release and don’t limit function.
Use the Tray as a Temporary Aid
A wheelchair tray can help reduce forward lean during meals.
- Acts as a light barrier to sliding
- Does not replace proper trunk support
- Combine with cushion fixes for best results
Limitation: Doesn’t help with side leaning or long-term positioning.
Know the Legal and Ethical Line
Support vs. Restraint: What’s the Difference?
| Factor | Support | Restraint |
|---|---|---|
| Purpose | Improve posture, comfort, function | Control behavior, prevent falls |
| Freedom of movement | Preserved | Restricted |
| Self-release | Possible | Blocked |
| Placement | Front buckles | Back or side buckles |
Key rule: If the person can’t remove it themselves, it’s likely a restraint.
Nursing Home Rules
- Restraints require doctor’s order, informed consent, and regular review
- Must document why less restrictive options failed
- Double restraints (e.g., vest + tray) are high-risk and heavily scrutinized
Reality check: Families have more freedom at home—but should still prioritize dignity and safety.
Protect Skin and Prevent Pain
Prevent Pressure Injuries
Poor posture concentrates pressure on the sacrum, ischial tuberosities, and heels.
Prevention Steps:
- Use pressure-redistributing cushions (gel, air, honeycomb)
- Reposition every 15–30 minutes (weight shifts or standing)
- Check skin daily for redness or sores
- Avoid letting aides remove cushions—this increases risk
Caregiver insight: “He wasn’t trying to get out—he was trying to get comfortable.”
Improve Sitting Tolerance
Uncomfortable seating leads to agitation, refusal to sit, and shorter engagement times.
- Proper support = longer, more comfortable sitting
- Enables participation in meals, therapy, and socializing
- Reduces pain from poor alignment
Goal: Help the person stay upright without suffering.
Follow a Step-by-Step Selection Plan
1. Assess Posture Type
Is the misalignment reducible (can you manually correct it) or fixed?
- Reducible → Use corrective supports (wedges, contoured cushions)
- Fixed → Use accommodative supports (custom-molded, geometric match)
2. Stabilize the Pelvis
- Choose wedge or contoured cushion
- Level pelvis with foam inserts if oblique
- Ensure proper seat depth and width
3. Support the Trunk
- Add lateral supports for side leaning
- Use harness only if forward lean persists
- Avoid overloading with too many accessories
4. Add Head Support (If Needed)
- Start with posterior support
- Use anterior support only for complete head drop
- Always mount on a stable backrest
5. Keep It Simple
- Less is more: Start with cushion and back support
- Add layers only if necessary
- Reassess regularly—needs change over time
Final truth: There’s no one-size-fits-all fix. Use clinical judgment and observe the person’s response.
Summary: Quick Fixes for Common Issues
| Problem | Best Solution |
|---|---|
| Forward sliding | Wedge cushion + proper seat depth |
| Side leaning | Plush wedge or foam insert on low side |
| Pelvic tilt | Contoured cushion with pelvic well |
| Head drop | Posterior headrest + trunk stability |
| General instability | Rehab wheelchair + cushion + lateral supports |
| Frequent sliding | Tilt-in-space function or harness (use carefully) |
Final Note: Keeping someone upright in a wheelchair isn’t just about straps and cushions—it’s about dignity, safety, and function. Always involve an occupational therapist, physical therapist, or ATP (Assistive Technology Professional) for a full seating assessment. What works for one person may harm another. Prioritize comfort, prevent skin breakdown, and respect autonomy. With the right setup, your loved one can sit safely, breathe easily, and engage with the world—upright and with confidence.