If your wheelchair feels sluggish, harder to push, or wobbles during turns, low tire pressure could be the culprit. Knowing how to inflate wheelchair tires properly is essential for smooth mobility, safe braking, and extending the life of your equipment. Most manual wheelchairs use pneumatic (air-filled) tires that lose pressure over time—just like bicycle or car tires. Without regular maintenance, underinflated tires increase rolling resistance, reduce control, and raise the risk of flats. This guide walks you through every step: identifying your tire type, selecting the right pump, checking PSI, and inflating safely. Whether you’re a new user, caregiver, or long-time rider, mastering this simple task ensures greater independence and a safer, more comfortable ride.
Confirm Your Wheelchair Tires Are Inflatable
Before attempting to add air, verify that your tires actually require inflation.
Look for Valve Stems
Pneumatic tires have a valve stem—a small metal tube protruding from the wheel rim. It’s often covered with a black rubber or plastic cap. Even if the cap is missing, the presence of the stem means the tire holds air.
✅ Check the sidewall: If you see a PSI (pounds per square inch) rating printed on the tire’s side, it’s definitely pneumatic and needs periodic inflation.
Identify Solid (Airless) Tires
Not all wheelchairs use air-filled tires. Many power chairs and low-maintenance models come with solid or foam-filled tires that require no inflation.
- No valve stem visible.
- Tire feels rock-hard when pressed.
- Often labeled “airless,” “solid core,” or “foam-filled” in manuals or specs.
❗ Never attempt to inflate solid tires—doing so can damage the wheel or cause injury.
💬 User Tip: One caregiver shared: “I thought my tires were flat, but they’re airless. The wear made them look deflated.”
⚠️ If your solid tires appear compressed or worn, consider replacement—not inflation.
Identify the Valve Type on Your Wheelchair Tires

Using the wrong pump can lead to leaks, damage, or failed inflation. Most wheelchairs use one of two valve types.
Schrader Valve – Most Common
The Schrader valve is the same type used in car tires and most bicycles. It has a short, thick metal stem with a spring-loaded pin in the center.
- Found on the majority of everyday manual wheelchairs.
- Compatible with standard floor pumps, hand pumps, and gas station compressors.
✅ Ensure your pump has a Schrader-compatible head—usually the wider black side on dual-head models.
Presta Valve – Used in High-Performance Models
Some lightweight or all-terrain wheelchairs use Presta valves, especially those with high-pressure tires like Schwalbe Marathon models.
- Longer, thinner stem with a lock nut on top.
- Requires a specific pump port or adapter.
🔧 To inflate a Presta valve:
1. Remove the small metal cap.
2. Unscrew the lock nut counterclockwise.
3. Press lightly on the tip to release trapped air and open the valve.
4. Attach the pump securely.💡 Pro Tip: Dual-head pumps often have a narrow silver side for Presta and wide black side for Schrader—use the correct one.
❌ Never force a Schrader pump onto a Presta valve without proper adjustment—this can damage the valve.
Know the Correct PSI for Your Wheelchair Tires
Inflating to the right pressure ensures safety, comfort, and tire longevity.
Check the Sidewall for PSI Rating
The recommended pressure is printed on the tire’s sidewall. This is your go-to reference—never exceed the maximum PSI listed.
General Pressure Guidelines by Use Case
| Use Case | Recommended PSI |
|---|---|
| Paved surfaces | 45–60 psi |
| Off-road or gravel | 40–50 psi |
| Sand or beach | 30–35 psi |
| Wet conditions | Reduce by ~5 psi |
| Heavy user/load | +5 to +10 psi |
📌 Example: Freedom Chair recommends 45 psi on pavement and 35 psi off-road.
⚠️ High-performance tires (e.g., Schwalbe) may require 80–90 psi—check manufacturer specs.
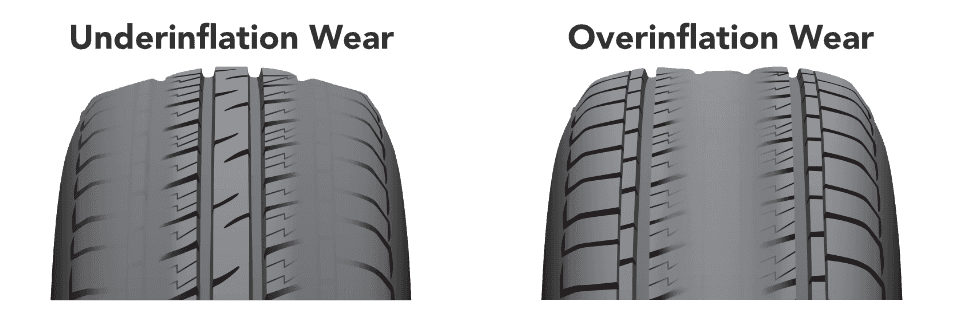
❗ Underinflation causes pinch flats and poor braking; overinflation leads to harsh rides and center tread wear.
Choose the Right Inflation Tool for Your Needs
The best pump depends on your strength, mobility, and how often you inflate.
Floor Pump (Track Pump) – Best Overall
Ideal for home use, a floor pump offers stability, accuracy, and ease.
- Features a built-in pressure gauge.
- Dual-head models support both Schrader and Presta valves.
- Requires minimal effort compared to hand pumps.
✅ Advantages: Precise control, durable, no electricity needed.
💡 Tip: Use the larger port for Schrader, smaller port for Presta.
Hand Pump – Portable Option
Compact and travel-friendly, a hand pump is great for occasional top-ups.
⚠️ Requires significant hand strength—may not suit users with limited dexterity.
❗ Struggles to reach pressures above 80 psi.
Electric Air Compressor – Low-Effort Choice
Perfect for users with limited upper-body strength.
- Plugs into wall outlet or car socket.
- Many include auto-shutoff and digital PSI display.
Ideal Specs:
- Max pressure: 125–135 psi
- Tank size: 2.5–3.5 gallons
- Noise level: Under 70 dB
- SCFM at 90 psi: 1.5–2.5
✅ Example: A 3.5-gallon pancake compressor with 135 psi max and auto-shutoff is ideal.
❌ Avoid industrial compressors—they’re too powerful and hard to control.
💡 Bonus: Can also inflate sports balls or camping gear.
Portable 12V Inflators – On-the-Go Solution
Battery-powered or car-charged, these are lightweight and fast.
✅ Many include preset PSI settings and auto-stop.
🔋 Rechargeable models offer cordless convenience.
Step-by-Step Inflation Process
Follow these steps to safely and accurately inflate your wheelchair tires.
Prepare the Wheelchair
- Place on a flat, stable surface.
- Disengage the brakes so wheels spin freely.
- Ensure no one is seated during inflation.
Locate and Uncover the Valve
- Find the valve stem on the rim.
- Remove and keep the cap—it prevents dirt and moisture from entering the valve core.
Check Current Pressure (Optional)
- Use a standalone gauge or pump gauge.
- Compare reading to recommended PSI.
📊 Tires lose 1–2 psi per week naturally—regular checks are crucial.
Attach the Pump Correctly
For Schrader Valves:
- Press pump head firmly onto the valve.
- Flip the lever or twist to lock in place.
For Presta Valves:
- Unscrew the lock nut first.
- Press gently to open the valve.
- Attach pump securely.
✅ Ensure no hissing—a leak means a poor seal.
Inflate to Target PSI
- Pump steadily (manual) or activate (electric).
- Watch the gauge constantly.
- Stop as soon as you hit the target pressure.
⚠️ Do not overinflate—this risks blowouts and reduces traction.
Remove Pump and Replace Cap
- Release the pump head carefully.
- Screw the valve cap back on to prevent slow leaks.
Inspect Rim and Tire Alignment
- Rotate the wheel slowly.
- The rim line should be evenly visible.
❗ If the rim dips or disappears in spots, the tire may be underinflated or improperly seated.
Test Brake Performance
- Engage the handbrake.
- Push the chair forward gently.
✅ The wheelchair should not move.
❌ If it rolls, recheck pressure and brake pad alignment.
Maintain a Regular Inflation Schedule
Consistent checks prevent issues before they arise.
Recommended Check Frequency
- Every two weeks – Minimum standard.
- Before long trips – Critical for safety.
- After temperature swings – Cold air contracts; heat expands it.
- After repairs or new tires – Confirm proper seating.
🔄 Tires naturally lose air—even without punctures.
Recognize Pressure Problems
Incorrect inflation harms performance and safety.
Under-Inflated Tires
Symptoms:
- Harder to push.
- Spongy or wobbly ride.
- Poor cornering.
- Brakes less effective.
Risks:
- Pinch flats (“snake bites”) from hitting curbs.
- Outer tread wear.
- Increased risk of rolling away on inclines.
Over-Inflated Tires
Symptoms:
- Bumpy, uncomfortable ride.
- Less grip on wet or uneven ground.
- Higher puncture risk from sharp objects.
Risks:
- Center tread wear.
- Reduced shock absorption.
- Possible burst from impact.
Optimal Inflation Benefits
- Smooth, energy-efficient rolling.
- Reliable braking.
- Even tire wear.
- Better handling on turns.
- Longer tire and rim life.
🎯 Customize Pressure: Adjust based on weight, terrain, and riding style.
Adjust for Terrain
Fine-tune pressure for different surfaces.
| Terrain | PSI | Why |
|---|---|---|
| Paved roads | 45–60 psi | Maximizes speed and efficiency |
| Gravel/dirt | 40–50 psi | Balances grip and roll |
| Sand/mud | 30–35 psi | Increases contact area for traction |
| Wet surfaces | Reduce by 5 psi | Enhances grip on slippery ground |
🔁 Pro Tip: Outdoor enthusiasts should carry a portable pump to adjust pressure on the fly.
Troubleshoot Common Issues
Pump Won’t Stay Attached
- Cause: Wrong valve type or worn pump head.
- Fix: Confirm compatibility; clean or replace pump head.
Hissing During Inflation
- Cause: Leaky connection or damaged valve core.
- Fix: Retighten; replace valve core if persistent.
Tire Won’t Hold Air
- Cause: Puncture, cracked tube, or faulty valve.
- Fix: Inspect for debris; patch or replace inner tube.
Missing Valve Cap
- Cause: Common but exposes valve to dirt.
- Fix: Replace with standard Schrader cap (available at auto stores).
Gas Station Compressor Fails
- Cause: Nozzle incompatible or pressure too high.
- Fix: Use a personal pump or regulated inflator.
💬 User Experience: One caregiver said: “Gas station staff didn’t know how to help and I feared blowing the tire.”
✅ Solution: Stick with a personal floor pump or quiet electric compressor for safety and control.
Use Visual Guides and Videos
Supplement this guide with real-time demonstrations.
Recommended Resources:
- YouTube: Search “Inflating Wheelchair Tires with Track Pump” by Richard Cheshire.
- Manufacturer Videos: Some brands show underinflation effects on braking.
- Infographics: PSI charts and valve comparison guides.
📺 Watching a video can clarify proper pump attachment and pressure reading.
Best Practices Summary
✅ Do:
- Check pressure every two weeks.
- Use a gauge-equipped pump.
- Inflate to sidewall-recommended PSI.
- Adjust for terrain and load.
- Replace valve caps after inflation.
- Test brakes post-inflation.
❌ Don’t:
- Assume all tires are inflatable—verify first.
- Use industrial compressors without regulation.
- Inflate while someone is seated.
- Ignore persistent air loss—it signals a leak.
🎯 Top Recommendation: A dual-head floor pump with gauge is the best all-around tool. For low-effort inflation, choose a quiet pancake compressor (135 psi max, 3.5-gallon tank, <70 dB).
Properly inflated tires mean safer stops, easier pushing, and longer equipment life. With the right knowledge and tools, maintaining your wheelchair tires becomes a quick, confident routine—keeping you rolling smoothly and independently.