Choosing the right wheelchair isn’t just about mobility—it’s about health, comfort, and long-term independence. An ill-fitting wheelchair can lead to pressure sores, poor posture, chronic shoulder pain, and even permanent joint damage. Whether you’re selecting a manual or power chair for yourself or a loved one, precise measurements are non-negotiable. The difference between a supportive, efficient chair and one that causes harm often comes down to just one or two inches.
This guide walks you through how to measure for a wheelchair using clinically proven methods. You’ll learn the 10 essential dimensions that determine fit, avoid common mistakes, and know when to seek professional help. Whether you’re preparing for a clinical evaluation or doing a DIY measurement at home, this information ensures you make a safe, informed decision that protects your body and enhances your freedom.
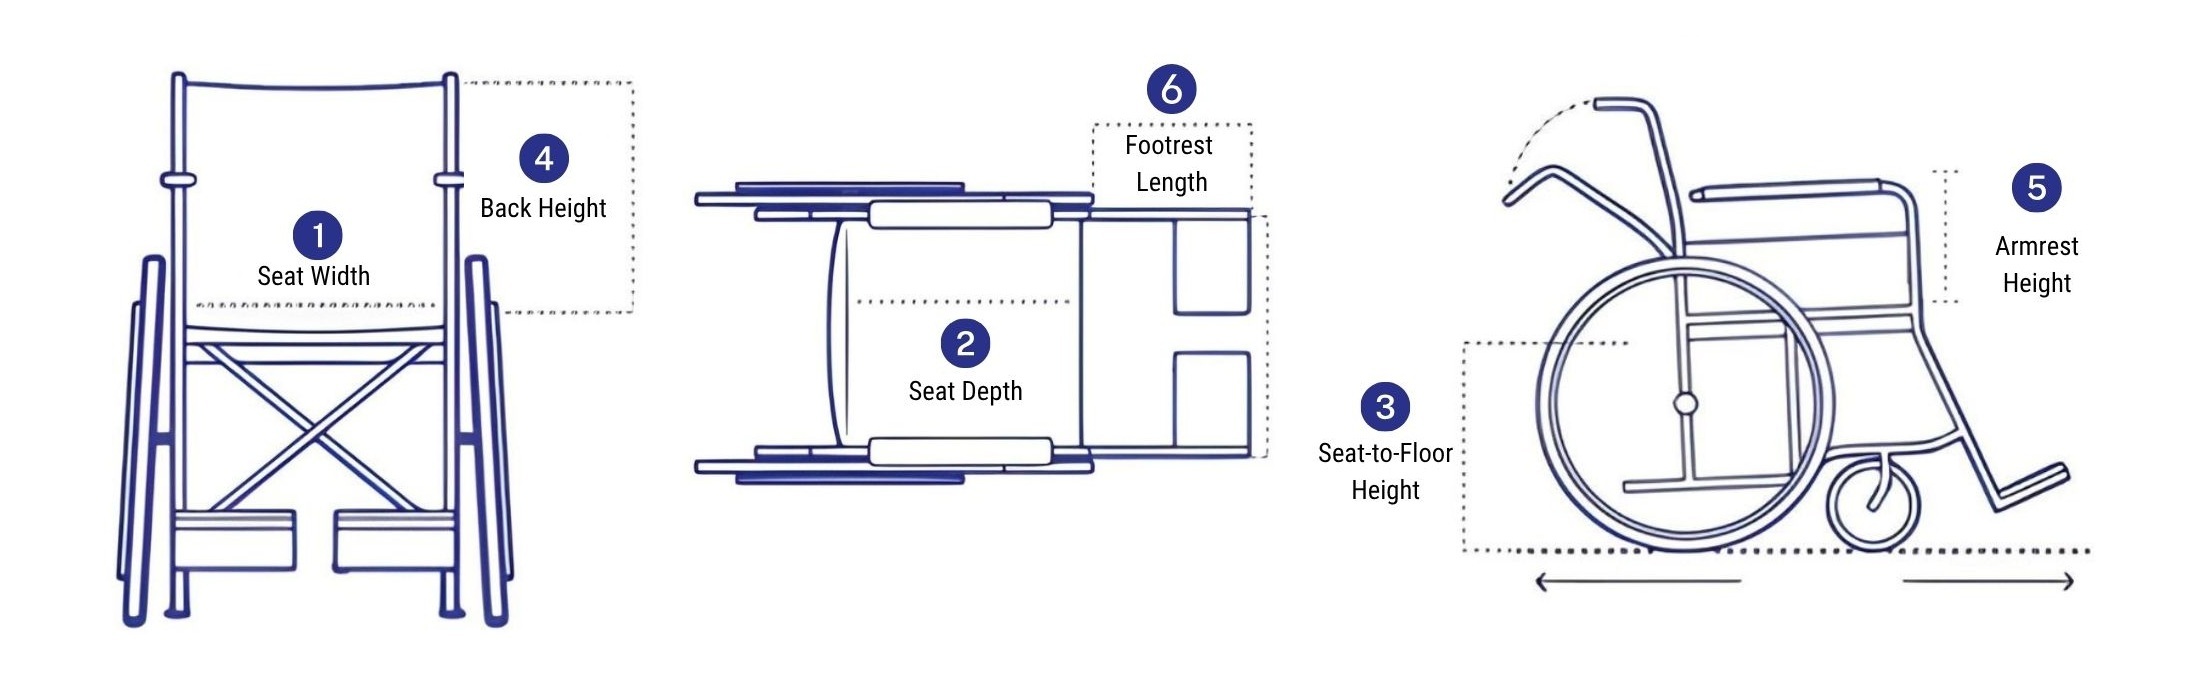
Seat Width: Get the Hip Measurement Right
Find the Widest Point of Hips or Thighs
Seat width is the foundation of proper fit. It determines how well your hips are supported and how efficiently you can propel the chair. To measure correctly:
- Have the person sit upright on a firm, flat surface (like a bench or exam table).
- Ensure hips, knees, and ankles are bent at 90 degrees.
- Use a metal tape measure (not cloth) to span the widest part of the outer thighs or hips.
- Apply gentle pressure—do not compress soft tissue.
The final measurement should allow for about 1 inch of total clearance (½ inch per side) between the hips and armrests. This snug fit supports posture and reduces shoulder strain during pushing.
Use the Book Method for Reliable DIY Accuracy
For a foolproof technique:
– Place hardcover books vertically against both hips while seated.
– Measure the distance between the books.
– This eliminates tape sag and gives a more accurate reading.
Pro Tip: Always include orthotics, bulky clothing, or braces in your measurement—they affect fit.
Seat Depth: Prevent Pressure Behind the Knees
Measure from Buttocks to Back of Knee
Seat depth ensures your thighs are fully supported without pressure behind the knees. Here’s how:
- With the person seated and feet flat, measure from the back of the buttocks (ischial tuberosities) to the popliteal crease (back of the knee).
- Keep the tape straight—no sagging.
- Subtract 1 to 2 inches to prevent the seat edge from pressing into the back of the legs.
Too short? You lose thigh support and increase pressure on your sit bones. Too long? It can restrict blood flow and encourage slouching due to posterior pelvic tilt.
Always Measure With Your Cushion
Cushions change seated position. A thick or contoured cushion can shift your body forward or backward. Always perform this measurement with the cushion you plan to use to ensure real-world accuracy.
Warning: Incorrect seat depth can cause pressure sores in as little as two hours of continuous sitting.
Seat-to-Floor Height: Set Proper Footrest Clearance
Determine Leg Support and Transfer Ease
Seat-to-floor height (STFH) affects how your feet rest and how easily you transfer in and out of the chair.
To measure:
– With shoes on, bend the knee to 90 degrees.
– Measure from the floor to the underside of the knee (popliteal fold).
– Add 1 to 2 inches for footrest clearance.
This ensures your feet sit flat on the footplates without dragging and prevents the footrests from scraping thresholds or curbs.
Balance Stability and Propulsion
Lower STFH improves stability and makes transfers easier but may hinder leg movement for propulsion. Higher STFH helps users who “scoot” or use their legs to move but raises the center of gravity, increasing tipping risk.
Checklist: Confirm footrests clear the ground by at least 1 inch when rolling over door thresholds.
Backrest Height: Support Trunk Without Restricting Shoulders
Measure From Seat to Shoulder Level
Backrest height should support your trunk while allowing full shoulder movement—especially if you self-propel.
For active users:
– Measure from the seat (with cushion) to the bottom of the shoulder blades (mid-scapula).
– This allows full range of motion for pushing.
For users needing more support (e.g., spinal cord injury, muscular dystrophy):
– Measure to the armpits (axilla) and subtract 2 inches to avoid shoulder impingement.
Avoid Excessive Back Height
Too high a backrest restricts arm swing and reduces propulsion efficiency. Unless medically necessary, avoid full-torso backrests on manual chairs.
Expert Note: Reclining or tilt-in-space chairs may require different back height rules—consult a therapist if needed.
Armrest Height: Prevent Shoulder and Neck Strain
Measure From Seat to Underside of Forearm
Proper armrest height supports your arms without lifting your shoulders.
To measure:
– Sit with shoulders relaxed and elbows bent at 90 degrees.
– Measure from the seat (with cushion) to the underside of the forearm.
This height allows arms to rest comfortably while enabling smooth transfers—arms should glide under or lift over the rests without strain.
Choose the Right Armrest Type
- Fixed height: Best for consistent posture.
- Adjustable: Ideal for growth or changing needs.
- Flip-back: Improves side transfers.
Common Mistake: Armrests too high cause trapezius tension and neck pain over time.
Footrest Length: Support Legs and Maintain Alignment
Measure Popliteal Fold to Heel
Footrest length ensures your legs are fully supported and aligned.
To measure:
– With knee bent at 90 degrees, measure from the back of the knee to the heel.
– Keep the foot neutral—not pointed or flexed.
– Use this number to set the footplate position.
Prevent Pelvic Misalignment
If footrests are too high, they lift the legs and increase sacral pressure. If too low, feet drag and the pelvis shifts forward, causing slouching.
Tip: Test the position by sitting in a mock chair—your thighs should be fully supported, and feet flat.
Rear Wheel Axle Position: Maximize Propulsion and Shoulder Health
Align Axle With Shoulder Joint
Axle position is critical for efficient pushing and shoulder protection.
Ideal setup:
– When arms are extended forward, the rear wheel axle should be at or slightly in front of the shoulder.
– This reduces push force and minimizes repetitive strain.
Most standard chairs have axles too far back from the factory. Active users should opt for adjustable axles (3-position common).
Trade-Offs: Stability vs. Efficiency
Forward axle = easier propulsion, less stability
Rearward axle = more stable, harder to push
Pro Insight: Athletes and frequent self-propellers benefit most from forward axle positioning.
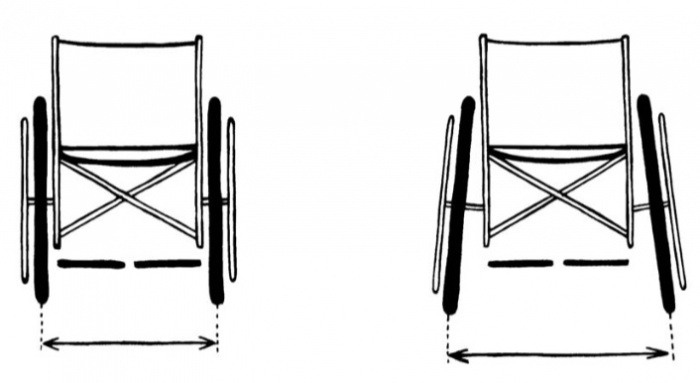
Camber Angle: Improve Stability and Handling
Tilt Wheels Inward for Better Control
Camber is the inward angle of the rear wheels (tops farther apart than bottoms).
Benefits:
– Enhances lateral stability
– Improves cornering
– Reduces shoulder strain
Typical values:
– 0°: Standard for narrow doorways and transport
– 2°–3°: Ideal for active indoor/outdoor users
– 6°+: Common in sports chairs
Consider Accessibility Trade-Offs
More camber improves performance but reduces doorway clearance and storage options. Choose based on environment and activity level.
Note: Camber affects tracking—ensure wheels are aligned after adjustment.
Front Caster Size: Match Terrain Needs
Choose 5”, 6”, or 8” Based on Use
Casters impact rolling resistance and maneuverability.
- 5” casters: Smooth indoor use, tight turning
- 6” casters: Balanced for home and light outdoor use
- 8” casters: Handle curbs, gravel, grass, and uneven terrain
Adjust Caster Placement for Performance
- Forward placement: Better straight-line tracking
- Rearward placement: Tighter turns, improved indoor agility
Avoid small casters on rough surfaces—they vibrate and increase effort.
User Tip: If you roll over thresholds or outdoor paths daily, go bigger.
Tilt and Recline: For Pressure Relief and Posture Control
Understand the Difference
- Tilt: Entire seat and back tilt backward; hip-knee angle stays the same
- Recline: Backrest folds back; hip-knee angle opens
Use tilt/recline for:
– Pressure relief (every 15–30 minutes)
– Managing spasticity
– Improving head control
– Assisting with transfers
Know When to Include It
Not all users need tilt or recline. But if you have:
– Limited trunk control
– High risk of pressure sores
– Difficulty maintaining upright posture
…then consider a chair with these features.
Insurance Note: Tilt/recline often requires medical documentation for coverage.
Step-by-Step Measurement Procedure
Prepare for Accurate Results
- Use a firm, level surface like an exam table or sturdy bench.
- Wear regular clothing and shoes—they affect fit.
- Include your seating cushion in all measurements.
- Have an assistant help—positioning matters.
Follow This Order
- Seat Width
- Seat Depth
- Seat-to-Floor Height
- Back Height
- Armrest Height
- Footrest Length
- Shoulder Width (if custom back needed)
- Back Length (for full-support chairs)
Record Everything Clearly
Use a printable form like the NRRTS Wheeled Mobility Evaluation or Broda Anatomical Assessment. Note:
– Any postural asymmetries
– Contractures
– Preferred sitting positions
Pro Tip: Take photos of the seated position—useful for telehealth consults.
Common Measurement Mistakes to Avoid
- Adding extra inches to seat width – leads to poor posture and inefficient propulsion.
- Ignoring axle position – factory defaults often misalign wheels.
- Measuring without the cushion – alters seated depth and height.
- Using a cloth tape measure – stretches and gives false readings.
When to See a Professional
Seek help from an Occupational Therapist (OT) or Assistive Technology Professional (ATP) if:
– You have a spinal cord injury, cerebral palsy, or muscular dystrophy
– You need custom seating or positioning
– You use the chair more than 2 hours daily
– You feel pain or pressure in your current chair
Professionals use pressure mapping, goniometers, and dynamic assessments to fine-tune fit.
Insurance Alert: Most providers require a formal anatomical assessment for coverage of custom chairs.
Final Tips for Long-Term Success
- Test Before You Buy – Sit in multiple models for at least 30 minutes.
- Document All Measurements – Keep records for insurance and future needs.
- Prioritize Health Over Convenience – A wheelchair is a medical device, not furniture.
Bottom Line: A well-measured wheelchair isn’t just about mobility. It’s about dignity, independence, and lifelong health.
Whether you’re measuring at home or preparing for a clinical evaluation, accuracy saves pain. Use this guide to advocate for the right fit—because when it comes to wheelchairs, inches matter.