
Every time you prepare to get in or out of a wheelchair, one critical step must never be skipped: locking the wheels. The simple act of engaging the wheel locks can prevent serious falls and injuries, especially during transfers or when parked on even a slight incline. Whether you’re a new user, caregiver, or experienced wheelchair rider, knowing how to lock a wheelchair properly is essential for safety and independence. This guide covers all types of wheel locks, correct usage, safety tips, maintenance, and troubleshooting—so you can move with confidence and avoid preventable accidents.
Types of Wheelchair Locks
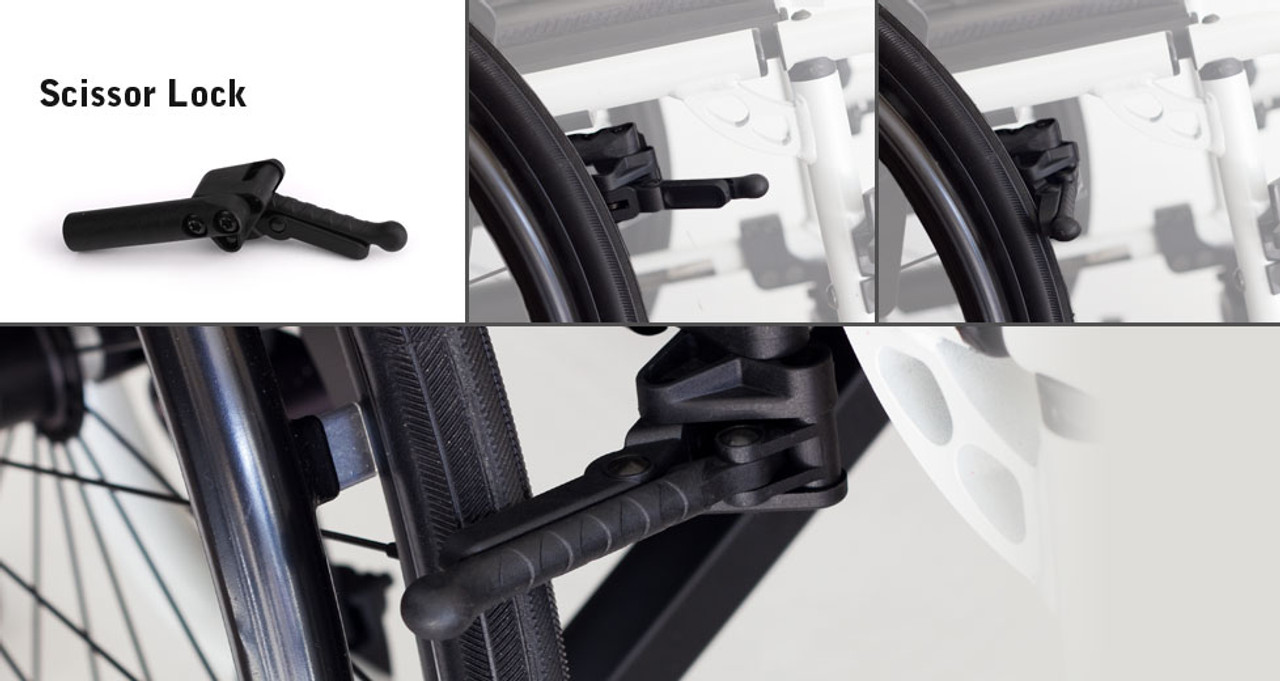
Push-to-Lock Mechanism
Push-to-lock wheel locks are common on manual wheelchairs and operate by pressing the lever down and forward until it contacts the tire. You’ll often hear a “click” when fully engaged. These locks move away from your body during use, making them safer during transfers and less likely to interfere with clothing or skin.
- Best for: Users with strong pushing motion in arms or shoulders.
- Caution: May interfere with swing-away leg rests if not positioned correctly.
- Pro Tip: Check for loose mounting screws over time—repeated rotation can cause one side to loosen. Some brands (like Newton) use reverse-threaded screws to prevent this.
Pull-to-Lock Mechanism
Pull-to-lock systems require you to pull the lever up and back toward your body to engage. These are widely used across both basic and high-performance chairs and suit users with stronger pulling strength.
- Best for: Users with good shoulder and back control.
- Risk: The upward motion may extend into the transfer path, increasing skin pinch or abrasion risk.
- Safety Note: Disengaged levers can interfere with handrims during propulsion—keep them fully down when not in use.
Scissor Locks
Scissor locks sit below the seat and use a side-squeeze or press-down mechanism to lock the rear wheels. Their low-profile design keeps them out of both transfer and propulsion paths.
- Advantages:
- No interference during transfers.
- Reduces risk of finger or skin injury.
- Lightweight and durable (often made with composite materials).
- Ideal for: Users focused on safety, smooth transfers, and minimal equipment bulk.
Expert Note: Newton’s scissor lock features a spring-loaded design and textured grip for better traction, even with wet or gloved hands.
Grade Aids
Grade aids are not full wheel locks—they prevent backward rolling on inclines while allowing forward movement. This helps users maintain momentum uphill without needing to stop and re-engage locks.
- Function: Three-position system—free wheel, grade aid, full lock.
- Use Case: Hilly environments or outdoor use.
- Key Benefit: Eliminates need for separate anti-rollback devices.
- Design Perk: Low handle height prevents transfer interference and automatically disengages to avoid thumb injury during pushing.
Attendant Wheel Locks
Mounted at the rear of the wheelchair, attendant locks are operated by a caregiver using a hand or foot lever. They’re ideal for users with limited upper body strength or cognitive challenges.
- Best for: Dependent users in home care or institutional settings.
- Compatibility: Can be added alongside self-operated locks for partial independence.
- Example: Motion Composites offers rear-mounted options that integrate seamlessly with ultralight frames.
Hub Locks
Hub locks use a cable-actuated piston to lock the wheel at the hub, not the tire. This makes them independent of tire pressure, tread wear, or wheel size.
- Reliability: Works consistently whether tires are inflated or flat.
- Adaptability: Ideal for users who switch between tire types or axles.
- Best for: Active users who modify their setup frequently or need dependable performance in variable conditions.
No Wheel Locks (Omit Locks)
Some high-performance ultralight wheelchairs are configured without any wheel locks to reduce weight and parts.
- Weight Savings: Lightest possible setup—preferred by elite athletes or experienced users.
- Risks: No stabilization during transfers; requires expert-level balance and transfer technique.
- Only Recommended For: Highly skilled users who transfer safely without external support.
How to Use Wheel Locks
Engage Wheel Locks: Step-by-Step
-
Stop on a Flat Surface
Always park on level ground before engaging locks. If on a slope, back up to a curb or use a spotter. -
Push or Pull the Lever
– For push-to-lock: Press lever down and forward until it touches the tire.
– For pull-to-lock: Pull lever up and back firmly. -
Confirm Both Sides Are Locked
Engaging only one side allows the chair to pivot or roll sideways. Always check both locks. -
Listen and Feel for the Click
Most locks produce an audible or tactile “click” when fully engaged. -
Test Stability
Gently push forward and backward. If the chair moves, re-engage the locks.
Critical Rule: Always lock wheels before beginning any transfer—whether getting in or out.
Release Wheel Locks Safely
-
Ensure You’re Ready to Move
Confirm feet are on footrests, hands on handrims, and path is clear. -
Lift or Push the Lever
– Push-to-lock: Lift upward to release.
– Pull-to-lock: Push downward. -
Verify Full Release
Make sure levers are completely disengaged and not dragging on tires. -
Begin Propulsion Smoothly
Avoid jerking forward—this can cause loss of balance if a lock is still partially engaged.
Extension Handles for Better Access

Why Use an Extension Handle?
Some users have the strength to operate wheel locks but lack the range of motion or balance to reach standard levers. Extension handles solve this by bringing the control within easier reach.
- Design: Typically 6” long, removable, and tethered to prevent loss.
- Compatibility: Works with push-to-lock, pull-to-lock, and grade aid systems.
- Newton Model: Universal composite handle that reduces weight and improves grip.
Usage Tip: Remove the extension during transfers if it blocks movement, but always reattach it immediately after.
Safety Rules Every User Should Know
Always Lock Both Sides
Using only one wheel lock creates a pivot point. The chair can still rotate or tip, especially on uneven surfaces. Always engage both locks—every time.
Never Use Locks as Brakes
Wheel locks are not designed to stop motion. Attempting to lock wheels while moving can damage the mechanism and lead to loss of control. Use controlled hand braking on the rims instead.
Test Locks on Different Surfaces
Smooth floors like tile or hardwood offer less friction. Even with locks engaged, the chair may slide.
- Solution: Use non-slip mats or position the chair on carpet or textured flooring when possible.
Avoid Locking on Steep Inclines Alone
On hills or ramps, wheel locks may not be enough. Back up to a curb, use a spotter, or opt for a grade aid system for added security.
Check Before Every Transfer
Whether you’re getting in or out, verify locks are engaged. This is the #1 way to prevent transfer-related falls.
Adjusting and Maintaining Your Wheel Locks
When to Adjust Wheel Locks
Over time, locks may become too loose or too tight due to wear or screw loosening.
- Too Loose: Fails to hold the chair in place.
- Too Tight: Causes strain or pain when operating.
- Wobbling Levers: Often due to loose mounting hardware.
Warning: Never attempt major adjustments without proper tools or training. Consult a wheelchair technician if unsure.
Monthly Maintenance Checklist
- ✅ Inspect for loose screws, worn parts, or bent levers.
- ✅ Clean dirt and debris from the lock mechanism.
- ✅ Apply light lubricant to hinges and moving joints.
- ✅ Test full engagement and release on both sides.
- ✅ Recheck after changing tires, air pressure, or axle position.
Pro Tip: After any wheelchair modification, always retest lock performance.
Troubleshooting Common Problems
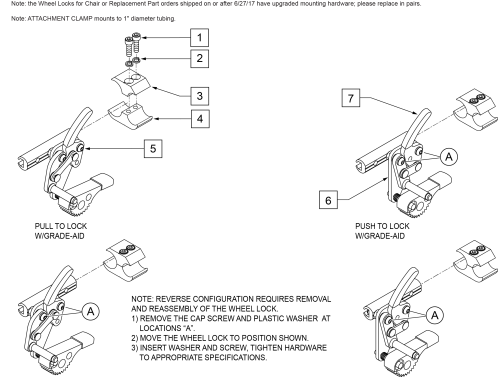
Locks Won’t Engage Fully
Causes:
– Debris in mechanism
– Misalignment
– Worn internal parts
Fix: Clean the lever and contact point. If issue persists, seek professional service.
Hard to Operate
Causes:
– Over-tightened mechanism
– Lack of lubrication
– Mechanical wear
Fix: Apply a drop of light oil to pivot points. Adjust tension or replace if damaged.
Chair Moves When Locked
Causes:
– Loose mounting screws
– Worn or underinflated tires
– Low-traction surface
Fix: Tighten hardware, inflate tires, and test on a carpeted or textured floor.
Only One Lock Works
Cause: Misalignment or mechanical failure on one side.
Fix: Engage both locks manually. Inspect the non-working side and repair or replace.
Extension Handle Wobbles
Cause: Loose attachment or worn joint.
Fix: Tighten mounting screw. Replace handle if cracked or damaged.
Choosing the Right Wheel Lock for You
Match Lock to Your Strength
- Push-to-lock: Best for those with strong downward arm motion.
- Pull-to-lock: Ideal if you have better pulling strength.
- Scissor or hub locks: Great for users with limited range of motion.
Prioritize Transfer Safety
Avoid locks that cross your transfer path. Scissor or low-profile locks reduce skin and finger injury risk.
Consider Your Environment
- Hilly areas: Use grade aids or full locks with reliable grip.
- Outdoor use: Hub locks perform better on variable terrain.
- Indoor use: Lightweight composite locks reduce strain and weight.
Think About Weight and Performance
For ultralight chairs, every ounce matters. Newton locks save up to 1.3 oz per side and use durable composite materials.
Need Caregiver Help?
If you can’t operate locks independently, attendant locks allow a helper to secure the chair safely from behind.
Real-World Use Cases
For New Users
- Practice locking and unlocking on a flat, open surface.
- Use a mirror or ask for feedback to confirm proper lever position.
- Repeat until the motion becomes automatic.
Tip: Record yourself or use a trainer to build confidence.
For Caregivers
- Always park the chair on a level, stable surface before assisting.
- Double-check both locks before helping the user stand.
- Use attendant locks when the user cannot self-lock.
- Teach lock use gradually to promote independence.
For Transport Wheelchairs (e.g., Medline)
- Engage: Push brake levers forward until they touch the rear wheels.
- Release: Lift levers upward.
- Weight Limit: Do not exceed 250 lbs unless specified.
- Safety Belt: Always fasten during movement.
- Footrests: Use release clips to lift or remove. Secure legs with ankle cuffs during transit.
Expert Recommendations
Never Skip the Lock
Skipping wheel lock engagement is the leading cause of preventable wheelchair falls. Make it a non-negotiable habit—every single time.
Get a Professional Assessment
If you have complex mobility needs, consult a seating and mobility specialist. They can recommend the best lock type based on your strength, transfers, and lifestyle.
Try Before You Buy
Test different lock styles during a trial period. What works for one user may not suit another.
Invest in Quality
While basic locks work, high-performance models (like Newton by Motion Composites) offer better durability, weight savings, and safety features—especially for daily, long-term use.
Regular Inspection Is Mandatory
Set a monthly reminder to inspect your locks. Worn or loose mechanisms are silent hazards.
Final Note: Your wheel lock is more than a mechanical part—it’s a critical safety system. Whether you use a simple transport chair or a custom ultralight model, always engage both locks before transferring, maintain them regularly, and choose the type that best fits your strength, environment, and independence goals. With the right knowledge and habits, you can stay safe, stable, and in control—every time you stop.