A properly adjusted wheelchair isn’t just about comfort—it’s essential for maintaining posture, preventing injury, and maximizing independence. When your chair fits your body and lifestyle, it reduces shoulder strain, prevents pressure sores, improves mobility, and makes daily tasks easier. Whether you’re new to using a wheelchair or fine-tuning your current setup, knowing how to adjust a wheelchair correctly can transform your experience. This guide walks you through every critical adjustment—seat dimensions, armrests, footrests, wheel alignment, and more—using expert-backed techniques and real-world usability tips. You’ll learn how to customize your chair for optimal balance, ease of movement, and long-term health.
Measure Your Seat Fit First
Before making any mechanical adjustments, start with accurate body measurements. A well-fitted seat ensures even weight distribution and prevents long-term complications like pressure ulcers or joint pain.
Seat Width: Avoid Hip Pressure and Shoulder Strain
The ideal seat width allows about 1 inch (2.5 cm) of space on each side of your hips. To measure, sit upright and use a tape measure from the outer edge of one hip to the other, then add two inches. A seat that’s too wide forces you to stretch to reach the push rims, increasing the risk of shoulder overuse injuries. One that’s too narrow causes friction on your thighs and ischial tuberosities, raising the chance of skin breakdown. Always measure while seated to account for soft tissue compression.
Seat Depth: Protect Circulation and Prevent Numbness
Seat depth is measured from your lower back to the back of your knees. The front edge of the seat should stop 2 inches (5 cm) or two to three fingers’ width before the popliteal fossa—the hollow behind your knee. If the seat is too deep, it presses against the back of your thighs, restricting blood flow and potentially causing numbness or swelling. Too shallow, and you lose critical support under your legs, leading to pelvic instability and discomfort.
Seat Height: Balance Ground Clearance and Leg Support
Seat height depends on how you use your legs. If you rely on footrests, ensure your feet rest flat with thighs parallel to the floor. For active users who push off the ground (common in sports or pediatric chairs), a lower seat improves reach and control. Regardless of use, maintain at least 2 inches of ground clearance under the footrests to prevent catching on curbs or thresholds. Always test height adjustments with your shoes on to reflect real-world positioning.
Set Armrests for Shoulder Health and Easy Transfers
Armrests play a crucial role in posture, stability, and safe transfers. Getting the height right ensures your shoulders stay relaxed and your spine remains aligned.
Find the Right Armrest Height
Sit upright with arms at your sides. Your elbows should bend at a 90-degree angle when resting on the armrests. If the armrests are too high, your shoulders hike up, leading to neck and trapezius muscle tension. If too low, you’ll hunch forward, compromising spinal alignment and reducing trunk support. Adjustable armrests let you fine-tune this based on clothing or activity. Many active users prefer removable armrests to improve propulsion efficiency and make transfers smoother.
Remove or Attach Armrests Quickly and Safely
To remove, press the release buttons at both the front and back mounting points simultaneously and lift straight up. To reattach, align the armrest with the posts and press down firmly until you hear a click. Always test stability by gently pushing down on each end—wobbly armrests can compromise safety during transfers or movement.
Customize Footrests for Leg Support and Circulation
Improper footrest positioning can cause swelling, joint pain, or pelvic tilt. Adjusting them correctly supports your legs and improves overall posture.
Adjust Footrest Length Correctly
For best results, remove the leg rest before adjusting. Press the two release buttons on the adjustment sleeve and slide the inner tube up or down. Make sure both locking pins fully engage—listen for a distinct click. Match both sides exactly to keep your legs level and prevent asymmetrical posture. The footplate should support your feet fully, with heels resting flat and no dangling toes.
Elevate Legs to Reduce Swelling
If you experience edema or fatigue, elevate your legs by pushing the lever away from the frame and raising the footrest. To lower, hold the leg rest to prevent a sudden drop, push the lever forward, and gently release. This feature is especially helpful during long sitting periods and helps manage fluid buildup in the lower limbs.
Attach or Remove Leg Rests Safely
To remove, push the release lever toward the front, swing the rest forward, pull the lever all the way, then lift straight off the hanger pins. To reattach, hook the leg rest onto the pins, swing it forward, and lock the lever securely. Double-check that both sides are level and stable before use—uneven leg rests can cause pelvic rotation and discomfort.
Optimize Wheel Position and Balance
Your wheelchair’s center of gravity (COG) determines how stable or maneuverable it feels. Small changes in wheel position can have a big impact on daily use.
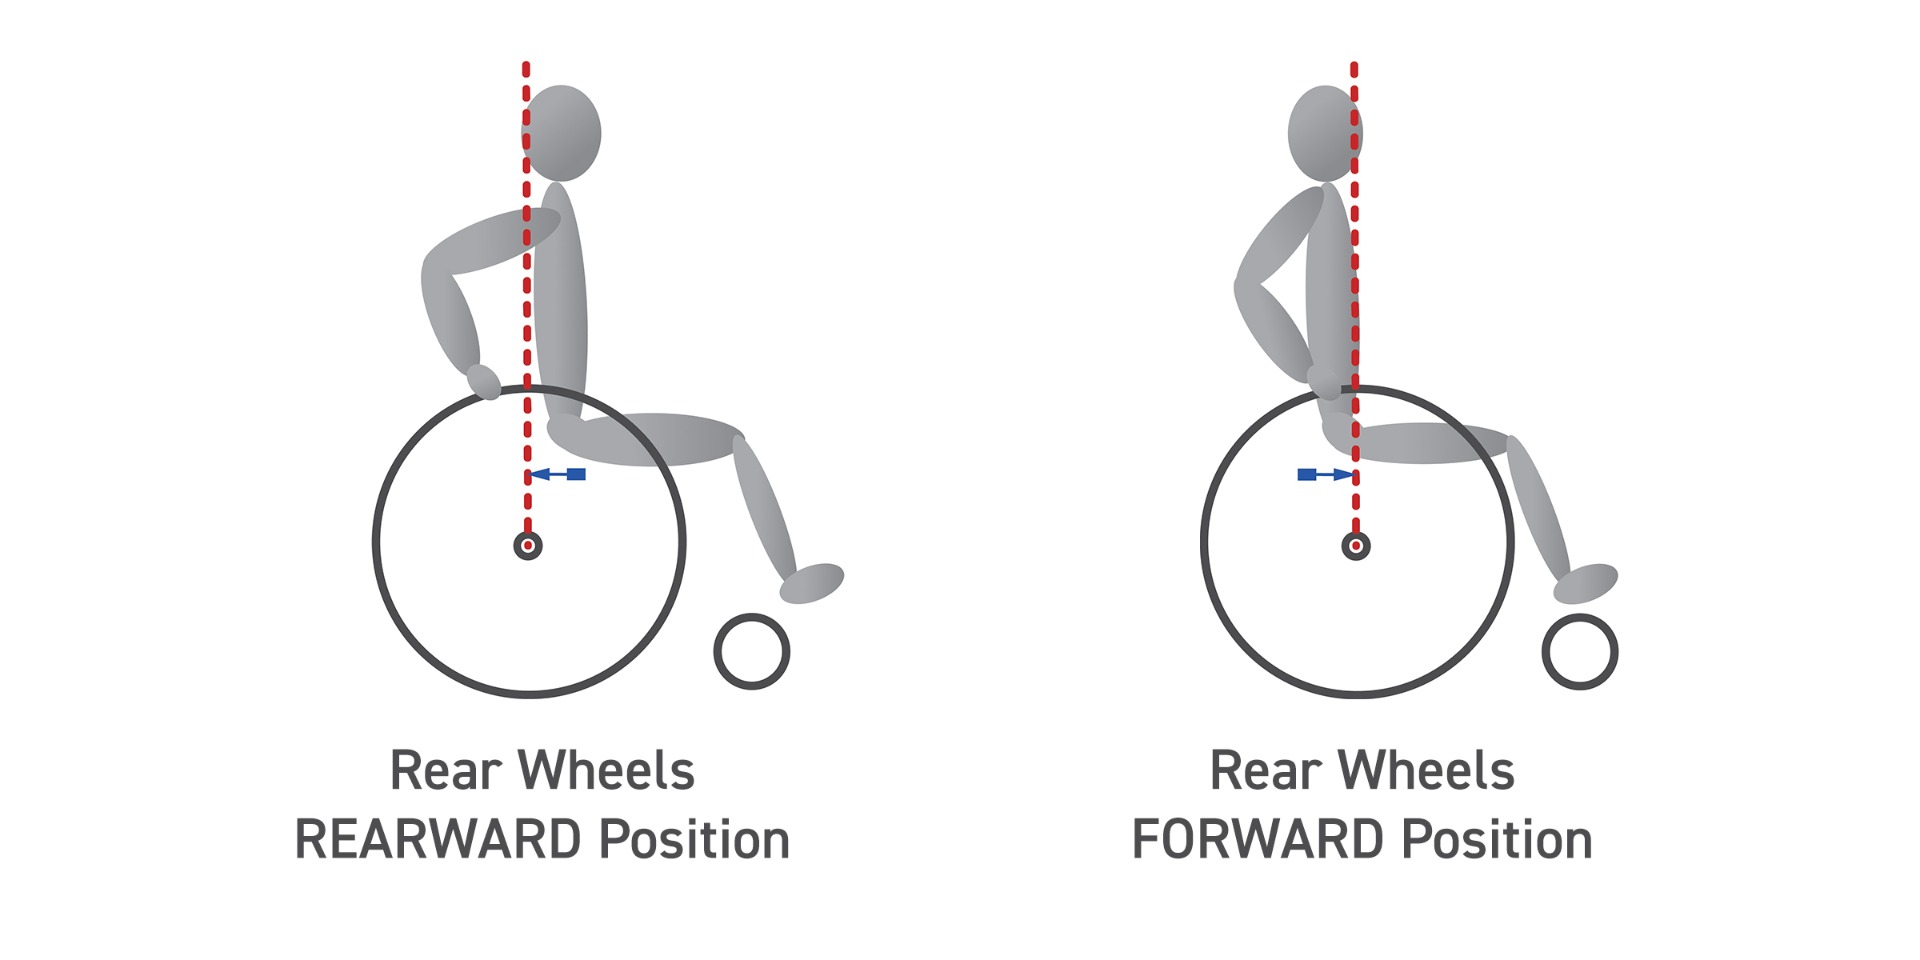
Move Axle Forward for Stability
Sliding the rear axle forward in the axle plate shifts weight toward the front wheels. This makes the chair more stable, especially on downhill slopes or uneven terrain. It also improves traction when climbing inclines and reduces the risk of tipping backward—ideal for beginners or those with limited upper body strength.
Shift Axle Backward for Maneuverability
Moving the axle rearward shifts weight over the rear wheels, creating a more “tippy” feel. This allows easier wheelies, curb climbs, and tight turns—popular among active manual users. However, too far back reduces control and increases the risk of tipping. Always test changes gradually and recheck brake and caster alignment afterward.
Check Caster Alignment After Changes
Any adjustment to wheel position affects the front casters. Misaligned casters cause veering, increase rolling resistance, and wear out tires faster. They should point straight ahead and sit perpendicular to the ground. Refer to your manual—such as Chapter 11 of the Tilite ZRA manual—for precise realignment steps.
Fine-Tune Seat Angle and Backrest for Posture
Small angular adjustments can significantly improve comfort, propulsion, and pressure management.
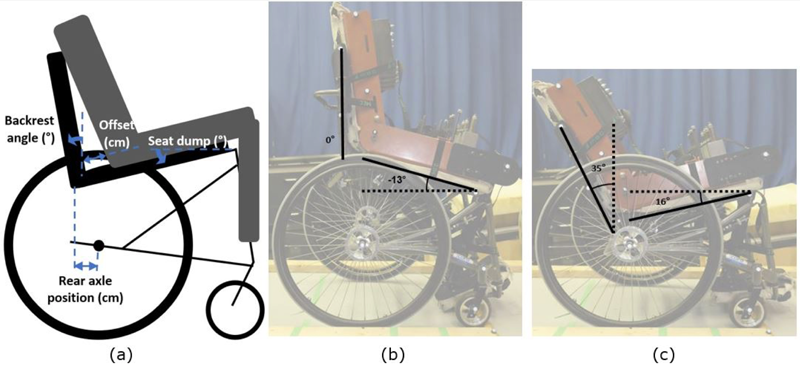
Adjust Seat Dump for Pelvic Control
Seat dump refers to the rearward slope of the seat from front to back. Increasing dump shifts weight toward the back, which can improve pelvic stability for some users but increases tippiness. Adjust via the front caster bracket or camber tube. Always recheck caster alignment after changing the dump angle.
Set Backrest Angle for Posture and Propulsion
A reclined backrest increases comfort and pressure redistribution but limits shoulder range for pushing. An upright angle supports better propulsion mechanics and trunk control. After adjusting, reassess your center of gravity and caster tracking to maintain balance.
Use Tilt or Recline Features for Pressure Relief
Tilt-in-space or reclining backrests help redistribute pressure and prevent sores. Use them every 15–30 minutes by leaning forward, side-to-side, or performing armrest push-ups. If available, activate tilt to shift weight off your pelvis safely during prolonged sitting.
Align Rear Wheels for Smooth Rolling
Proper wheel alignment ensures straight tracking and reduces the effort needed to propel the chair.
Set Slight Toe-In for Stability
The front edges of the rear wheels should angle slightly inward—known as toe-in. This improves straight-line stability and reduces wobbling, especially at higher speeds. Adjust using the axle plates after any COG change. See Chapter 8 of the Tilite ZRA manual for model-specific instructions.
Adjust Camber for Reach and Stability
Camber is the inward tilt of the top of the rear wheels. Higher camber brings push rims closer, benefiting users with limited reach or shoulder issues. However, it increases the turning radius and may require checking brake and tire clearance.
Lock and Release Brakes Properly
Brakes are critical for safety. They must engage fully and be easy to reach.
Engage Brakes with One Hand
Push down the brake lever in front of each rear wheel until it clicks. Ensure both lock securely and release completely. After adjusting wheels or frame, verify brake pads contact the tires evenly.
Test Brake Reach and Function
If levers are hard to reach, check for adjustable mounts. Never modify brakes beyond manufacturer specs—this can void warranties and compromise safety.
Fold and Unfold Safely
Proper technique prevents injury to you or the chair.
Fold Without Straining Your Back
Lock brakes first. Remove leg rests and cushion. Stand in front, bend your knees, keep your back straight, grasp the center of the seat frame, and pull upward. The cross-brace collapses inward. Avoid pinching fingers.
Unfold with Control
Place the chair on flat ground. Grasp both armrests and pull apart gently. Press down on the outer edges of the seat frame to expand the frame. Continue until the chair locks open. Reinstall leg rests and cushion.
Prevent Pressure Sores with Proper Posture
Even the best chair can cause harm if posture isn’t maintained.
Center Your Pelvis Over the Seat
Your sit bones should bear weight evenly. Use gel, foam, or air-cell cushions to distribute pressure. Avoid slouching or leaning to one side.
Shift Weight Regularly
Perform weight shifts every 15–30 minutes. Lean forward, side-bend, or do armrest push-ups. If your chair has tilt or recline, use it to unload pressure safely.
Support Your Head and Trunk
If you have weak core or neck muscles, use a headrest and lateral trunk supports. These prevent fatigue and maintain spinal alignment during long sitting periods.
Maintain Your Chair Weekly
Regular upkeep extends lifespan and ensures safety.
Check Tires, Brakes, and Fasteners
Inspect tire pressure weekly. Look for worn brake pads, loose bolts, or cracked frames. Lubricate moving parts like axles and folding joints as the manual recommends.
Clean Cushions and Upholstery
Wipe down surfaces regularly. Wash removable covers according to care instructions. Replace cushions showing signs of wear or compression.
Get Professional Help When Needed
Even DIY-savvy users benefit from expert input.
See a Specialist for Initial Setup
An occupational therapist or certified mobility specialist can assess your posture, propulsion style, and daily needs. They’ll ensure every adjustment supports your health and independence.
Reassess Fit After Body Changes
Weight loss, muscle atrophy, or joint contractures alter how your chair fits. Schedule a professional review at least once a year—or sooner if discomfort arises.
Attend Free Setup Events
Events like the Abilities Expo offer free tuning by manufacturers. Bring your chair and get expert adjustments, brake alignments, and posture checks at no cost.
Know Your Manufacturer’s Guide
Always follow your chair’s manual over general advice.
Use the Tilite ZRA Manual for Precision
For models like the Tilite ZRA, refer to the official manual for:
– COG adjustment (Chapter 8)
– Backrest angle settings (Chapter 4)
– Caster alignment (Chapter 11)
– Torque specifications for bolts
Deviating from these specs can compromise safety and void warranties.
A properly adjusted wheelchair isn’t just a tool—it becomes an extension of your body. Small tweaks in seat depth, wheel position, or armrest height can dramatically improve comfort, efficiency, and independence. Never assume “good enough” is good enough. Measure, adjust, test, and reassess. With the right fit, your chair won’t just move you—it will empower you.