Imagine transforming a discarded cardboard box into a detailed, functional-looking wheelchair—no metal, no welding, just creativity and smart engineering. While a cardboard wheelchair cannot support real human mobility, it’s an incredibly powerful project for STEM education, artistic expression, inclusive play, and design prototyping. Whether you’re building a doll-sized model for storytelling, a human-scale prototype for classroom testing, or a diorama with emotional impact, this guide shows you how to turn simple materials into a structurally sound and visually realistic creation.
You’ll learn how to cut, layer, and reinforce cardboard like a professional designer, assemble rolling wheels and stable axles, and apply finishing touches that elevate your model from craft to concept. Every technique—like lamination for strength, gusseting for stability, and sealing for durability—is grounded in real-world engineering principles. Let’s build something meaningful from the simplest of materials.
Design Your Cardboard Wheelchair Before Cutting
Choose the Right Scale and Purpose
Before touching a blade, decide why you’re building this wheelchair. Your goal shapes every decision—from size to materials to reinforcement.
- STEM education: Teach load distribution, joint mechanics, and material science.
- Miniature storytelling: Create a wheelchair for Barbie or Monster High dolls to promote inclusive play.
- Art installation: Craft a narrative piece—like a figure in a wheelchair with “no hope” text—to spark conversation.
- Design prototyping: Test ergonomic ideas before investing in metal or plastic.
A 1:6 scale doll model (about 11–12 inches tall) requires fine detail but minimal reinforcement. A human-scale mockup demands structural integrity, even if it’s never meant to bear weight. Know your purpose—it keeps your build focused and effective.
Take Accurate Measurements
Use standard wheelchair dimensions to ensure realism:
- Seat width: Hip width + 1–2 inches (16–18”)
- Seat depth: 16” (buttocks to knees minus 1–2”)
- Seat height: 18–20” from the ground
- Backrest height: 12–18”
- Armrest height: 6.5–8” above the seat
For doll-scale models, follow 1:6 proportions. Use a printable PDF pattern with a built-in ruler to verify scale accuracy before cutting.
Sketch a Full-Scale Blueprint
Draw or digitally design all components:
– Seat base
– Backrest
– Side frames (L-shaped)
– Armrests
– Axle mounts
– Wheel positions
Label fold lines, hole placements, and joint angles. A clear blueprint prevents assembly errors and ensures symmetry—critical for both function and appearance.
Select the Right Materials for Strength and Realism
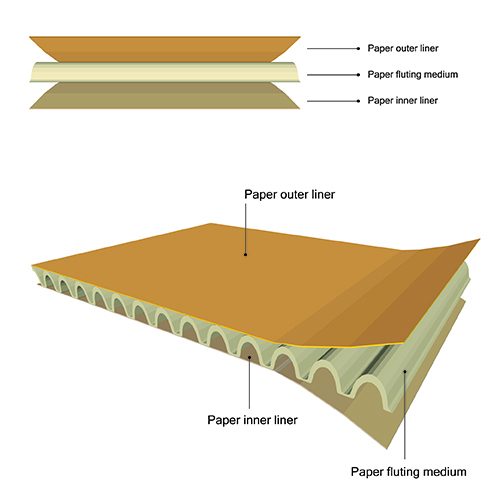
Use Corrugated Cardboard for Maximum Strength
Not all cardboard is equal. Corrugated cardboard—with its fluted inner layer—offers the best compression resistance. Use:
- 3–5 laminated layers for seat, frame, and legs
- Single-layer corrugated for side panels
- Thin cardboard (e.g., cereal boxes) only for non-structural details
Always orient the flutes (ridges) vertically in upright parts to maximize strength. Avoid bent, wet, or crushed boxes—they compromise structural integrity.
Gather Essential Components
You’ll need more than just cardboard:
| Part | Recommended Material |
|---|---|
| Axles | Wooden skewers (miniature), metal rods (large) |
| Wheels | Layered cardboard circles or bottle caps |
| Bearings | Plastic tubing or pre-punched holes |
| Adhesives | PVA (white/craft) glue or hot glue |
| Fasteners | Binder clips (for holding during drying) |
| Reinforcements | Duct tape, cardboard gussets, edge binding |
Prepare Optional Upgrades
Enhance realism and durability:
– Waterproof sealant: Mod Podge, acrylic spray, or varnish
– Fabric upholstery: Glue cotton fabric to seat and backrest
– Paint & decoration: Use acrylics to simulate metal, rubber, or narrative text
Cut and Prepare All Pieces with Precision
Transfer and Cut Pattern Pieces
Print your template at 100% scale. Cut out each piece and trace onto corrugated cardboard using a pencil.
Use a utility knife or razor blade with a metal ruler for straight cuts. Make multiple light passes—don’t force the blade. For circles (wheels), rotate the cardboard while cutting.
Trim rounded corners with scissors after initial cutting for clean edges.
✅ Pro Tip: Work on a cutting mat or foam board to protect surfaces and improve hole-punching accuracy.
Score and Fold All Lines
Fold the paper pattern first to identify crease lines. Then, transfer these to cardboard using a butter knife or envelope opener—press firmly along the line to score, not cut.
Scoring allows sharp, consistent folds without cracking the cardboard surface.
Punch and Enlarge Holes
Place each piece on scrap foam board. Use a push pin to pierce holes at marked points.
Widen each hole with a skewer, pencil, or awl. Rotate the tool gently to avoid tearing. Remove any raised flaps on the underside so pieces lie flat when assembled.
Build the Seat and Backrest for Stability
Laminate the Seat Base
Cut two 18″ x 16″ rectangles. Stack 3–4 layers of corrugated cardboard and glue them with PVA or hot glue. Clamp under weight and let dry 24 hours for maximum bond strength.
Reinforce edges with folded cardboard strips glued around the perimeter—this prevents crushing and adds rigidity.
Construct the Backrest
Cut a vertical panel (e.g., 16″ wide x 18″ tall). Laminate multiple layers for stiffness.
Attach it to the seat using:
– Cardboard L-brackets
– Strong adhesive (PVA or hot glue)
For doll models, hem cotton fabric and glue it to the backrest before assembly for a padded look.
Install Armrests and Frame for Realistic Structure
Add Ergonomic Armrests
Cut two blocks (e.g., 18″ long x 3″ wide x 4″ high). Hollow slightly for comfort.
Attach them between the seat and backrest using internal cardboard beams and triangular gussets for reinforcement.
❗ Avoid weak joints: Never rely on glue alone—use mechanical support.
Assemble L-Shaped Side Frames
Create two L-shaped side frames from laminated corrugated cardboard:
– Vertical leg: Connects to seat
– Horizontal leg: Holds rear axle
These are primary load-bearing members. Ensure flutes run vertically in upright sections.
Reinforce all corners with triangular cardboard gussets (30°–60° angles). Apply extra glue and let cure fully.
Attach Wheels and Axles for Functional Movement
Make Strong Cardboard Wheels
Cut two large circles (12–16″ for full size, ~3–4 cm for dolls) from layered cardboard.
Reinforce the rim by gluing a curved cardboard strip around the edge. For better durability, insert a wooden dowel or plastic core at the center.
✅ Alternative: Use painted bottle caps as tires for miniature models.
Install Axles and Spinners
Cut axles to length:
– Rear axle: 24″ (full size) or two 13 cm skewers (doll-scale)
– Front crossbar: Proportional to width
Insert axles through pre-punched holes in side frames. Slide wheels on and secure with hot glue at the hub—avoid gluing the entire wheel to allow free spinning.
✅ Pro Tip: Add a thin line of black paint around the wheel edge to simulate rubber treads.
Choose Front Caster Type
For mobility:
– Functional: Attach plastic casters with brackets for swivel action
– Simplified: Use fixed cardboard wheels for display models
Don’t glue casters directly to side panels—this restricts rotation.
Reinforce for Durability and Load Resistance
Laminate Critical Parts
Double or triple-layer all high-stress areas:
– Seat
– Backrest
– Side frames
– Legs
Apply glue between layers, press flat, and clamp. Let dry 24 hours.
Bind Edges and Joints
Wrap exposed edges with folded cardboard strips glued in place. This prevents delamination and increases crush resistance.
Use Gussets at All Corners
Cut triangular supports from scrap cardboard. Glue them at 90° joints—especially where armrests, legs, and backrest meet the frame.
✅ Best Practice: Use PVA glue and let cure overnight for strongest hold.
Apply Weight Distribution Tactics
- Spread load over broad contact areas
- Use honeycomb inserts or box beam designs inside legs for extra strength
- Test with increasing weight: Start at 10 lbs, add 25 lbs at a time
Seal and Finish the Model for Longevity
Waterproof the Structure
Even light moisture weakens cardboard. Seal the entire wheelchair with:
– Mod Podge
– Acrylic spray
– Clear varnish
Sealing can increase stiffness by up to 30% and protect against humidity.
❗ Never skip this step if using in humid environments or for long-term display.
Sand and Paint
Lightly sand rough edges with fine-grit sandpaper to prevent splinters.
Paint after sealing:
– Use silver acrylic for metal-like axles
– Add black paint to wheel edges for treads
– Include text or logos for realism (e.g., “no hope” for narrative effect)
Customize for Personality
Make it unique:
– Add rhinestones to wheel hubs
– Use printed decals or fabric scraps
– Incorporate mini figures or accessories (e.g., a foam cat sculpture)
Test Before Final Use
Perform a Pre-Use Inspection
Check for:
– Cracks or warping
– Loose joints or glue failure
– Wheel wobble or axle misalignment
– Soft spots in seat or frame
Fix any issues before load testing.
Conduct Incremental Load Testing
Only for prototypes:
1. Place on a flat, level surface.
2. Add weight in 25-lb increments.
3. Watch for:
– Frame deflection (>½ inch)
– Joint separation
– Axle bending
4. Stop immediately if any failure occurs.
✅ STEM Tip: Document results for classroom analysis—great for teaching engineering principles.
Know the Limits and Stay Safe
This Is Not a Medical Device
No cardboard wheelchair meets ISO 7176 or any medical mobility standard. They are not safe for actual human use.
Use only for:
– Education
– Art
– Prototyping
– Play (with dolls)
⚠️ Safety Warning: Supervise children at all times. Never allow sitting on human-scale models.
Understand Material Weaknesses
Cardboard fails under:
– Moisture: Rapid degradation
– UV exposure: Weakens fibers
– Repeated stress: Fatigue at joints
– Humidity: Warping and softening
Lifespan: Days to weeks under light use.
Apply Creatively and Educate
Use in STEM Learning
Perfect for:
– Teaching load distribution
– Demonstrating joint mechanics
– Exploring sustainable materials
Students learn by doing—iterative builds improve problem-solving.
Inspire Inclusive Play
Doll-sized wheelchairs promote:
– Representation of disability
– Empathy and care in storytelling
– Accessibility awareness
Compatible with Monster High, Barbie, and other 1:6 scale dolls.
Create Emotional Art
Miniature dioramas can tell powerful stories:
– A wheelchair with “no hope” text
– A figure reaching for help
– A pet (e.g., foam cat) nearby
Materials like spackle on foam can mimic fur—adding realism.
Final Note: Building a cardboard wheelchair isn’t about replacing medical devices—it’s about innovation, education, and empathy. With careful planning, smart reinforcement, and creative finishing, you can turn a humble box into a symbol of strength, resilience, and imagination. Whether for a classroom, a diorama, or a design challenge, this project proves that even the simplest materials can carry profound meaning.