If you’re seeking a reliable, long-term solution for improving home accessibility, learning how to make a concrete wheelchair ramp is a valuable investment. Unlike temporary alternatives, a properly constructed concrete ramp offers durable, slip-resistant, and code-compliant access for wheelchairs, walkers, and mobility scooters. Whether you’re modifying a home entrance or aiming for full ADA compliance, building a solid concrete ramp ensures safety, stability, and independence for years to come.
This guide provides a complete, step-by-step approach to constructing a concrete wheelchair ramp from the ground up. You’ll learn how to calculate the correct slope, prepare a stable base, pour and finish the concrete, and install essential safety features—all while meeting accessibility standards. By the end, you’ll have the knowledge to build a safe, lasting ramp that withstands heavy use and harsh weather.
Calculate Ramp Dimensions for Safety and Compliance
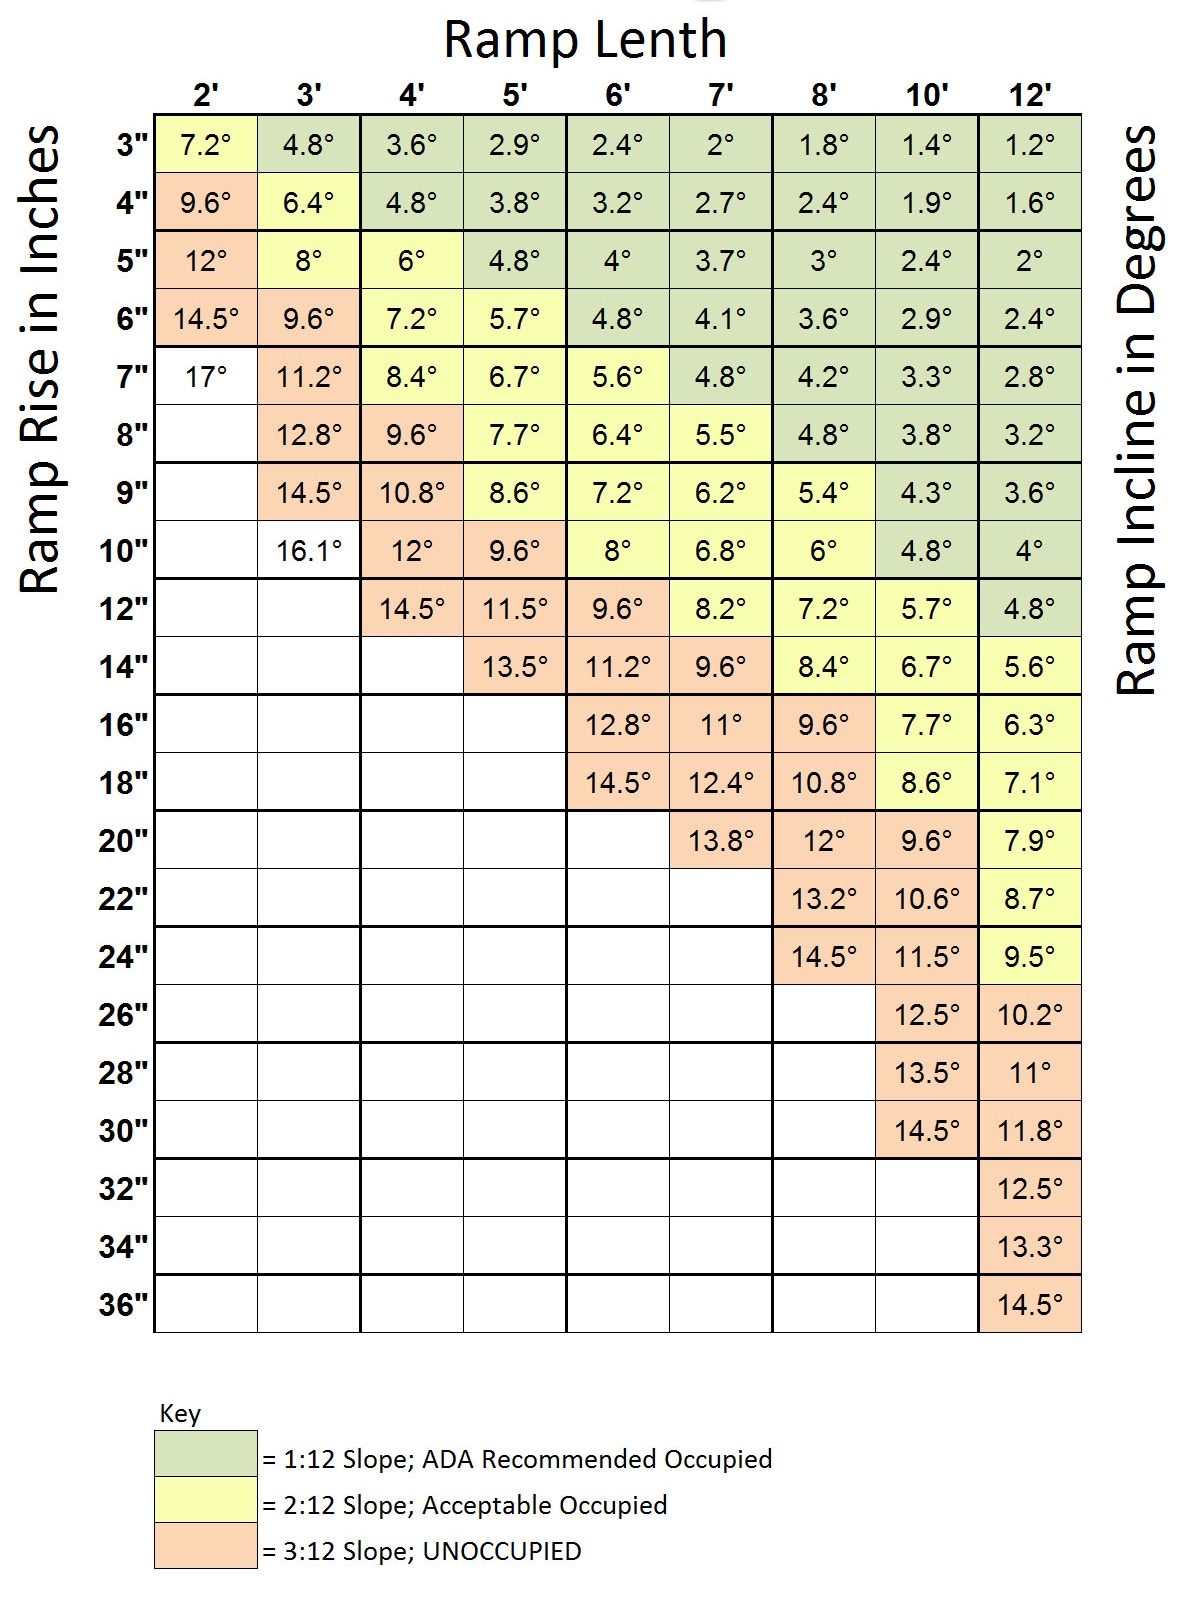
Measure Vertical Rise Accurately
Begin by measuring the exact vertical rise from the ground to the door threshold or porch surface. Use a tape measure and a level to ensure precision. This measurement determines your ramp’s minimum length. Even a small error—like missing an inch—can result in a slope that violates ADA standards and becomes unsafe for users.
For example:
– A 24-inch rise requires a 24-foot-long ramp (1:12 slope).
– An 8-inch rise needs an 8-foot run.
Double-check your measurements before digging to avoid costly corrections later.
Apply the 1:12 Slope Rule
The ADA requires a maximum slope of 1:12, meaning each inch of vertical rise must be supported by 12 inches of horizontal ramp. This gentle incline allows safe use by both manual and powered wheelchairs. Never exceed this ratio—even a slightly steeper slope can make the ramp difficult or dangerous to navigate.
To verify the slope during layout, use a long level and string line stretched from top to bottom. Adjust your form height along the run to maintain a consistent, code-compliant gradient.
Size Landings for Safe Maneuvering
Install level landings at:
– The top and bottom of the ramp,
– Every 30 inches of vertical rise, or
– Every 30 feet of horizontal length.
Each landing must be:
– At least 60 inches long,
– As wide as the ramp (minimum 36 inches).
A 5′ x 5′ landing at the top provides ample space for turning, especially if the door swings outward. This is critical for safe and independent access.
Verify Permits and Local Building Codes
Confirm Local Requirements Before Starting
While the ADA sets federal accessibility standards, your local building department may enforce stricter rules. Always contact your city or county office before breaking ground. You may need:
– A construction permit,
– Engineered plans for multi-segment ramps,
– Inspections at key stages.
Some areas require handrails even for rises as low as 4 inches—knowing these details prevents rework or fines.
Plan for Climate Challenges
In cold climates, your ramp’s foundation must extend below the frost line to prevent heaving. Use rigid foam insulation (XPS) beneath the slab or install deeper footings as required. Also, ensure the site drains away from the house to avoid water pooling, which can lead to ice buildup and structural damage.
Prepare the Subgrade for Stability
Excavate and Level the Ground
Remove all grass, roots, and loose soil from the ramp path. Excavate to a depth that allows for:
– 4 to 6 inches of compacted gravel, and
– 4 to 5 inches of concrete.
Use a laser or transit level to mark slope reference points on stakes. The subgrade must follow the exact 1:12 gradient—any deviation affects the final surface.
Install a Compacted Gravel Base
Lay ¾-inch crushed stone in 2-inch layers, compacting each with a plate compactor. This creates a dense, well-draining foundation that:
– Supports heavy loads,
– Prevents settling,
– Reduces frost heave risk.
Ensure the top of the gravel is 1 inch below the form height to allow for proper concrete thickness.
Build in Drainage with Cross-Slope
Create a 1–2% cross-slope (about ⅛ to ¼ inch per foot) across the ramp’s width to shed water. This slight tilt directs runoff to the sides, preventing puddles. Never slope the ramp toward the house—use grading to divert water away.
Construct Solid Formwork
Build Forms from Plywood and 2x4s
Use ¾-inch plywood for the vertical faces and 2x4s for bracing. Cut side forms to match the ramp’s width (minimum 36 inches). Secure them:
– With stake-and-screw braces in soil,
– Or Tapcon screws if attaching to existing concrete.
Make sure both sides are parallel and identical in height to maintain consistent width and slope.
Set Slope Using a String Line
Run a tight string line from the top to the bottom of the ramp, aligned with the 1:12 slope. Use a line level to check for accuracy. Adjust the form height along the run to match the string, ensuring a smooth, ADA-compliant incline.
Install Expansion and Isolation Joints
Where the ramp meets the house or sidewalk, place ¼-inch foam isolation board to allow for independent movement. For long ramps, plan expansion joints every 10–15 feet. These cuts prevent stress cracks caused by temperature changes and concrete shrinkage.
Reinforce the Slab for Durability
Add Rebar or Wire Mesh
Use #4 rebar (½-inch diameter) spaced 24 inches apart in a grid. Elevate the rebar 1–2 inches above the gravel using plastic chairs so it sits in the middle of the slab. For smaller ramps, welded wire mesh is sufficient.
Reinforcement:
– Prevents cracking,
– Supports daily wheelchair traffic,
– Increases structural strength.
Maintain Minimum 4-Inch Thickness
Pour concrete to a minimum of 4 inches thick across the entire ramp. Thinner sections are prone to cracking under load. At transitions (e.g., where ramp meets porch), ensure the slab doesn’t taper below 4 inches. If needed, pour a transition slab to raise the existing surface.
Insulate in Cold Climates
In freezing zones, lay 1–2 inches of XPS foam insulation beneath the gravel or directly under the slab. This reduces frost penetration and protects against heaving. Some jurisdictions require frost walls—always check local codes.
Pour and Level the Concrete
Use a Stiff, Low-Slump Mix
Choose concrete with a 4-inch slump or less to prevent it from slumping down the slope. Wet mixes lose their shape and compromise the gradient. For freeze-thaw resistance, use air-entrained concrete or add fibers for extra durability.
Pour from Top to Bottom
Start at the highest point and work downward. Shovel concrete in sections, filling gradually. Avoid dumping large piles, which can displace forms or create voids.
Consolidate with Vibration
Use a poker vibrator or tap the forms with a hammer to release trapped air. This increases density, prevents honeycombing, and ensures a stronger, more durable slab.
Screed and Float for a Smooth Surface
Screed for a Perfect Slope
Use a magnesium or 2×4 screed board. Rest it on the form edges and pull uphill in a sawing motion. Fill low spots; remove excess from high areas. Frequently check flatness with a 10-foot straightedge—even minor dips or humps affect wheelchair stability.
Bull Float for Initial Smoothing
Begin 1 hour after pouring, once bleed water has evaporated. Use a bull float in overlapping passes to:
– Push large stones below the surface,
– Fill voids,
– Create a uniform plane.
Avoid overworking, which weakens the surface by bringing too much paste to the top.
Magnesium Float for Final Texture
Follow with a magnesium float to refine the surface. This tool provides a smooth, ready-to-broom finish. Check for flatness and correct imperfections before moving on.
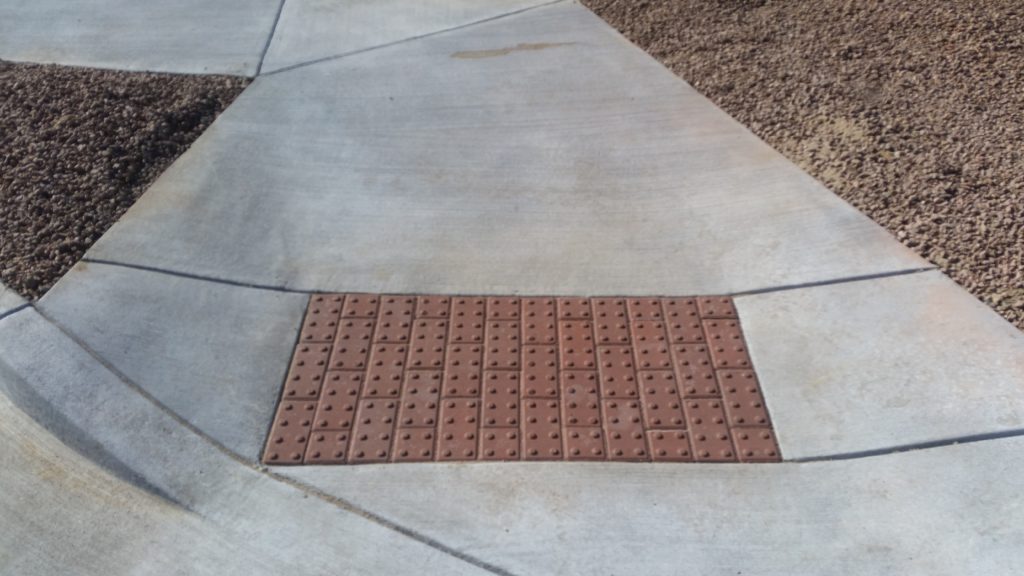
Apply a Non-Slip Finish
Round Edges with a Concrete Edger
Use a concrete edger to soften the ramp’s corners. Rounded edges resist chipping from wheel impacts and are safer for pedestrians.
Add Broom Finish for Traction
Once the surface firms up (no footprints), drag a wet push broom up the ramp in 2–3 steady passes. This creates a slip-resistant texture that remains safe in rain, snow, and ice. Rinse the broom often to avoid paste buildup.
Avoid trowel finishes—they’re too slick for outdoor use.
Cut Control Joints to Prevent Cracking
Saw-Cut Joints for Crack Control
Install control joints every 10–15 feet, or at intervals no more than 24–30 times the slab thickness (e.g., every 10 feet for a 5-inch slab). Cut 1 to 1.5 inches deep using a soft-cut saw within 24 hours of pouring.
Mark lines with a chalk line for straight cuts. Remove dust with a battery-powered blower after cutting.
Install Handrails and Edge Protection
Add handrails on both sides if:
– The rise exceeds 6 inches, or
– The run is over 72 inches.
Mount rails at 34–38 inches high and extend them 12 inches beyond the top and bottom. Anchor securely with Tapcon screws or epoxy bolts.
Install curbs or edge rails to prevent wheels from slipping off.
Cure and Seal for Longevity
Moist-Cure for 5–7 Days
Cover the ramp with plastic sheeting or curing blankets immediately after finishing. Keep the surface damp in dry or windy conditions. Proper curing:
– Prevents cracking,
– Maximizes strength,
– Ensures durability.
Avoid foot traffic for 3 days, and heavy loads for 7 days.
Remove Forms Carefully
Remove forms after 3 days for small ramps, or the next day for large pours. Gently pry them off to avoid chipping edges. Repair minor damage with a patching compound.
Apply Penetrating Sealer
After curing, use a penetrating concrete sealer (e.g., Radon Seals). It:
– Blocks water and de-icing salts,
– Prevents freeze-thaw damage,
– Preserves the broom finish without adding slipperiness.
Reapply every 2–3 years in harsh climates.
Finalize Access and Transitions
Ensure Flush Landings and Doorway Access
Verify the top landing is level with the doorway. If not, pour a transition slab to raise the porch. Grade surrounding soil or gravel to match the ramp height for smooth entry.
Connect Seamlessly to Walkways
Integrate the ramp with sidewalks or driveways using matching finishes or stamped patterns. Avoid tripping hazards—ensure no vertical offsets at joints.
Add Weather Protection (Optional)
For side entrances, install an awning or roof extension to shield users from rain and snow. This improves comfort and usability during bad weather.
Maintain Long-Term Safety and Function
Inspect for Damage Twice a Year
Check the ramp for:
– Cracks,
– Chipped edges,
– Surface wear.
Seal small cracks with flexible concrete caulk to prevent water intrusion.
Keep the Surface Clean and Clear
Remove leaves, ice, and debris regularly. Use a plastic shovel for snow—metal tools can scratch the surface. Avoid rock salt; use calcium chloride to reduce concrete corrosion.
Reapply Sealer as Needed
In areas with heavy weather exposure, re-seal every 2–3 years. This maintains slip resistance and extends the ramp’s life.
Building a concrete wheelchair ramp is a significant project, but the payoff in safety, independence, and long-term value is unmatched. By following ADA standards, using proper reinforcement, and applying a non-slip finish, you create a durable, accessible solution. With regular maintenance, your ramp can serve reliably for decades—providing seamless access for all.