If you’re facing mobility challenges at home, installing a wheelchair ramp for three steps can transform access and independence. With a typical rise of 22.5 inches—based on three standard 7.5-inch steps—this upgrade requires careful planning to ensure safety, usability, and compliance. A poorly built ramp can be dangerous, especially if it’s too steep or unstable. But a well-designed one, following proper slope ratios and structural guidelines, makes entry and exit smooth and secure for wheelchairs, scooters, or walkers. This guide walks you through everything you need to know: how to accurately measure your rise, calculate the correct ramp length, choose between wood, concrete, or aluminum, and either build a durable DIY ramp or select the best pre-made option. Whether you’re doing it yourself or hiring a pro, you’ll learn how to create a safe, long-lasting solution tailored to your home and needs.
Measure the Exact Rise of Your Three Steps
Before any construction begins, you must determine the total vertical rise—the distance from the ground to the top landing. This measurement drives every other decision, from ramp length to slope and compliance.
Confirm Each Step’s Height
- Use a tape measure to record the height from the base of the first step to the top surface of the third.
- Standard risers are 7.5 inches, so three steps equal 22.5 inches total rise.
- Always measure your actual steps—older homes or custom builds may vary by an inch or more.
Even a small error can result in an unsafe incline. Measure from the finished ground level (not grass or soil that may settle) to the bottom of the door threshold.
Map the Ramp Path and Check Obstructions
- Clear the intended path of plants, rocks, or furniture.
- Ensure at least 36 inches of clear width is available.
- Confirm the front door swings outward or has enough clearance when open.
- Avoid soft, sloping, or wet ground unless properly reinforced.
Accurate measurements and site prep prevent costly rework and ensure your ramp meets accessibility standards from day one.
Calculate the Required Ramp Length for Safety and Compliance
The slope of your ramp determines how easy it is to use. Too steep, and it becomes a hazard—especially for manual wheelchairs.
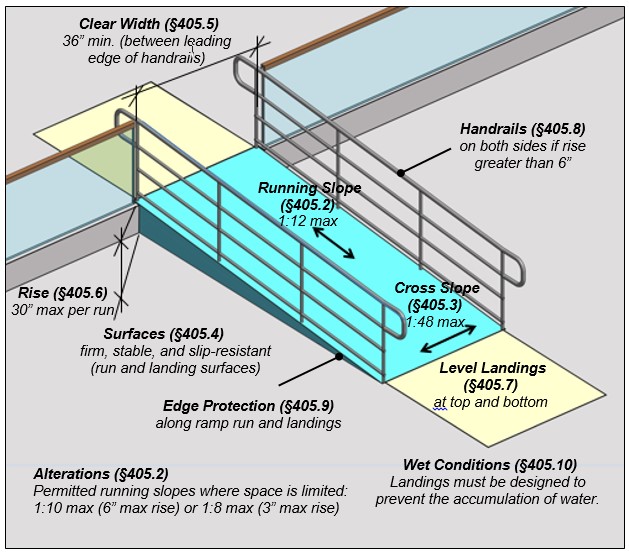
Use the 1:12 Slope for Independent Use
- ADA standard: 1 inch of rise = 12 inches (1 foot) of ramp
- For 22.5 inches of rise: 22.5 feet of ramp
- This is the safest and most accessible option
A 1:12 slope allows most users to navigate independently. It’s required in public buildings and strongly recommended for homes when space allows.
Evaluate Shorter Slopes for Space Constraints
If a 22.5-foot ramp won’t fit, consider these residential alternatives:
| Slope | Ramp Length | Best For |
|---|---|---|
| 1:12 | 22.5 ft | Full independence, ADA compliance |
| 1:8 | 15 ft | Assisted use, moderate effort |
| 1:6 | 11.25 ft | Powered chairs or temporary access |
| 1:2 | 11.25 ft | ❌ Not recommended—high fall risk |
Avoid 1:2 slopes. While common in DIY builds, they’re unsafe for solo use and may disqualify you from insurance or grant funding.
Install Landings at Top and Bottom
Every ramp needs level, stable landings:
– Minimum size: 60 inches long × 36 inches wide
– Must match the ramp’s width
– Provide 30″×48″ clearance in front of doors for turning
If your ramp exceeds 30 feet, add an intermediate landing. For three steps, top and bottom landings are usually sufficient.
Choose Between Wood, Concrete, or Aluminum Ramps
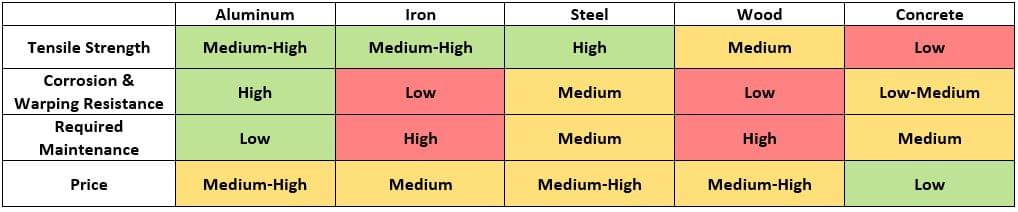
Your material choice affects durability, cost, maintenance, and safety.
Build a Wooden Ramp for Budget-Friendly Customization
Wood is ideal for DIYers with basic carpentry skills.
Pros:
- Low cost ($150–$400 in materials)
- Fully customizable
- Can be built with common tools
Cons:
- Requires annual sealing to prevent rot
- Can warp, splinter, or shift over time
- Needs concrete footings for support posts
Best for: Temporary or semi-permanent home use with space for a 1:12 slope.
Key Materials:
- 2x4s or 4x4s for frame and supports
- ¾” exterior plywood for decking
- 3″ exterior screws (no nails)
- Metal handrails (avoid wood—splinter hazard)
Pour a Concrete Ramp for Permanent Stability
Concrete offers unmatched durability and low maintenance.
Pros:
- Lasts decades with no upkeep
- Resists weather, pests, and fire
- Smooth, solid surface
Cons:
- High cost ($1,000–$3,000)
- Requires formwork and curing (7–14 days)
- Not easily modified
Best for: Long-term accessibility solutions.
Construction Tips:
- Build wooden forms to shape the incline
- Use rebar or wire mesh for strength
- Finish with a broom texture for slip resistance
- Embed anchor bolts for handrail attachment
Install Aluminum for Fast, Code-Compliant Access
Prefabricated aluminum ramps are the easiest and safest choice for most homeowners.
Types:
- Custom Aluminum Ramps: Tailored to your rise; 1:12 slope; bolted down
- Modular Ramps: Snap-together sections; reconfigurable
- Portable Ramps: Foldable—not ideal for 3 steps
Pros:
- Meets ADA and IBC standards
- Weather-resistant, no maintenance
- Quick installation (often DIY)
- Reusable if you move
Cons:
- Higher cost ($1,500–$5,000)
- May require professional setup
Avoid portable ramps for 22.5″ rise. A 12-foot folding ramp creates a 1:2.25 slope—too steep for safe solo use.
Build a Wooden Ramp: Step-by-Step Instructions
If you’re comfortable with tools, building a wood ramp is a rewarding project.
Frame the Ramp Structure
- Cut two 2×4 side stringers to your ramp length (e.g., 22.5 ft)
- Angle the top end to match the slope using a 4×4 block as a guide
- Install cross supports every 16–24 inches with 2x4s
- For extra strength, use 4x4s for the main frame
Use a long level or laser to ensure the frame is straight and sloped correctly.
Install Vertical Supports
- Place 4×4 posts every 2 feet under the frame
- Set bottom ends in concrete footings or piers (not on bare soil)
- Check each post with a level—must be plumb
- Secure with 3″ exterior screws
This prevents sinking, especially in wet or soft ground.
Add Diagonal Bracing for Rigidity
- Install 2×4 diagonal braces between supports
- Or use metal cross-bracing for added strength
- Prevents side-to-side sway on long spans
Bracing is essential for ramps over 20 feet. Without it, the structure can flex under weight.
Attach the Decking and Add Traction
- Lay ¾” exterior plywood over the frame
- Leave ⅛” gaps between sheets for expansion
- Screw down with 2.5″ exterior screws every 6–8 inches
- Never use nails—they loosen over time
Apply non-slip tape or grit coating for traction. Seal or paint for weather protection.
Install Handrails and Landings for Safety
Handrails and landings aren’t optional—they’re required by code and essential for safety.
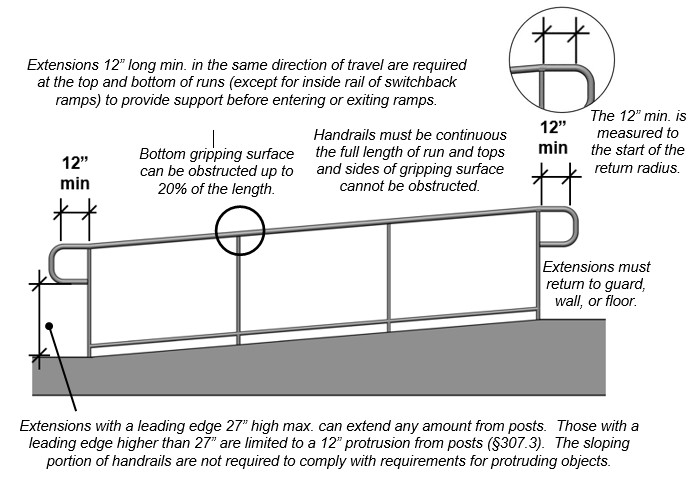
Add ADA-Compliant Handrails
- Required if rise exceeds 6 inches (applies to 3 steps)
- Install on both sides
- Height: 34–38 inches above ramp surface
- Use graspable metal rails (1¼”–1½” diameter)
- Extend 12 inches beyond top and bottom
- Ends must return to wall or curve down
Avoid wooden handrails—they can splinter. Use Kee Klamp or similar metal systems.
Build Top and Bottom Landings
- Construct 60″×36″ platforms using 2×4 frame and plywood
- Ensure they are level and securely anchored
- Top landing should attach to the house or step
- Bottom landing should sit on concrete piers or compacted gravel
Include 30″×48″ clearance in front of doors for turning space.
Buy a Pre-Made Ramp for Faster, Safer Installation
If you lack time, tools, or confidence, buying a ramp is often the better choice.
Choose a Custom Aluminum Ramp
- Fully tailored to your rise and space
- Guaranteed 1:12 slope
- Bolted or anchored for permanence
- ADA-compliant, low maintenance
- Lifespan: 20+ years
Ideal for long-term use. Many companies offer free on-site assessments.
Opt for Modular Aluminum Ramps
- Sold in 12–20-foot sections
- Assembled with Allen keys or wrenches
- Expandable and reconfigurable
- Often DIY-installable
Best for durable, semi-permanent solutions without concrete work.
Skip Portable Ramps for 3 Steps
- Max safe rise: 15 inches (2 steps)
- A 12-foot ramp on 22.5″ rise = 1:2.25 slope—too steep
- Only usable with assistance or powered chairs
Use portable ramps for vehicles or temporary access, not as permanent home solutions.
Prepare the Site and Prevent Safety Hazards
Even the best ramp fails if the foundation is weak or the site is unsafe.
Level and Stabilize the Ground
- Remove grass, roots, and loose soil
- Lay 4–6 inches of compacted gravel for drainage
- Place concrete piers or blocks under supports
- Avoid soft or sloping ground
A stable base prevents sinking or collapse.
Manage Drainage and Keep the Path Clear
- Ensure water flows away from the ramp
- Use gravel or French drains if needed
- Keep 36-inch clearance to and from the ramp
- Trim bushes and ensure adequate lighting
Standing water causes rot, rust, and slip hazards.
Follow Daily Safety Practices for Long-Term Use
A ramp is only as safe as its use.
Maintain the Surface Regularly
- Keep free of ice, snow, leaves, and moisture
- Inspect monthly for loose screws, warping, or rust
- Re-seal wood ramps every 1–2 years
- Check aluminum bolts annually
Add non-slip strips or textured coating for extra grip.
Use Proper Wheelchair Techniques
- Engage brakes when stopped
- Approach straight on—no side angles
- Lean forward when ascending
- Control descent slowly—never free-wheel
- Use handrails for balance
Caregivers should stand behind the user when assisting.
Never Exceed Weight Limits
- Check manufacturer specs for load capacity
- Most ramps support 300–600 lbs
- Include user + wheelchair + any cargo
Overloading can cause collapse, especially on DIY wood ramps.
Know When to Hire a Professional
DIY is possible, but some situations demand expert help.
Call a Pro If You:
- Are unsure about structural integrity
- Need permits or inspections
- Want a custom aluminum or concrete ramp
- Have uneven terrain or drainage issues
- Lack tools, time, or experience
Many accessibility contractors offer free estimates and handle permits and compliance.
Benefits of Professional Installation
- Guaranteed ADA and IBC compliance
- Proper foundation and anchoring
- Expertise in slope, handrails, and landings
- Warranty and long-term support
For a permanent solution, professional help is worth the investment.
A well-built wheelchair ramp for three steps isn’t just a construction project—it’s a gateway to independence, safety, and dignity. Whether you build a wood ramp, pour concrete, or install a modular aluminum system, the key is safety, compliance, and usability. Stick to a 1:12 slope when possible, add handrails and landings, and choose durable materials. Measure twice, plan carefully, and don’t hesitate to ask for help. A properly designed ramp doesn’t just open a door—it opens up a world of freedom.