When a wheelchair lift fails, it’s more than an inconvenience—it can cut off access, compromise safety, and leave users stranded. Whether installed in a van, SUV, or building, these electro-mechanical systems are crucial for independence and ADA compliance. Most breakdowns stem from preventable issues: blown fuses, misaligned barriers, dead batteries, or faulty sensors. The good news? Many wheelchair lift repair problems can be diagnosed and fixed quickly with basic tools and a methodical approach.
This guide walks you through the most common failures and their solutions—empowering users, caregivers, and fleet managers to restore function fast. From checking power sources to performing emergency manual operation, you’ll learn how to troubleshoot like a pro. We’ll also cover preventive maintenance, when to call in experts, and how to avoid costly downtime. With the right knowledge, you can keep your lift running reliably and safely for years.
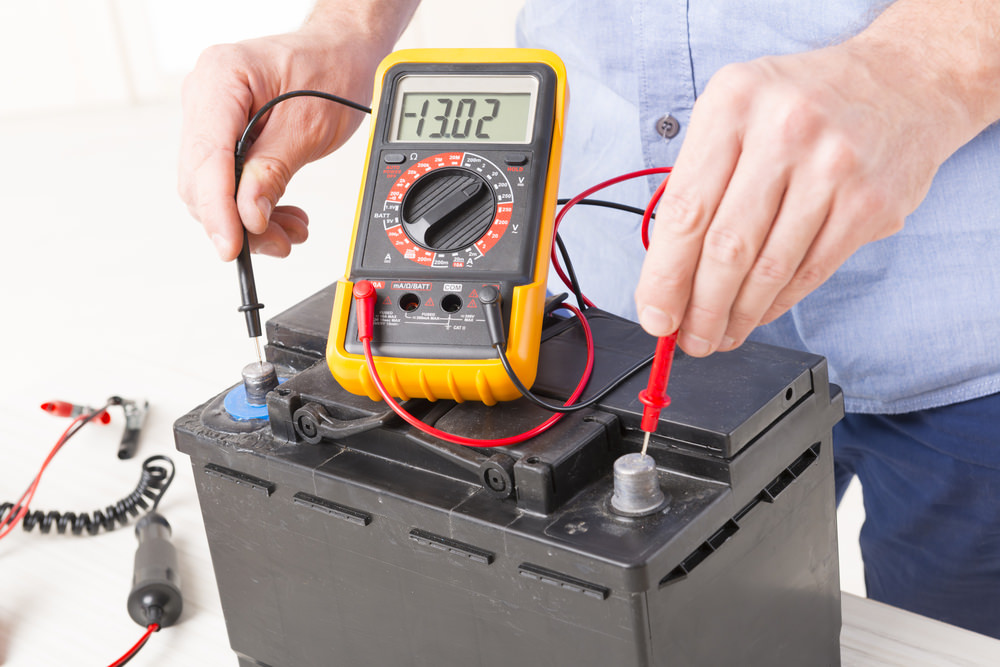
Test Battery Voltage and Electrical Connections
A wheelchair lift that won’t power on is often a simple electrical issue. Start here before diving into complex components.
Check for Minimum 12V Battery Charge
Most vehicle-mounted lifts operate on 12V DC from the vehicle’s battery. Use a digital multimeter to test:
– Fully charged: 12.6V
– Minimum for operation: 12.0V
If voltage drops below 12V, the lift may not activate—even if the engine runs.
Important: A running engine doesn’t guarantee a fully charged battery. Alternators may not recharge deeply drained batteries, especially during short trips.
Action Step: Recharge or replace weak batteries. Keep a portable jump starter on hand for emergencies.
Locate and Inspect Fuses and Circuit Breakers
Blown fuses are one of the top causes of sudden lift failure.
How to check:
1. Find the fuse box—typically near the lift control module or under the dashboard.
2. Refer to the owner’s manual to identify the correct fuse (amperage and location).
3. Remove and inspect the fuse: a broken filament means it’s blown.
4. Replace only with an identical-rated fuse—never use a higher amperage.
Pro Tip: Keep spare fuses in your emergency kit. Label them by lift model and amperage.
Examine Wiring, Grounding, and Corrosion
Loose, damaged, or corroded wiring disrupts power flow and causes intermittent operation.
What to inspect:
– Battery terminals: Clean with a baking soda and water mix to remove corrosion.
– Wiring harness: Look for fraying, pinching, rodent damage, or exposed wires.
– Ground connection: Ensure the ground wire is tightly bolted to clean, unpainted metal.
Quick Test: Wiggle wires while attempting to operate the lift. If it powers on intermittently, you’ve found a loose connection.
Diagnose Hand Pendant Malfunctions
If the hand pendant doesn’t light up or respond, the problem may not be the lift—it could be the control interface.
Ensure the Pendant Is Fully Latched
Many pendants have a tower switch on the side that must be fully engaged.
Fix:
– Remove the pendant and reinsert it firmly into the dock.
– Press the side switch gently as you plug it in.
– If lights come on, the switch was disengaged.
Note: A loose latch mimics a dead system—always check this first.
Inspect the Pendant Cable and Connectors
Frayed or kinked cables cause erratic behavior or total failure.
Look for:
– Cracks in the cable sheath
– Exposed internal wires
– Bent or dirty connector pins
Warning: Never tape over damaged wires. This creates fire and shock hazards.
Solution: Replace the cable or pendant with an OEM-approved unit. Aftermarket parts may not meet safety standards.
Test Internal Microswitches
Over time, internal switches wear out.
Symptoms: Buttons feel soft, unresponsive, or don’t click.
Fix: Replace the entire pendant. Attempting to repair internal switches is unreliable and unsafe.
Fix “IB Up” Switch Failure on Inboard Barrier
If the lift lowers to near the ground but stops a few inches short, the inboard barrier (IB) switch is likely at fault.
Understand How the IB Up Switch Works
This safety switch confirms the back barrier is fully raised before deployment.
Mechanism:
– A pad on the barrier presses against the switch.
– When activated, it signals the control system the lift is safe to operate.
– If not engaged, the lift halts mid-cycle.
Check Barrier Height and Alignment
Steps:
1. Manually raise the inboard barrier.
2. Confirm it rises at least 2–3 inches.
3. Ensure nothing blocks its travel.
Adjustment:
– Loosen the mounting bolts slightly.
– Reposition the barrier so the pad fully contacts the switch.
– Retighten and test.
Test Switch and Floor-Level Wiring
Use a multimeter in continuity mode:
– Press the switch manually.
– You should hear a beep or see near-zero resistance.
If no signal, inspect wiring under the platform for cuts or corrosion. Replace the switch if faulty.
Clear Outboard Barrier and Foot Release Blockage
When the lift starts to rise but stops after a few inches, the outboard barrier is likely the issue.
Confirm Barrier Locks Fully
The barrier must close and click into place to activate the foot release.
Failure signs:
– Lift stops mid-cycle
– No hydraulic pressure buildup
– Barrier appears closed but doesn’t engage
Fix:
– Close the barrier manually and listen for a click.
– If no sound, check for debris, bent latches, or loose hardware.
Inspect Microswitches Behind the Latch
Two microswitches control the foot release:
– One detects closure
– One confirms lock engagement
Troubleshooting:
– Clean contacts with electrical contact cleaner.
– Test for continuity with a multimeter.
– Replace faulty switches—never bypass them.
Warning: Bypassing safety switches violates ADA and voids warranties.
Reset Sensor and Safety Lock Errors
Modern lifts use sensors to prevent unsafe operation. False triggers can disable the system.
Clean Sensor Surfaces
Dust, moisture, or spider webs can block infrared or magnetic sensors.
Steps:
– Wipe lenses with a dry, lint-free cloth.
– Avoid harsh solvents that damage plastic.
– Check outdoor units for ice or dirt buildup.
Perform a System Reset
Clear temporary glitches with a soft reset:
1. Turn off power at the fuse or disconnect.
2. Wait 30 seconds.
3. Restore power.
4. Try normal operation.
This often clears error codes and restores function.
Recalibrate Sensors if Supported
Some models require periodic calibration.
Steps (refer to manual):
– Enter service mode via pendant.
– Follow prompts to recalibrate position sensors.
– Save and exit.
Incorrect calibration causes false errors and incomplete cycles.
Lubricate and Inspect Moving Parts Monthly
Lack of lubrication leads to grinding, slow operation, and premature wear.
Lubricate Key Components Every 50 Cycles
Areas to treat:
– Hinges and pivot joints
– Chain or belt drives
– Gear housings
– Hydraulic cylinder rods
Use: Only manufacturer-approved lubricants (e.g., silicone or lithium grease). Avoid WD-40—it attracts dust.
Check for Mechanical Wear
Inspect for:
– Rust or corrosion
– Loose bolts or worn bushings
– Bent arms or cracked welds
– Chain stretch or belt wear
Action: Replace worn parts immediately with OEM components.
Listen for Warning Noises
- Grinding: Gear or bearing failure
- Squeaking: Needs lubrication
- Clunking: Loose fasteners or broken welds
Address noises early—they often precede major breakdowns.
Align Platform and Rails for Smooth Operation
Misalignment causes scraping, binding, and stowage issues.
Ensure Platform Is Level
When deployed, the platform should be:
– Level with the ground
– Slightly tilted forward (½” lower at front) for preload
Adjustment:
– Loosen platform bolts.
– Use a bubble level to align.
– Retighten securely.
Re-Center Mounting Brackets
If the platform scrapes or binds:
1. Measure distance from platform edges to vehicle frame.
2. If unequal, loosen bracket bolts.
3. Re-center and retighten.
4. Test deployment and stowage.
Never force a misaligned lift—this damages motors and gears.
Perform Emergency Manual Operation Safely
When power fails, use manual override to lower or raise the lift.
Lower Hydraulic Lifts by Gravity
Steps:
1. Retrieve the manual pump handle (stored under the vehicle).
2. Locate the open port on the hydraulic pump.
3. Insert handle and turn ¼ turn counterclockwise.
4. Lift lowers by gravity.
To raise:
– Turn valve clockwise until tight.
– Pump handle to build pressure.
– Platform rises as fluid returns.
Override Single Post (Worm Drive) Lifts
Steps:
1. Open the tower cover.
2. Flip two main switches to override mode.
3. Use red toggles to control lift directly from battery power.
Functions:
– Deploy: Unfold platform
– Down: Lower to ground
– Up: Raise with wheelchair
– Stow: Fold vertically
Critical: Vehicle battery must have charge. Test override function monthly.
Schedule Preventive Maintenance Inspections
Regular maintenance prevents 80% of failures and keeps warranties valid.
Monthly User Checklist
Before each use:
– ✅ Inspect for damage or obstructions
– ✅ Test pendant lights and buttons
– ✅ Listen for unusual noises
– ✅ Confirm barriers lock
– ✅ Check battery voltage
– ✅ Look for fluid leaks (hydraulic models)
Annual Professional PMI
A certified technician should perform a full inspection yearly, including:
– Diagnostic scan
– Safety interlock testing
– Hydraulic pressure check
– Calibration and lubrication
Benefit: Catches hidden issues like wire fatigue or internal switch failure.
Use Professional Repair Services When Needed
For complex issues, rely on certified technicians with OEM tools.
Choose Arrow Lift Service Plans
Performance Basic Plan:
– Annual ASME A18.1 safety inspection
– Factory-recommended maintenance
– Priority emergency service
– Parts/labor discounts
Performance Plus Plan (Recommended for Fleets):
– All Basic benefits
– Free diagnosis and repair of most issues
– No surprise bills
– Predictable long-term costs
Contact Freedom 1st Auto Repair
Specialists in hydraulic lift repair in the Midwest.
Services:
– Full operational assessment
– Control system diagnostics
– Lubrication and alignment
– Warranty verification (even without docs)
Contact:
📞 630-486-1778
📍 200 Poplar Pl Unit C, North Aurora, IL 60542
🕘 Mon–Sat: 7:00 AM – 7:00 PM
Prevent Future Breakdowns with Smart Practices
Long-term reliability comes from routine care and smart choices.
Install with Certified Technicians
30% of early failures stem from improper installation.
Ensure:
– Correct lift-to-vehicle compatibility
– Proper grounding and wire routing
– Weatherproof connections
– ADA-compliant platform height
Use OEM Parts Only
Aftermarket parts may fit but fail under load.
Risks:
– Shortened lifespan
– Voided warranties
– Safety system incompatibility
Always use manufacturer-approved components.
Upgrade Older Systems
Modernize with:
– Digital control modules
– Improved sensors
– Quieter motors
– Remote diagnostics
Retrofit kits extend life and improve reliability.
Keep Records and Manuals
Maintain a repair log with:
– Service dates
– Parts replaced
– Technician notes
– Warranty info
Store manuals digitally and physically.
Final Note: Wheelchair lift repair isn’t just about fixing problems—it’s about ensuring safety, independence, and compliance. By mastering basic troubleshooting, practicing manual overrides, and scheduling professional PMIs, you can prevent most failures before they happen. Whether you’re a user, caregiver, or fleet manager, proactive care keeps lifts running when they’re needed most. Don’t wait for a breakdown—start your maintenance routine today.