Navigating stairs or elevated entrances in a wheelchair is only possible with a properly designed and correctly used ramp. Yet, too many people assume that any sloped surface labeled “accessible” is safe to use—this assumption can lead to serious injury. Millions of individuals rely on wheelchairs daily, and ramps are often the sole means of accessing homes, vehicles, public buildings, and sidewalks. But without the right technique, even a compliant ramp can become a hazard.
This comprehensive guide walks you through how to use a wheelchair ramp safely, whether you’re the user or the caregiver. Based on ADA standards, real-world best practices, and expert recommendations, it covers everything from inspecting ramp safety to mastering ascent and descent techniques. You’ll learn how to avoid dangerous mistakes, adapt to different ramp types, and ensure true accessibility—not just symbolism. Whether you’re using a manual chair, power chair, or scooter, this step-by-step resource empowers you with the knowledge for confident, safe mobility.
Verify the Ramp Meets Safety Standards
Before rolling onto any ramp, confirm it’s structurally sound and compliant. Many accidents occur because users trust ramps that are too steep, unstable, or missing critical features.
Check the 1:12 Slope Rule
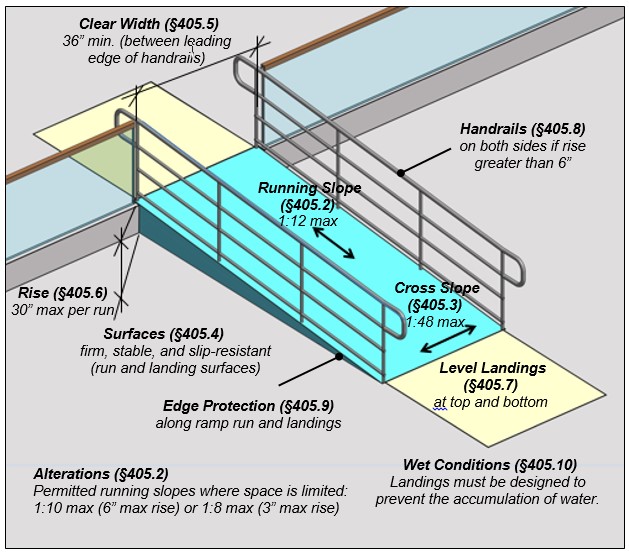
The most important safety standard is slope. According to the Americans with Disabilities Act (ADA), the maximum allowable incline is 1:12—meaning for every 1 inch of vertical rise, the ramp must extend at least 12 inches horizontally.
– A 6-inch step requires a 6-foot-long ramp.
– A 24-inch rise (like two standard steps) needs a 24-foot ramp.
– Anything steeper—like 1:6 or 1:4—is not ADA-compliant and poses a tipping or loss-of-control risk.
Use a level tool or a smartphone inclinometer app to measure the angle if unsure. If the ramp feels too steep or requires excessive effort to climb, it likely exceeds safe limits.
Look for Essential Safety Features
Even with the correct slope, a ramp must have key components to be safe:
– Handrails: Required on both sides if the rise exceeds 6 inches. They should be 34–38 inches high and extend at least 12 inches beyond the top and bottom.
– Landings: Level platforms measuring 5 feet by 5 feet at the top and bottom. Needed every 30 inches of vertical rise for longer ramps.
– Non-slip surface: No ice, water, moss, or debris. Aluminum or rubberized coatings improve traction.
– Edge protection: Raised edges or curbs to prevent wheels from slipping off.
– Stability: No wobbling, loose joints, or rocking when pressure is applied.
Pro Tip: If the ramp shakes when you touch it or lacks handrails on a high rise, do not use it—find an alternative route or request assistance.
Position the Wheelchair Properly
Correct alignment prevents tipping and ensures smooth movement across the ramp surface.
Always Face Forward
Position the wheelchair so the user is facing forward, never sideways or backward. This maintains the center of gravity over the rear wheels and reduces tipping risks. Center the chair on the ramp path and ensure the front casters are aligned straight.
If the chair has anti-tip wheels, verify they are in place and touching the ground. These small rear stabilizers prevent backward flips during ascent.
Engage Brakes Before Moving
Lock both rear wheel brakes before approaching the ramp. Only release them when you’re ready to begin moving. Re-engage the brakes during pauses or once fully on level ground.
Visual Cue: If the chair rolls while brakes are engaged, either the brakes are faulty or the ramp is too steep.
Ascend the Ramp with Proper Technique
Going up requires strength, balance, and correct body mechanics—especially when pushing someone else.
Use Leg Power, Not Arms
To protect your back and maintain control:
1. Stand behind the chair, feet shoulder-width apart.
2. Lean forward slightly, bending your knees.
3. Keep your back straight, gripping the push handles firmly.
4. Push with your legs and core, not just your arms.
5. Move slowly and steadily—avoid jerking motions.
This technique reduces strain and gives better control over the chair’s momentum.
Keep the Passenger Facing Forward
Never push a wheelchair backward up a ramp. Doing so shifts weight forward and increases the chance of the chair tipping over the front wheels. Always keep the user facing uphill.
Communicate clearly: say “Starting now,” “Taking a break,” or “Almost there” to keep the user informed and calm.
Take Breaks on Landings Only
If you need to rest mid-ramp:
– Stop only on a level landing, never on the incline.
– Re-engage brakes fully before releasing the handles.
– Catch your breath, then resume with controlled motion.
Warning: If there’s no landing and you’re fatigued, get help. Never risk losing control halfway up.
Descend with Full Control
Going down is often more dangerous than going up. Gravity pulls the chair forward, so resistance and balance are critical.
Stay Behind and Lean Back
- Stand behind the chair, never in front.
- Lean back slightly, using your body weight to resist downward motion.
- Hold the handles firmly, applying steady pressure.
- Let the chair roll slowly—do not let it free-wheel.
- Use brakes intermittently if stopping mid-ramp.
Keep your feet wide for stability and avoid leaning forward, which could strain your back.
Maintain Forward Passenger Position
The user should face forward throughout descent. If they want to see where they’re going, gently tilt the chair backward using the handles to adjust their view without compromising balance.
Consider Backward Descent (With Caution)
Some trained caregivers walk backward down the ramp, facing downhill. While this allows better visibility, it increases tripping risk. Only attempt this method with practice and on short, stable ramps.
Pro Tip: Practice descending with an empty wheelchair first to build confidence.
Operate Power Chairs and Scooters Safely

Motorized devices behave differently on inclines due to weight, power, and balance.
Ascending a Power Chair
- Remove rear items (bags, walkers) that shift balance.
- Fasten seat belt and check anti-tip wheels.
- Center on ramp, facing forward.
- Use the lowest speed setting.
- Look ahead, avoid sudden turns.
- Practice on gentle slopes first.
Never exceed the manufacturer’s specified incline rating—most power chairs handle up to 6–8 degrees.
Descending a Power Chair
- Seat belt fastened, device centered.
- Use minimal throttle—let gravity assist.
- Lean back slightly or use a chest strap for support.
- Ease off power near the bottom, stopping gradually.
Avoid sudden stops that could cause forward lurching.
Navigate Curbs Using the One-Step Method
For small curbs (1–6 inches), manual wheelchairs can use the one-step technique—but only if the chair allows tipping.
Going Up a Curb
- Release brakes.
- Tilt chair back using the tip bar until balanced on rear wheels.
- Roll forward until rear wheels hit the curb.
- Push upward and forward—do not lift.
- Let front casters climb over.
- Lower gently, then roll rear wheels up.
Going Down a Curb
- Turn chair so user faces away from curb.
- Tilt back slightly using handles.
- Lower rear wheels slowly over edge.
- Roll backward carefully, maintaining balance.
- Lower front wheels once clear.
Critical: This method only works for standard manual wheelchairs. Never use on scooters or power chairs.
Communicate and Respect User Preferences
Autonomy matters. Always ask before assisting and follow the user’s preferred method.
Ask Before Helping
- “Would you like help?”
- “How do you prefer to go down ramps?”
- “Are you comfortable with this ramp?”
Explain Each Action
- “I’m going to tip back now.”
- “We’re starting the descent.”
- “Taking a quick break.”
Some users prefer to see forward while descending—adjust technique accordingly without sacrificing safety.
Avoid Common but Dangerous Mistakes
Even small errors can lead to falls or equipment damage.
- Don’t use non-compliant ramps—steep slopes are unsafe.
- Never stand in front when descending—you could be run over.
- Don’t skip anti-tip checks—test wheels before every ramp use.
- Avoid wet, icy, or debris-covered surfaces—use only if non-slip.
Prepare for Vehicle Ramps
Vans and buses use specialized ramps that require extra care.
Manual Slide-Out Ramps
- Deploy fully—listen for a click or lock.
- Check angle—must not exceed 1:12.
- Center wheelchair before rolling on.
- Engage brakes once inside.
- Retract completely after use.
Electric or Hydraulic Ramps
- Wait for full deployment.
- Never force movement if it hesitates.
- Report malfunctions immediately.
Note: Rear-entry ramps require backing on; side-entry allows forward entry.
Final Safety Checklist
Before every ramp use, confirm:
– ✅ Slope is 1:12 or gentler
– ✅ Surface is dry, clean, non-slip
– ✅ Handrails present and secure (if needed)
– ✅ Landings are level and clear
– ✅ Brakes and anti-tip wheels work
– ✅ Passenger is secure, seat belt on
– ✅ You’re using proper body mechanics
– ✅ Communication is clear
A wheelchair ramp is only as safe as its use. True accessibility isn’t about appearance—it’s about function, safety, and dignity. Use this guide to ensure every journey is secure.