A wheelchair ramp should empower independence—not create danger. Yet every year, preventable accidents occur due to steep slopes, slippery surfaces, missing handrails, or poor maintenance. Whether you’re using a portable ramp at home or navigating a permanent public accessway, wheelchair ramp safety is critical for preventing falls, injuries, and equipment damage. This guide delivers actionable, expert-backed wheelchair ramp safety tips covering design, usage, materials, and maintenance. You’ll learn how to spot hidden hazards, choose the right ramp, and use it confidently in all conditions—rain, snow, heat, or daily wear.
Use a 1:12 Slope Ratio for Maximum Safety

The incline of your ramp directly impacts usability and safety. Too steep, and it becomes exhausting or dangerous to climb. Too shallow, and space becomes an issue. The solution? Stick to the gold standard: the 1:12 slope ratio.
Why 1:12 Is Non-Negotiable
A 1:12 slope ratio means every inch of vertical rise requires 12 inches (1 foot) of horizontal ramp. This standard ensures:
– Manual wheelchair users can ascend without overexertion.
– Power chairs and scooters maintain control on descents.
– Reduced risk of tipping backward during ascent.
For example:
– A 6-inch step needs a 6-foot ramp.
– A 30-inch porch demands a 30-foot run—which may require switchbacks in tight spaces.
This ratio is not just a suggestion—it’s a requirement under the Americans with Disabilities Act (ADA) and ANSI A117.1 standards for public and commercial facilities.
Risks of Steeper Slopes
Slopes steeper than 1:12 (like 1:8 or 1:10) significantly increase danger:
– Tipping hazard: Especially when ascending with a power chair.
– Loss of control: Gravity accelerates descent, making braking harder.
– Fatigue: Manual users may lose momentum mid-ramp, leading to rollback.
Pro Tip: If space limits a full 1:12 ramp, consider a modular system with landings and turns instead of increasing the slope.
Choose Slip-Resistant Surfaces to Prevent Falls

No matter how perfect the slope, a slick surface turns any ramp into a hazard. Wet leaves, morning dew, or icy patches can cause wheels to slide—especially on untreated materials.
Best Materials for Traction
| Material | Traction Level | Best For |
|---|---|---|
| Textured aluminum | High | Outdoor, portable, long-term |
| Rubber-coated ramps | Very high | Thresholds, indoor/outdoor use |
| Composite decking | High | Permanent installations |
| Concrete (textured) | Moderate to high | Fixed ramps with proper finish |
| Untreated wood | Low (when wet) | Not recommended |
Avoid untreated wood—it rots, warps, and becomes slick when damp. Even treated wood requires annual resealing with anti-slip paint to remain safe.
Built-In Anti-Slip Features
Look for ramps with:
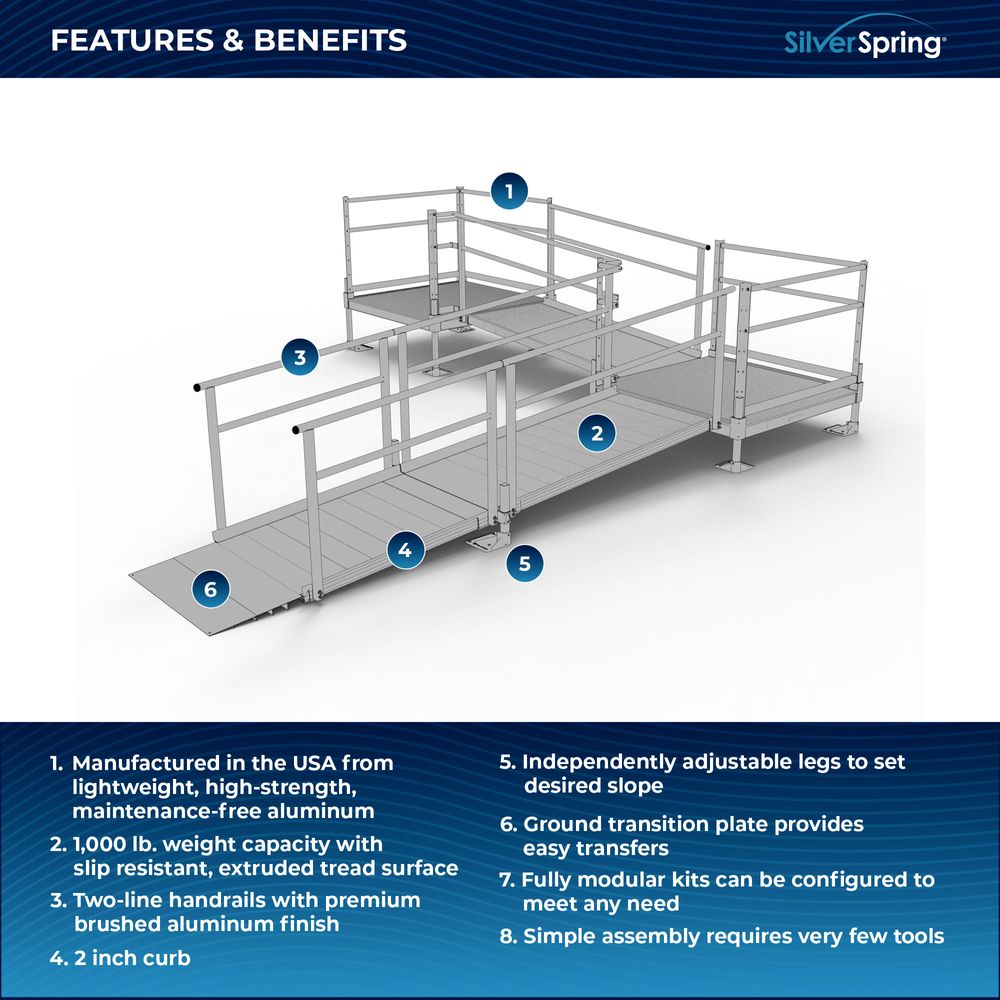
– Extruded treads: Raised patterns that grip tires.
– Grit-coated surfaces: Sand-like texture embedded in metal or rubber.
– Drainage channels: Prevent water pooling.
Visual Cue: After rain, walk on the ramp. If your shoes slip slightly, so will wheelchair tires.
Install Handrails on Both Sides for Balance and Support
Handrails aren’t optional extras—they’re lifelines. They provide balance, support, and a way to stop a fall before it happens.
When Handrails Are Required
- Ramps longer than 6 feet must have handrails on both sides.
- Public buildings are legally required to comply with ADA standards.
- Outdoor ramps should always include them, regardless of length.
Even short ramps benefit from rails if used by someone with limited strength or balance.
Proper Handrail Height and Strength
- Height: 34 to 38 inches above the ramp surface.
- Diameter: 1.25 to 1.5 inches—easy to grip.
- Mounting: Fully anchored, capable of supporting body weight.
- Continuity: Run the full ramp length, including landings.
Warning: Loose or wobbly rails can give a false sense of security. Test by pushing down hard—no movement should occur.
Build Level Landings at Top and Bottom
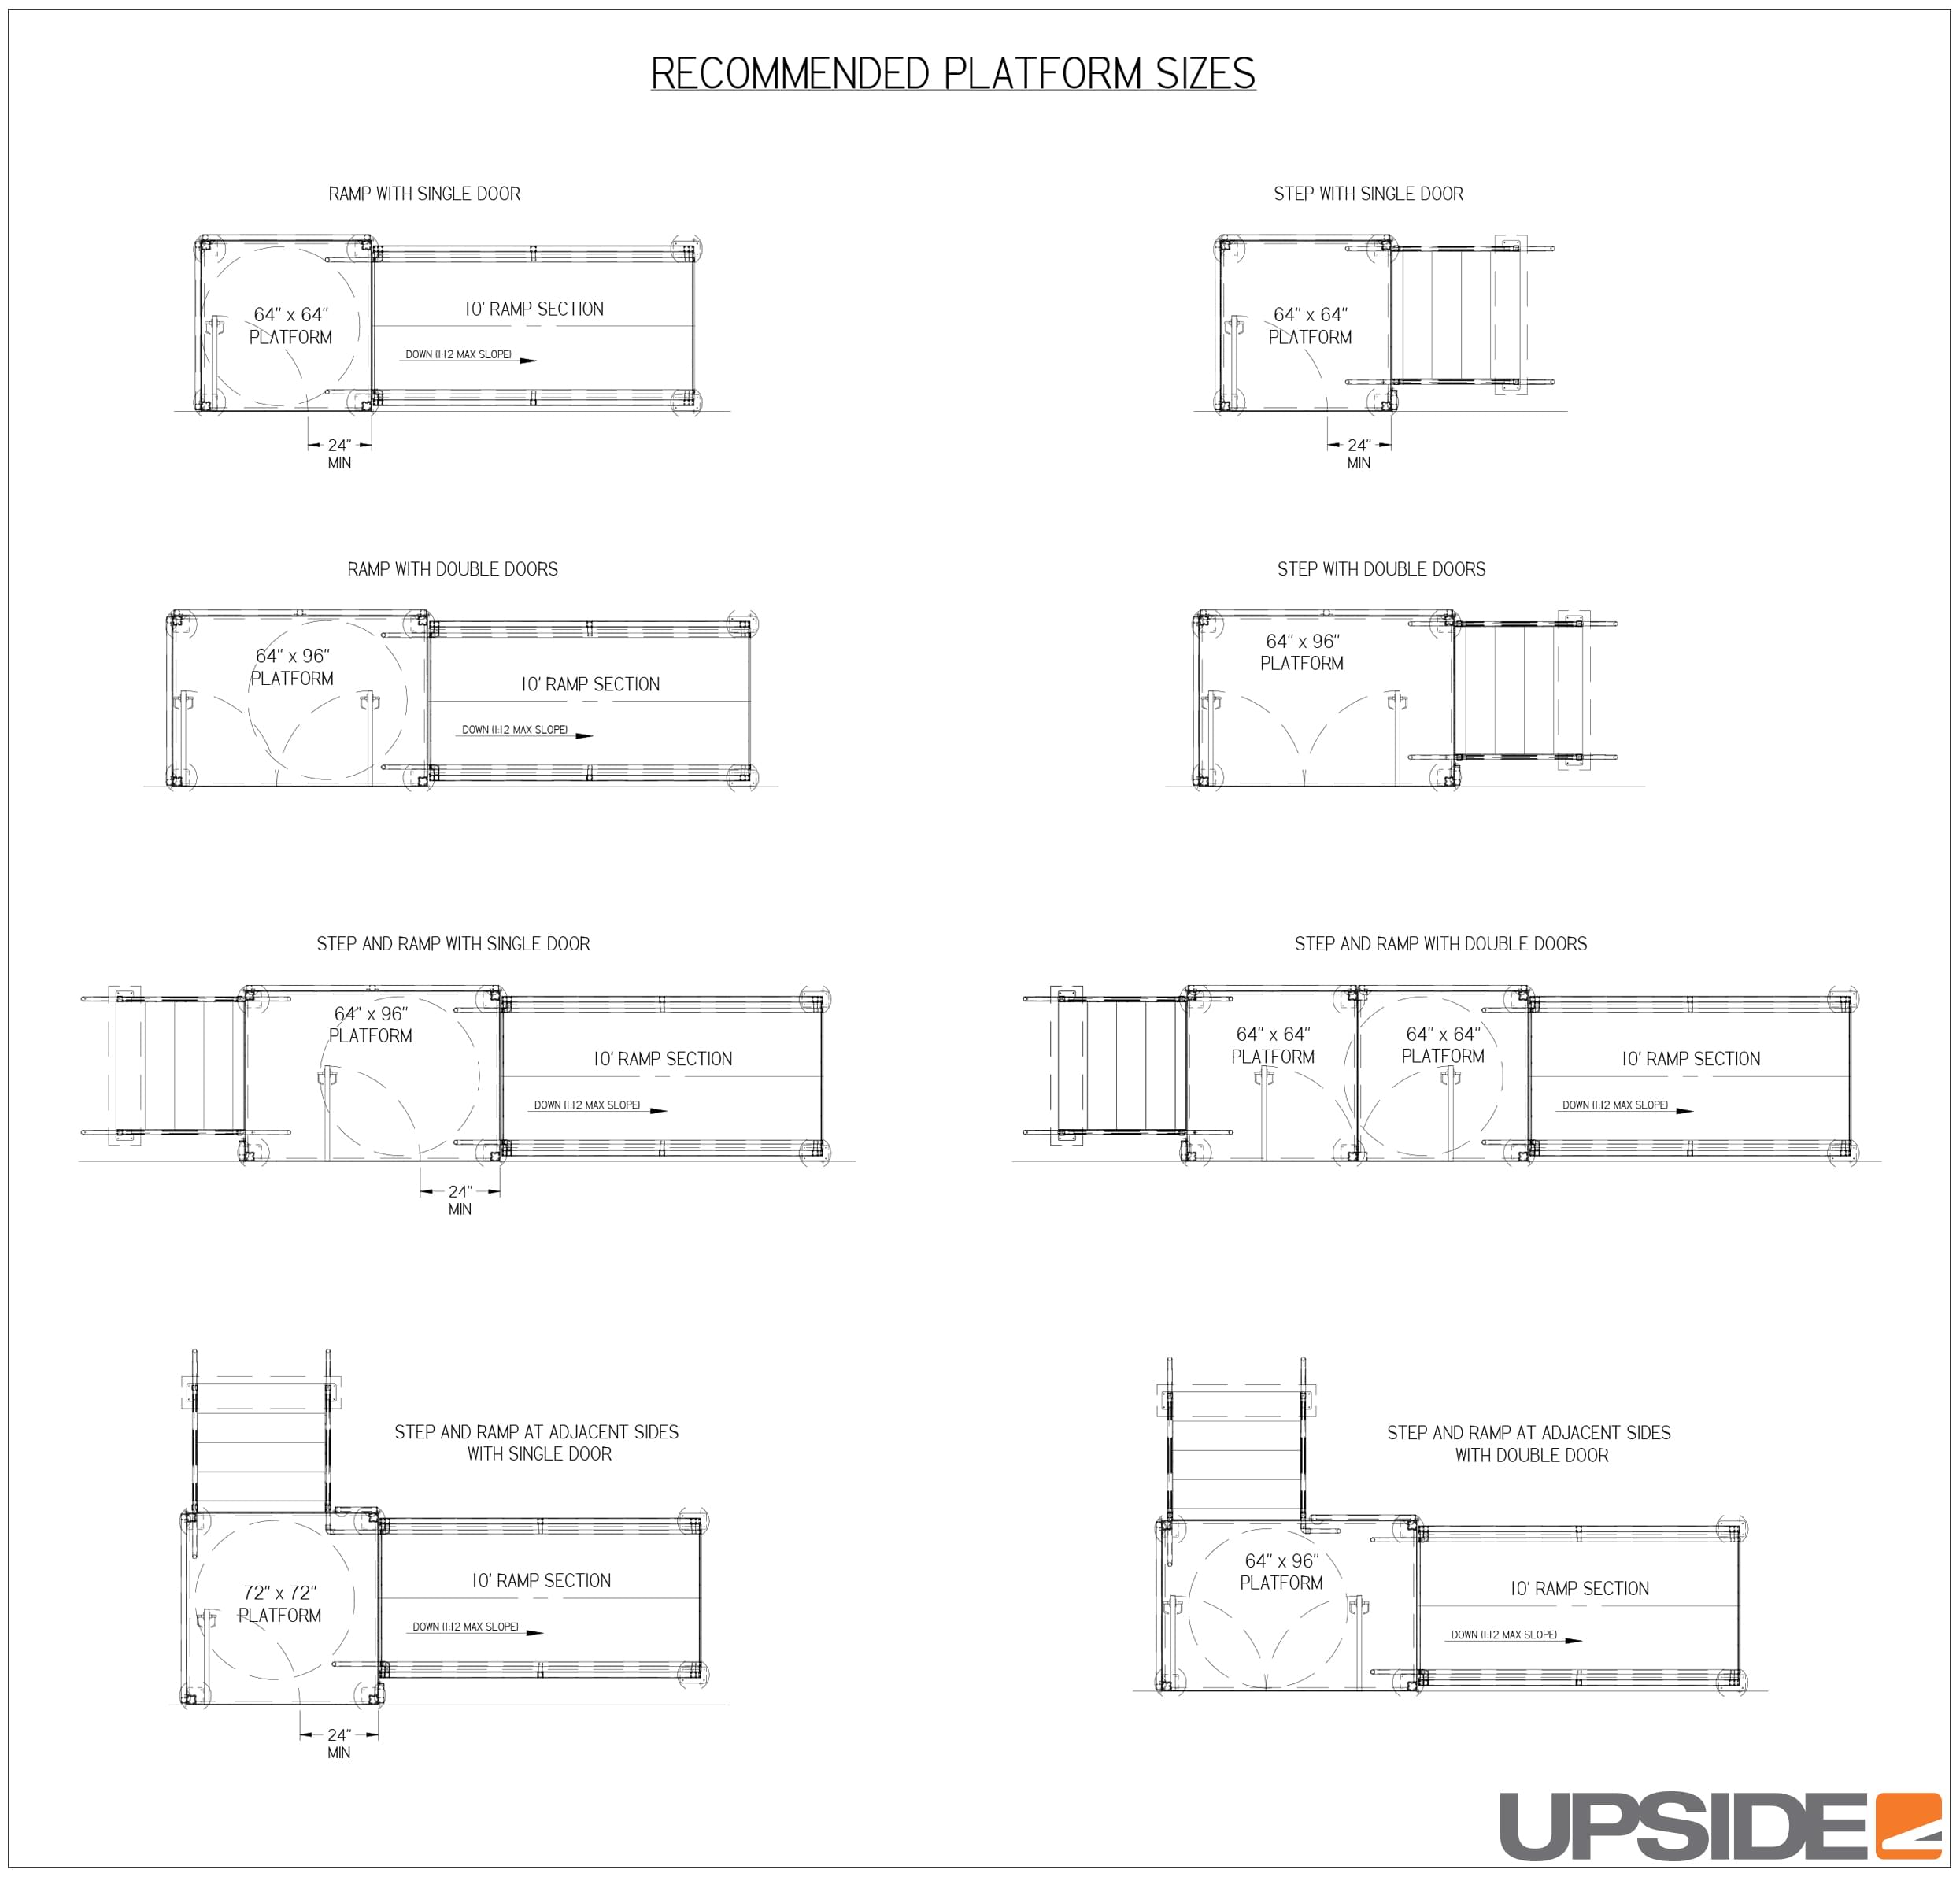
Landings aren’t just resting spots—they’re essential safety zones that prevent trips, allow door clearance, and enable smooth transitions.
Minimum Landing Dimensions
- Depth: At least 60 inches to stop safely or turn around.
- Width: Same as or wider than the ramp (minimum 36 inches).
- Levelness: Absolutely flat—no slope toward or away from the ramp.
Transition Safety Tips
- No gaps or lips: Use threshold ramps or metal plates to bridge uneven surfaces.
- Door swing clearance: Ensure doors open fully without hitting the ramp.
- Clear zone: Keep 5 feet clear beyond the landing for maneuvering.
Common Mistake: Placing a ramp flush against a door that swings outward—blocking escape in emergencies.
Ensure Adequate Ramp Width for Safe Navigation
Too narrow, and a ramp becomes stressful to navigate. Too wide, and it may be unnecessary—but wider is almost always safer.
Minimum and Ideal Widths
- 36 inches: Minimum for most wheelchairs and scooters.
- 48 inches: Recommended for better maneuverability, especially with caregivers.
- 60+ inches: Needed in public buildings for two-way traffic.
Measure your mobility device’s width plus 2–4 inches on each side for comfort.
Pro Tip: Test fit before installing. A scooter that’s 28 inches wide needs at least 36 inches of ramp to avoid scraping edges.
Verify Weight Capacity Before Use
Overloading a ramp risks collapse, bending, or sudden failure—especially with power chairs, oxygen tanks, or added cargo.
Calculate Total Load
Add together:
– User’s body weight
– Mobility device weight
– Accessories (bags, walkers, medical gear)
Most modular ramps support up to 1,000 lbs, but always check the manufacturer’s rating.
Structural Integrity Checks
- Inspect supports and joints monthly.
- Avoid placing ramps on soft ground—use concrete pads or pavers.
- Never modify or extend a ramp beyond its design limits.
Red Flag: Sagging in the middle or creaking under weight—replace immediately.
Conduct Monthly Maintenance Checks
A ramp that looks fine might hide serious risks. Proactive maintenance prevents accidents before they happen.
Quick Monthly Inspection Checklist
| Area | What to Look For |
|---|---|
| Surface | Cracks, warping, worn treads, rust |
| Debris | Leaves, ice, mud, snow |
| Handrails | Loose bolts, sharp edges, wobble |
| Fasteners | Missing screws, corroded connectors |
| Stability | Shifting, sinking, rocking |
| Landings | Unevenness, cracks, obstructions |
Time Estimate: Full inspection takes 5–10 minutes.
Cleaning Best Practices
- Use mild soap and water—avoid bleach or harsh chemicals.
- Scrub with a soft brush to preserve anti-slip texture.
- Rinse thoroughly and let dry if possible.
- After storms: Clear immediately to prevent mold, ice, or slip hazards.
Prepare for Seasonal Hazards Year-Round
Weather changes create new dangers. A safe ramp in summer can become treacherous in winter without adjustments.
Summer Safety Tips
Prevent Heat-Related Burns
- Aluminum ramps heat up in direct sun—can burn hands or damage tires.
- Solution: Add shade with awnings, trees, or canopies.
- Wear gloves when using manual chairs in hot weather.
Storm Readiness
- Rain reduces traction—clean off mud and leaves regularly.
- Trim nearby trees to prevent falling branches.
- Install gutters or downspout extensions to divert water from the ramp.
Winter Safety Strategies
Ice and Snow Prevention
- Shovel promptly using a plastic or rubber-edged shovel—metal can scratch surfaces.
- Use non-corrosive ice melt (e.g., calcium magnesium acetate)—avoid rock salt on metal.
- Consider heated ramps in icy climates—electric mats melt snow automatically.
Never pour hot water on a frozen ramp—it refreezes quickly and creates black ice.
Practice Safe User Techniques
Even the best ramp can’t compensate for unsafe usage. Knowing how to ascend and descend properly is essential.
Ascending Safely (Power Chair or Scooter)
- Remove rear-mounted items (e.g., backpacks) that raise the center of gravity.
- Fasten seat belt and confirm anti-tip wheels are engaged.
- Center on the ramp—don’t drift to one side.
- Proceed slowly with steady acceleration.
- Look forward, not down—maintaining balance.
Warning: Sudden throttle increases can cause tipping.
Descending Safely
Gravity works against you—control is key.
- Fasten seat belt and chest strap if available.
- Use motor braking—don’t rely solely on manual brakes.
- Go slow, especially on longer ramps.
- Ease off speed before reaching the bottom.
- Stop completely before transitioning to flat ground.
Pro Tip: Practice on gentle slopes first. Confidence builds with experience.
Hire Professionals for Permanent Ramps
While portable ramps can be DIY, permanent installations demand professional expertise.
Why Professional Installation Matters
- Ensures correct slope calculation and structural support.
- Guarantees ADA compliance for public or resale value.
- Integrates proper drainage, foundations, and handrails.
- Uses code-compliant materials and fasteners.
Red Flag: DIY ramps that rest on soil or mulch—they sink and shift over time.
For Portable Ramps: DIY with Caution
Even temporary setups require care:
– Secure placement: Use non-slip pads or anchors.
– Verify slope: Use a level app or inclinometer.
– Check stability: No wobbling or sliding when weight is applied.
Never use a portable ramp without confirming it meets 1:12 slope and weight limits.
Know Emergency Procedures
Accidents are rare—but being prepared saves lives.
Evacuation and Rescue Planning
- Identify alternate exits in case the ramp is blocked.
- Train caregivers in safe transfer techniques.
- Keep a phone or emergency alert device accessible.
Recognize Hidden Dangers
Some risks aren’t obvious:
– Micro-slip surfaces: Look dry but are slick when wet.
– Poor nighttime lighting: Increases fall risk.
– Loose handrails: May hold light pressure but fail during a fall.
– Inadequate drainage: Leads to puddles and ice.
Fix It Now: If you notice any of these, address them immediately.
Follow Key Safety Standards
Use this quick-reference table to ensure your ramp meets essential safety benchmarks.
| Safety Factor | Recommended Standard |
|---|---|
| Slope | 1:12 ratio (1″ rise per 12″ run) |
| Width | Minimum 36″, 48″+ preferred |
| Handrails | Required if >6 ft long; 34–38″ high |
| Landings | Level, 60″ deep, same width as ramp |
| Surface | Slip-resistant (textured metal, rubber, composite) |
| Weight Capacity | At least 600 lbs; 1,000 lbs ideal |
| Maintenance | Monthly inspections + after storms |
| Materials | Avoid untreated wood; prefer aluminum or composite |
Final Safety Recommendations
Safety isn’t one-time—it’s ongoing. Follow these final steps to keep your ramp reliable for years:
- Never sacrifice slope for space—use switchbacks or modular designs instead.
- Invest in professional installation for permanent solutions.
- Educate all users and caregivers on safe techniques and emergency plans.
- Schedule monthly inspections and keep a log.
- Empower users with knowledge—confidence comes from preparation.
- Promote awareness—remind others to keep ramps clear of obstacles.
A well-built, well-maintained ramp doesn’t just provide access—it provides dignity, independence, and peace of mind. By following these wheelchair ramp safety tips, you ensure every journey up or down is secure, smooth, and stress-free.