Creating a wheelchair ramp is one of the most impactful home modifications you can make. Whether for a loved one recovering from surgery, aging in place, or ensuring long-term accessibility, knowing how to make a ramp for a wheelchair that’s safe, stable, and compliant with accessibility standards can restore independence and confidence. A poorly built ramp isn’t just inconvenient—it can be dangerous. But with careful planning, the right materials, and adherence to safety codes, you can build a durable, smooth-access pathway that lasts for years.
This guide walks you through every critical step: measuring your rise and run, selecting the best material (wood, concrete, or metal), following ADA and IBC guidelines, avoiding common DIY pitfalls, and enhancing usability with smart safety features. Whether you’re installing a temporary aluminum ramp or constructing a permanent wooden or concrete structure, you’ll learn how to do it right—safely, legally, and affordably.
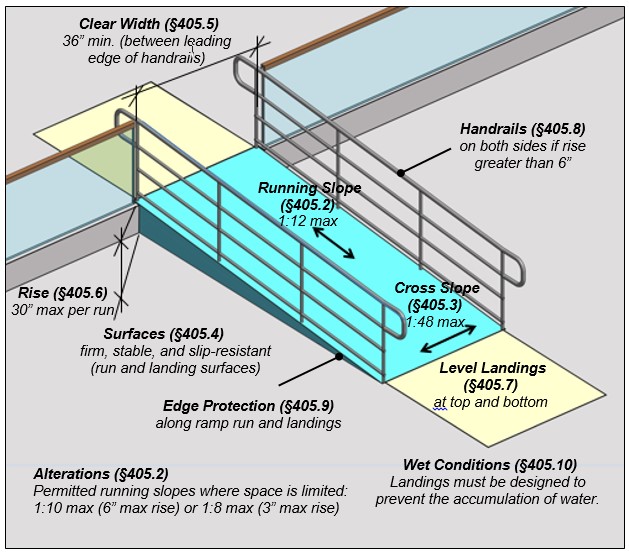
Measure the Rise and Run Correctly
Before buying materials or breaking ground, precise measurements are essential. A miscalculated slope can render your ramp unusable or even hazardous.
Calculate the 1:12 Slope Requirement
The universal standard for safe wheelchair access is a 1:12 slope ratio—for every inch of vertical rise, you need 12 inches (1 foot) of horizontal ramp. This gentle incline ensures manual and power wheelchair users can ascend and descend safely.
Example:
– A 24-inch rise (two steps at 12″ each) requires a 24-foot ramp.
– A 30-inch rise needs a full 30-foot run, plus landings.
To measure:
1. Use a tape measure to determine the vertical distance from the ground to the top landing (e.g., doorway threshold).
2. Include all elevation changes—steps, curbs, or raised foundations.
3. Double-check with a level to ensure accuracy.
Include Landings in Your Plan
Landings are not optional—they’re required by code and critical for safety.
- Top and bottom landings: Must be at least 60 inches long and as wide as the ramp (minimum 36 inches).
- Top landing must allow space for a wheelchair to open a door and turn safely—ideally 60″ x 60″ for a full turn.
- Intermediate landings are required every 30 inches of rise for multi-run ramps (e.g., switchbacks or L-shaped designs).
- Landings must be level, properly supported, and free of obstructions.
Choose the Right Ramp Material

Your choice of material affects cost, durability, safety, and maintenance. Each option suits different needs and budgets.
Wood Ramps: Affordable but High Maintenance
Wood is a popular DIY choice due to its low upfront cost and ease of customization.
Best for: Short-term needs, budget builds, or homes where aesthetics matter.
Key Tips:
– Use pressure-treated 2×6 lumber for decking and 2×8 or 2×10 stringers for framing.
– Space stringers 16 inches apart for stability.
– Anchor support posts in concrete footings below the frost line to prevent shifting.
– Use exterior-grade screws—nails can loosen over time.
– Keep gaps between boards under ½ inch to prevent wheel entrapment.
– Seal annually with water-resistant sealant to prevent rot and warping.
Avoid: Untreated wood, wide gaps, and surface-mounted handrails.
Concrete Ramps: Permanent and Durable
Concrete offers unmatched strength and longevity but requires more skill and investment.
Best for: Long-term, high-traffic, or commercial use.
Construction Steps:
1. Build a wood form to shape the ramp and landing.
2. Reinforce with rebar or wire mesh for structural integrity.
3. Pour 3,000–4,000 psi concrete with a slight drainage slope (1/8″ per foot).
4. Apply a broom finish or anti-slip additive for traction.
5. Cure for 7 full days before use.
Handrails: Must be anchored with epoxy-set bolts—never rely on surface mounting.
Metal Ramps: Modular and Low Maintenance
Aluminum and steel ramps are ideal for both temporary and permanent setups.
Best for: Over-stair installations, rental properties, or portable needs.
Advantages:
– Lightweight and corrosion-resistant (especially aluminum).
– Pre-engineered to meet ADA standards.
– Easy to assemble with bolt-together kits.
Installation Tips:
– Ensure the ground is level and stable.
– Use adjustable legs or concrete pads for support.
– Verify the anti-slip surface is intact and functional.
Follow ADA and IBC Safety Standards
Even residential ramps should meet or exceed accessibility codes for safety and future compliance.
Maintain Proper Slope and Rise Limits
- Maximum slope: 1:12 ratio—no steeper.
- Max rise per ramp run: 30 inches before a landing is required.
- Never exceed local code allowances, even for private homes.
Install Required Handrails
Handrails are mandatory if the rise is 6 inches or more:
– Height: 34–38 inches above the ramp surface.
– Continuity: Must run the full length on both sides.
– Grip: Round or easily graspable (1¼–1½” diameter), no sharp edges.
Pro Tip: Use Kee Klamp or similar metal rail systems—they’re smooth, durable, and code-compliant.
Add Edge Protection and Non-Slip Surfaces
- Edge guards: Install 2-inch curbs or barriers on open sides to prevent wheels from slipping off.
- Non-slip surface: Use textured paint, adhesive traction strips, or grooved decking.
- Avoid painted surfaces that wear down—opt for permanent solutions.
Build a Wooden Ramp: Step-by-Step Guide
This process applies to a permanent wooden ramp over stairs, one of the most common DIY scenarios.
Frame the Ramp Structure
- Attach a ledger board to the house using lag bolts and flashing to prevent water intrusion.
- Cut stringers from 2×8 or 2×10 pressure-treated lumber using the 1:12 slope.
- Install vertical support posts every 4–6 feet, set in concrete footings below frost line.
- Level and brace the frame securely.
Install Decking and Landings
- Lay 2×6 pressure-treated boards tightly together (≤1/2″ gap).
- Build top and bottom landings (60″ x 36″ minimum), ensuring they’re level and supported.
- Seal all wood with water-resistant sealant.
Add Handrails and Safety Features
- Mount metal handrails on both sides using code-compliant brackets.
- Install edge curbs or 2×4 kickboards along open sides.
- Apply non-slip tape or grit paint to high-traffic areas.
Design for Temporary Ramps
Even short-term ramps must be safe and stable—don’t compromise on basics.
Use Portable Aluminum Ramps
- Lightweight, foldable, and easy to store.
- Ideal for doorways, vehicles, or visiting family.
- Often come with carrying cases.
Secure the Ramp Properly
- Use non-slip rubber pads on contact points.
- Anchor with stakes or tie-downs if on soil or grass.
- Never place on icy or wet surfaces without traction aids.
Check for Level Ground
- Uneven terrain causes tipping and instability.
- Use adjustable legs or shims to level modular ramps.
Avoid Common DIY Mistakes
Even small errors can make a ramp dangerous or unusable.
❌ Too Steep a Slope
A ramp that’s even slightly steeper than 1:12 can be exhausting or impossible to climb in a manual wheelchair.
Fix: Recalculate the run and extend the ramp. Use a level or laser tool to verify slope.
❌ Gaps or Lips at Transitions
Any gap between the ramp and doorway, or between ramp sections, can stop a wheelchair.
Fix: Use beveled transition plates or threshold ramps to create a smooth path.
❌ Weak or Shifting Supports
Posts not set in concrete will shift over time, especially in freeze-thaw climates.
Fix: Always use concrete footings for permanent wood ramps.
❌ Poor Handrail Design
Wood handrails can splinter and lack proper grip.
Fix: Install metal handrails with rounded, smooth finishes.
Enhance Safety and Usability
Go beyond minimum standards to make the ramp user-friendly and safe in all conditions.
Add Nighttime Lighting
Install LED strip lights or motion-sensor path lights along the handrails or edges.
Improve Visibility
Use high-contrast paint or tape on edges and landings to help users see boundaries, especially in low light.
Install Weather Protection
For outdoor ramps:
– Add a canopy or awning to shield from rain and snow.
– Clear snow promptly using a plastic shovel to avoid surface damage.
Ensure Proper Drainage
- Slope the ramp slightly (1/8″ per foot) to shed water.
- Avoid pooling, which leads to ice in winter and slip hazards.
When to Hire a Professional
Some projects are too complex or risky for DIY.
Hire a Contractor If:
- The rise exceeds 30 inches and requires multi-run design.
- You’re pouring concrete or modifying structural elements.
- The ramp connects to a public or commercial space.
- Local codes require permits, engineered plans, or inspections.
Note: Professionals ensure ADA compliance and reduce liability risks.
Cost Comparison: Wood vs. Concrete vs. Metal

| Material | Cost per Foot | Labor Level | Maintenance |
|---|---|---|---|
| Wood (DIY) | $50–$100 | Moderate | High (annual sealing) |
| Concrete | $200–$300+ | High | Low |
| Modular Metal | $150–$250 | Low | Very Low |
| Prefab Aluminum Kit | $100–$200 | Low | Very Low |
Tip: While wood is cheaper upfront, metal or concrete often saves money over 5–10 years.
Test and Maintain the Ramp
A ramp is only as good as its performance in real use.
Test with a Wheelchair User
Have the intended user try the ramp:
– Can they ascend and descend easily?
– Is the surface too rough or slippery?
– Do handrails feel comfortable and secure?
Schedule Regular Inspections
Check monthly for:
– Loose screws or boards
– Rust on metal components
– Cracks in concrete
– Worn non-slip surfaces
Annual Tasks:
– Re-seal wood ramps.
– Tighten handrail bolts.
– Clean debris from drainage paths.
Final Checklist: How to Make a Ramp for a Wheelchair
✅ Measured vertical rise and calculated 1:12 run
✅ Included 60″ landings at top, bottom, and every 30″ of rise
✅ Chose material based on budget and permanence
✅ Built frame with pressure-treated lumber and concrete footings (if wood)
✅ Installed continuous handrails (34–38″ high) on both sides
✅ Added 2″ edge protection and non-slip surface
✅ Ensured smooth transitions with no gaps or lips
✅ Verified local code compliance and obtained permits
✅ Tested with actual user and made adjustments
✅ Scheduled ongoing maintenance checks
A well-built wheelchair ramp isn’t just a structure—it’s a gateway to independence. Whether you DIY a wooden ramp or install a modular aluminum system, following safety standards, using quality materials, and testing thoroughly ensures the ramp will serve its purpose for years. Prioritize function, safety, and comfort, and you’ll create an accessible entrance that truly supports mobility and dignity.