When a duck can no longer walk due to injury, neurological issues, or age-related conditions, it doesn’t mean the end of an active life. With a well-designed duck wheelchair, even birds with paralyzed legs or post-surgical limitations can regain independence, avoid pressure sores, and continue engaging with their flock and environment. Inspired by real builds from animal sanctuaries and dedicated caregivers, this guide walks you through how to make a duck wheelchair using affordable, easy-to-find materials. From PVC frames and custom harnesses to alternative systems like cable runners, you’ll learn everything needed to give a disabled duck a second chance at mobility.
Choose the Right Materials for Durability and Comfort
Use Lightweight, Durable Supplies
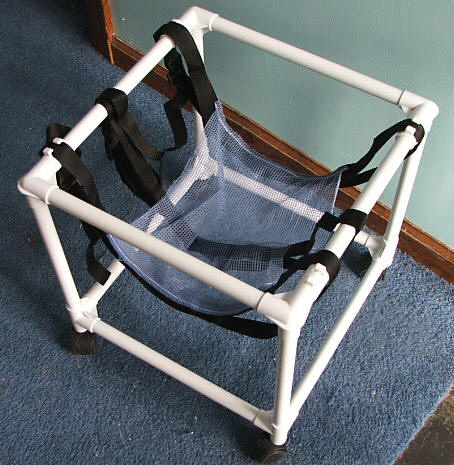
A duck typically weighs between 3 and 7 pounds, so the wheelchair must support movement without adding unnecessary strain. The most effective builds use PVC pipe (½” or ¾” diameter) for the frame—lightweight, rigid, and simple to assemble without tools.
- PVC Pipe and Fittings: Elbows, T-joints, and cross connectors allow you to build a stable, adjustable frame.
- Wheels (2–4 inches): Repurpose inline skate wheels, toy car axles, or small casters. Ensure they rotate smoothly and sit evenly.
- Axles: Use metal rods or thick wire threaded through drilled holes in vertical supports.
Pro Tip: Always sand cut PVC edges with fine-grit paper to prevent skin or feather abrasions.
Gather Harness Components
The harness lifts the duck comfortably while allowing natural posture and movement.
- Mesh Fabric or Laundry Sorter Mesh: Breathable, water-resistant, and strong—ideal for slings.
- Small Cat or Dog Collars: Serve as secure anchor points around the neck and pelvis.
- Elastic Straps or Pajama Waistbands: Provide flexible support under the belly and along the spine.
- Buckles and Adjustable Straps: Enable precise fitting and easy removal.
- Sewing Supplies: Reinforce stress points with double stitching for long-term durability.
Source Insight: Majestic Waterfowl Sanctuary successfully repurposed a mesh laundry sorter for both frame and sling, cutting build time and cost.
Build the Frame Step by Step

Measure and Cut PVC Pipes
Start by measuring your duck:
- Body Length: From chest to base of tail.
- Hip Height: From ground to top of hips when standing.
Using these, create a rectangular or trapezoidal base 1–2 inches wider than the duck’s body to allow clearance and stability.
- Cut two side rails (length = body + 2″).
- Cut front and back crossbars (width = hip span + 2–4″).
- Cut four vertical supports (6–8 inches tall) for corner legs.
Assemble with PVC elbows—test-fit first before gluing.
Design Hack: Insert accordion-style hose between frame sections if used outdoors. This allows flexibility on uneven terrain.
Attach the Wheels
Mount wheels to the bottom of each vertical support:
- Drill holes through the base of the pipes.
- Insert metal rods or thick wire as axles.
- Slide wheels on and secure with washers or zip ties.
Ensure all four wheels touch the ground evenly. Uneven contact causes tipping.
Visual Cue: Place the frame on flat ground. If one corner lifts, re-cut or adjust the supports.
Add Top Support Bar
Install a horizontal bar 4–6 inches above the duck’s back, connecting the two side rails near the center.
- Provides a stable attachment point for the harness.
- Prevents side-to-side tipping.
- Can be secured using T-joints or cross connectors.
This bar is critical for balance—especially when the duck moves or turns.
Design a Secure Harness
Option 1: Dual Collar + Elastic Sling (Featherfarmer Method)
A simple, proven design using repurposed materials:
- Neck Collar: Fit a small cat collar snugly (but not tight) around the neck.
- Pelvic Collar: Place a larger dog collar around the body just behind the legs.
- Back Strap: Cut an elastic strip from a pajama waistband. Sew one end to the neck collar, the other to the pelvic collar, running along the spine. Add a centered loop for leash or frame attachment.
- Belly Strap: Create a U-shaped strap that loops under the chest and between the legs, attaching to both collars.
- Leash Loops: Use two dog leashes—one on the back, one on the belly—to suspend the duck.
Warning: Avoid overly tight elastic. It can restrict breathing or blood flow.
Option 2: Mesh Body Harness (Sanctuary Style)
For better weight distribution:
- Cut a mesh rectangle large enough to wrap under the chest and abdomen.
- Cut leg openings near the front edge.
- Sew adjustable straps with buckles to shoulder and hip areas.
- Reinforce all seams and stress points.
Expert Note: Early designs allowed ducks to jump over the front—add a higher chest panel or cradle-style tummy support to prevent escape.
Attach Harness to Frame
Use Adjustable Suspension
The duck should be suspended so her feet lightly graze the ground—not drag, but able to touch for balance and muscle stimulation.
- Shoelaces or Paracord: Thread through harness loops and tie to side bars. Easy to adjust.
- Carabiners or Clips: Allow quick removal for cleaning or rest.
- Zip Ties: Temporary option—check regularly for wear.
Center the duck in the frame. Her spine should appear nearly level—no nose-down or rear-high tilt.
Test It: Let her try walking. If she struggles forward, raise the harness slightly. If she tips, widen the base or lower the center of gravity.
Try Alternative Mobility Systems
Install a Hanging Cable System
For ducks with no leg control, a pulley-based cable system offers freedom.
- Anchor Steel Cable: Run between two fence posts or indoor supports.
- Attach Pulley: Hang from cable to allow smooth sliding.
- Connect Harness: Link the duck’s back loop to the pulley with a short leash.
Success Story: Weebles, a Crested duck with neurological issues, runs the length of her yard daily using this system—swimming, foraging, and resting mid-cable with her companion Wobbleznot.
Benefit: Enables long-distance movement with minimal effort.
Maintenance Tip: Rotate grazing zones weekly to let grass regrow and prevent mud buildup.
Build a Ground-Based Cart
For ducks with no voluntary movement:
- Replace the sling with a padded cradle that supports the entire underside.
- Use larger wheels for lawn or dirt terrain.
- Keep the design low to the ground for stability.
Ideal for geriatric ducks or post-surgery recovery.
Test and Adjust for Comfort
Monitor Initial Use Closely
Ducks may resist at first. Supervise the first 5–10 minutes.
- Signs of Acceptance: Attempts to walk, explores, interacts.
- Signs of Stress: Panting, fluffing feathers, vocalizing, refusing to move.
Start with 5–10 minute sessions, increasing gradually.
Acclimation Tip: Place treats just ahead to encourage forward motion.
Prevent Tipping and Dragging
- Tipping Sideways? Widen the wheelbase or add outriggers.
- Tipping Forward? Shift harness attachment slightly backward.
- Legs Dragging? Raise the harness so feet lightly touch.
Visual Check: From the side, the duck’s spine should be nearly horizontal.
Maintain Health and Hygiene
Clean Harness Daily
Duck waste sticks and causes irritation.
- Rinse mesh or fabric after each use.
- Machine wash if possible, using mild detergent.
- Air dry completely.
Pro Tip: Add a detachable duck diaper for indoor use. Commercial waterproof harnesses are available online.
Inspect for Sores
Check daily for redness or swelling on:
- Chest (from sitting)
- Legs (from rubbing)
- Under straps
Action Step: If sores appear, remove the wheelchair and consult a vet.
Dry After Water Exposure
- Towel-dry after swimming.
- Disassemble PVC frame occasionally to drain moisture.
Winter Plan: Bring indoors during cold months. Use heated pads or deep bedding.
Learn from Real Duck Wheelchair Builds
Shelby: Recovered After Two-Day Build
A husband built a PVC wheelchair in two days. Shelby, a seven-year-old duck, adapted quickly—walking, foraging, and even attempting to run.
Key Insight: Gradual acclimation and positive reinforcement made all the difference.
Weebles: Thrives on Cable and Companion
Uses both a PVC walker indoors and a cable system outdoors. Bonded with Wobbleznot, she’s highly motivated to move.
Emotional Factor: Companionship boosts morale and encourages exercise.
Roberta: Post-Surgical Recovery Aid
Used a mesh laundry sorter, PVC, and buckles to create a lightweight frame for recovery.
Takeaway: Even short-term wheelchairs significantly improve healing.
Avoid Common Design Mistakes
- Duck Escapes Harness? Add a cradle-style belly support.
- Frame Tips Over? Widen base or add stabilizer bars.
- Legs Drag and Chafe? Adjust harness height.
- Material Degrades Quickly? Use waterproof mesh or replaceable liners.
Success Indicator: Duck walks willingly, spends less time lying down, and engages with flock.
Explore Commercial Options
While DIY is cost-effective, some prefer ready-made solutions:
- Custom Bird Wheelchairs (HandicappedPets.com)
- Adjustable Diaper Harnesses
- Chicken Carts (often duck-compatible)
Online Resources:
- HandicappedPets.com Forum
- Pinterest Boards: Search “duck wheelchair”
- Facebook Groups: Beth Rayfield-Stewart shares updates
- YouTube & TikTok: Search “duck on wheels” for real-time examples
Follow Best Practices for Long-Term Success
- Sand all edges.
- Avoid restrictive fits.
- Encourage natural behaviors—foraging, preening, socializing.
- Pair with a healthy companion—ducks with buddies are more active.
- Consult a vet—rule out treatable conditions and never use human painkillers.
Critical Warning: Tylenol, aspirin, and other human medications are toxic to birds.
Final Thoughts: Every Duck Deserves to Move
Building a duck wheelchair isn’t just about mechanics—it’s an act of compassion. With PVC, mesh, and a little ingenuity, you can restore mobility, dignity, and joy to a disabled duck. The stories of Shelby, Weebles, and Roberta prove that every bird, no matter their condition, can thrive with support. Start small, test often, adjust as needed—and watch your duck waddle freely once again.