If you’re looking for a reliable way to make a temporary wheelchair ramp, you’re taking an important step toward accessibility and independence. Whether it’s for post-surgery recovery, visiting family with mobility needs, or bridging access until a permanent solution is in place, a well-built temporary ramp can make all the difference. The good news is that with basic carpentry skills, the right materials, and adherence to safety standards, you can construct a sturdy, functional ramp in your own home—without hiring a contractor.
This guide walks you through how to make a temporary wheelchair ramp that’s safe, code-compliant, and durable enough for months—or even years—of use. From calculating the correct slope to installing handrails and non-slip surfaces, we’ll cover every critical step to ensure your ramp supports safe, confident access.
Measure the Rise and Calculate Ramp Length Using the 1:12 Slope Rule
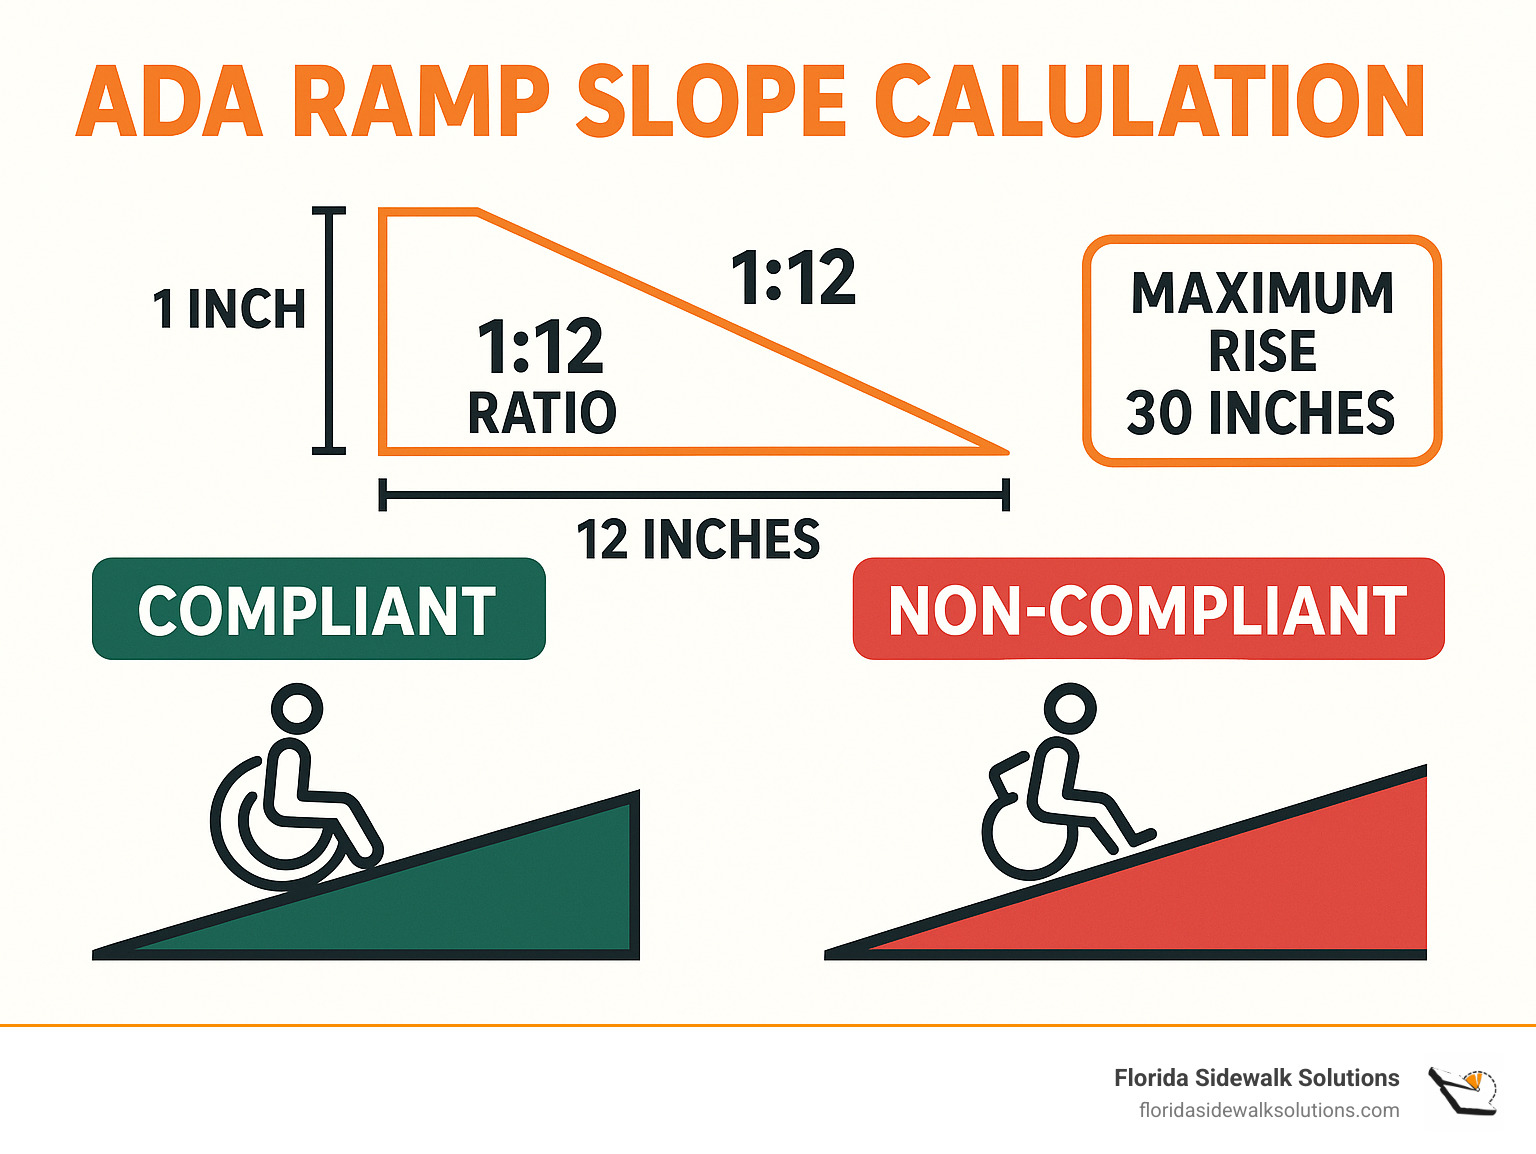
The foundation of any safe wheelchair ramp starts with accurate measurements. Begin by measuring the vertical rise—the distance from the ground to the bottom of your door threshold. This number determines your ramp’s minimum length based on the universally recommended 1:12 slope ratio: for every 1 inch of rise, you need 12 inches (1 foot) of ramp.
For example:
– A 6-inch step requires a 6-foot-long ramp
– A 24-inch porch demands a 24-foot ramp
While the ADA (Americans with Disabilities Act) does not legally enforce these standards for private residences, following the 1:12 rule ensures the incline is gentle enough for most users to navigate safely, even in manual wheelchairs.
Always measure at multiple points—doorways and ground levels are often uneven. Use a tape measure and a level to get precise readings. If your rise exceeds 30 inches, you’ll need to break the ramp into multiple sections with a level landing in between to prevent fatigue and improve safety.
Choose the Right Ramp Configuration Based on Space and Rise
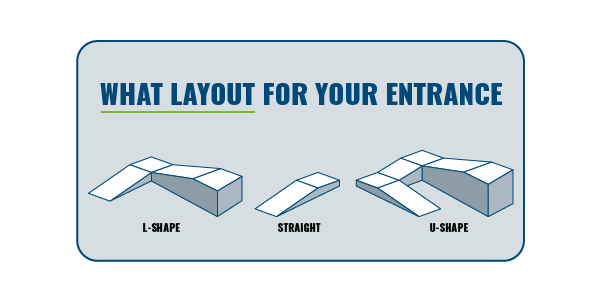
Your available space and total rise will determine which design works best.
Build a Straight Ramp for Low Rises and Open Areas
If you have a low rise (under 24 inches) and a clear, straight path, a straight ramp is the simplest and most cost-effective option. It requires minimal framing and is easier to assemble.
Use an L-Shaped Ramp for Corner Entries
When space is limited on one side, an L-shaped ramp with a single 90° turn and a 60×60-inch landing allows the ramp to wrap around a corner. This design improves accessibility without extending too far into the yard.
Opt for a U-Shaped or Switchback Ramp for High Rises
For porches over 24 inches high or tight entryways, a U-shaped or switchback ramp uses two turns and a central landing to fit a longer run into a compact footprint. Each turn must include a 60×60-inch level platform to allow full wheelchair rotation.
Mark your chosen layout with stakes and string to visualize clearance, door swing, and safe transitions before cutting any materials.
Select Weather-Resistant, Durable Materials for Long-Term Use
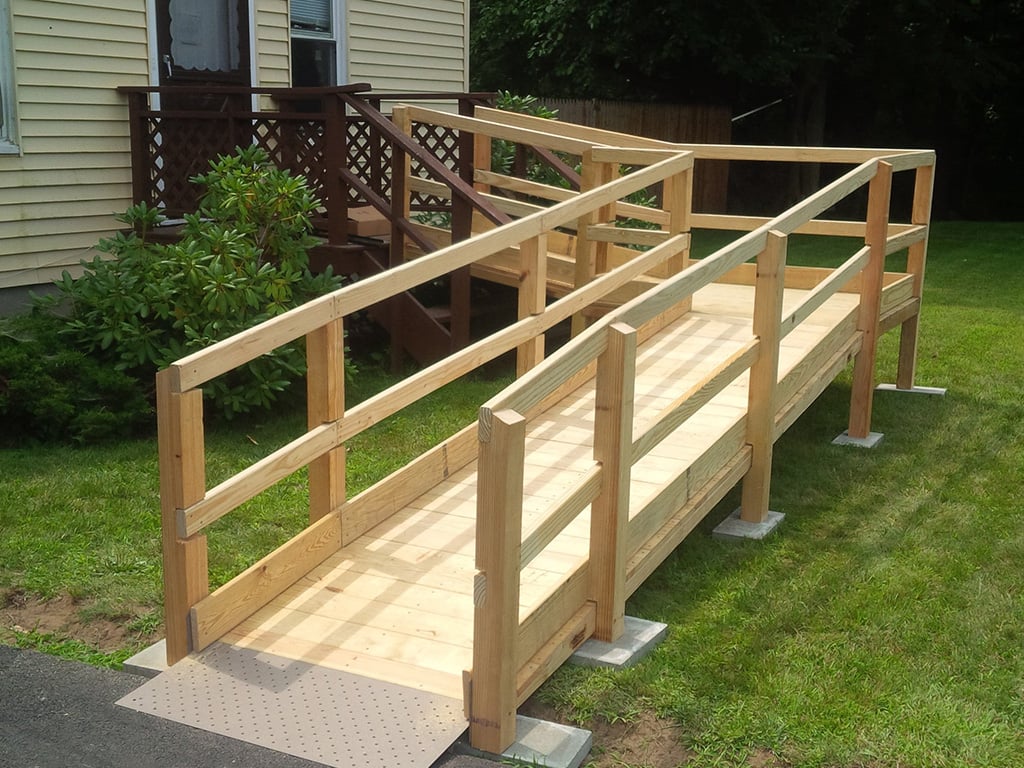
Even temporary ramps must withstand daily use and outdoor conditions. Use only pressure-treated lumber or naturally rot-resistant wood like cedar.
Build the Frame with 2×8 or 2×10 Stringers
Cut 2×8 or 2×10 pressure-treated boards into stringers—the diagonal support beams that carry the ramp’s weight. Space them 12 to 16 inches apart for maximum stability.
Use 2×6 Decking Boards with Minimal Gaps
Attach 2×6 pressure-treated lumber across the stringers to create the walking surface. Keep gaps between boards no wider than 1/8 inch to prevent wheels from catching. Secure with exterior-grade, corrosion-resistant screws—never nails, which loosen over time.
Add a Non-Slip Surface for All-Weather Safety
Even dry wood can be slippery. Cover the entire surface with:
– Non-slip rubber matting (glued with outdoor adhesive)
– Anti-slip tape in zigzag or parallel strips
– Textured epoxy paint for long-term durability
– Grit strips embedded into the wood
Ensure coverage extends edge-to-edge—no gaps or exposed wood.
Construct Modular Sections for Easy Assembly and Removal
Building your ramp in detachable sections makes it easier to install, disassemble, store, or reconfigure later.
Each modular unit should include:
– Pre-cut stringers
– Attached decking
– Integrated non-slip treatment
– Bolted or bracketed connection points
This approach is ideal for renters, seasonal use, or temporary medical needs. It also allows you to move the ramp to another door or home if needed.
Install Level Landings at Top, Bottom, and Every Turn
Landings are not optional—they’re essential for safety and compliance.
Build a 60×60-Inch Platform at Every Directional Change
Each turn requires a level, 60×60-inch landing to allow full wheelchair rotation. Construct it using the same materials as the ramp, supported by 4×4 posts and anchored securely.
Ensure Smooth Transitions with Beveled Edges or Threshold Plates
Eliminate tripping hazards by using beveled wood edges or metal transition plates where:
– Ground meets ramp
– Ramp connects to landing
– Landing leads to doorway
Keep gaps under 1/2 inch to prevent wheel binding.
Anchor the Ramp Securely Without Permanent Foundations
Even temporary ramps must stay stable under load.
Use Sandbags or Concrete Blocks for Short-Term Stability
For ramps used a few weeks or months, place sandbags or concrete blocks at the base and top. Add non-slip rug pads underneath on paved or indoor surfaces.
Consider Concrete Footings for Longer Use
If the ramp will stay for several months or years, pour concrete footings under support posts. Use adjustable post anchors to level the ramp on uneven ground.
At the top, anchor the landing to the house frame with lag bolts and metal brackets—never into siding, but into structural framing.
Install Handrails on Both Sides for Safety
Handrails are required when the rise exceeds 6 inches or the ramp is longer than 72 inches.
Mount Rails Between 34 and 38 Inches High
Install 2×2 or 2×3 pressure-treated wood, metal pipe, or composite rails 34 to 38 inches above the ramp surface. Leave 1.5 inches of clearance between the rail and wall or guard.
Extend Rails 12 Inches Beyond Ramp Ends
This provides support before stepping on and after exiting. On switchback ramps, keep handrails continuous through turns for uninterrupted grip.
Add Edge Protection and Guardrails for Elevated Ramps
If your ramp is over 30 inches above ground, install 2- to 4-inch curbs along both edges to prevent wheels from slipping off.
Use Spindles or Balusters Spaced No More Than 4 Inches Apart
Secure vertical balusters between the handrail and a bottom rail. This meets safety codes and prevents children from slipping through.
Build a Threshold Ramp for Small Steps (Under 4 Inches)
For indoor use or low thresholds, a simple threshold ramp suffices.
Construct with 2×6 or 2×8 Lumber
Cut to match doorway width (minimum 36 inches clear). Support with stringers every 12–16 inches. Sand edges smooth and apply non-slip tape or rubber matting.
Secure Without Damaging Floors
Use sandbags, double-sided tape, or screws with washers (patch holes later). Alternatively, use portable aluminum or rubber ramps—ideal for renters or frequent moves.
Test the Ramp Before Use and Inspect Regularly
Never assume your ramp is safe just because it’s built.
Conduct a Full Function Test
Have the actual user test it in their wheelchair. Check for:
– Wobbling or shifting
– Difficulty on transitions or turns
– Slipping on wet surfaces
– Handrail comfort and height
Adjust immediately—tighten screws, reposition anti-slip strips, or add edge guards.
Inspect Monthly for Wear and Tear
Look for:
– Loose fasteners
– Warped or rotting wood
– Peeling non-slip coatings
– Ice, snow, or debris
Reapply sealant annually to extend lifespan.
Compare DIY vs. Prefabricated Ramps

| Factor | DIY Wooden Ramp | Aluminum Portable Ramp |
|---|---|---|
| Cost (20 ft) | $300–$800 | $1,000–$2,500 |
| Installation Time | 1–2 weeks | Under 1 hour |
| Skill Level | Advanced DIY | No tools needed |
| Reusability | High (modular) | Very high |
| Weather Resistance | Good (with sealant) | Excellent |
Wood offers customization and lower cost; aluminum wins for portability and durability.
Maintain Your Temporary Ramp for Longevity
Even temporary structures need care.
Seal and Protect the Wood Annually
Apply water-repellent sealant, especially on cut ends. Ensure a slight 1:48 cross-slope for drainage.
Keep It Clean and Clear
Remove leaves, snow, and ice promptly. In cold climates, use heated mats or non-chloride ice melt to avoid wood damage.
Prioritize Safety, Independence, and Dignity
A temporary wheelchair ramp isn’t a shortcut—it’s a lifeline. When built correctly, it provides safe, dignified access for anyone with mobility challenges. By following the 1:12 slope, using durable materials, adding handrails and non-slip surfaces, and anchoring securely, your DIY ramp can perform as well as a professional installation.
Whether for six weeks or six months, focus on user independence, stability, and long-term usability. With this guide, you now have the knowledge to make a temporary wheelchair ramp that’s not just functional—but safe, reliable, and respectful of the person who depends on it.
Always check local codes and involve the end user in planning. When in doubt, consult a professional contractor experienced in accessible design.